Congratulations to vtecmec for winning May/June's Lude Of The Month, with his DIY Turbo BB1 build.

>>> Click Here For Profile <<<

Image

Never Ending Story... Prelude race car build.

Tell us all about your Lude, you know you want to ...
User avatar
Buzzonion Vtec
Posts: 214
Joined: Sat Jan 28, 2012 10:29 am
My Generation: 4G

Re: Thread Building - Please don't reply just yet ;-)

Post by Buzzonion Vtec » Sun Jan 29, 2012 6:24 pm

COMMENTS

uknowiama wrote:Top work as usual 8)

MaDMaXX wrote:Thanks for posting this and thanks for the pictures.

I find it fascinating to see the insides and actual guts of the body, especially as i know the car so well now days. I've been close to the areas you're covering but never knew just how things related inside and outside and with sections that are just never seen by anyone.

Looks like you've got some serious weight saving happening with excellent attention to detail and things most people would probably miss or notice and not bother with.

Looking forward to seeing how this goes, keep us updated :)

Crazy_C wrote:Wow, that is certainly coing along real nice there bro.

Would love to get to see it someday! Hopefully will get to :)

By the way, are you going to keep it street legal too so you can drive to n from the tracks??

MaDMaXX wrote:I think its already non street legal and most of the planned stuff isn't street legal either.

As far as i know, this is a full out and out race car, not a track car per sé.

paul bristol uk wrote:Great write up as before!

Brilliant! eagerly awaiting the next instalment,

Bri wrote:Seriously cool 8)

ludey wrote:hellfire this car is naked, wonder how much she weighs now,i would hate to have a smash in that lol.looking like a fun project

LudeConduct wrote:Just seen this....what a fantastic project...lovely colour, and awesome sounding plans 8)

I particularly admire your stubborness Yichy, in turning your lude into a race car instead of just going the easy way with a teg or something more 'conventional' :lol: 8) Can't wait to see it finished and kicking ass on the track 8) 8) 8)


.

User avatar
Buzzonion Vtec
Posts: 214
Joined: Sat Jan 28, 2012 10:29 am
My Generation: 4G

Re: Thread Building - Please don't reply just yet ;-)

Post by Buzzonion Vtec » Sun Jan 29, 2012 6:26 pm

REPLY


As always, thanks for your comments and enthusiasm guys... It'll all come in handy during the dark hours of the project where things don't go to plan or enthusiasm gets a little drained.

Maxx -
No problem at all posting the info up and the pics, glad that they are coming in useful for gaining an understanding into how the Lude is put together.....just be sure to tell me if I post too many :lol:

Weight is the enemy in pretty much all aspects of a race car so although being thorough with it means the project will be slow it is far easier to do it all now than to look at the finished build and say "wish I'd removed that". I'm sure with the best will in the world I will still find something like that when it's all done but the aim is to make it as light as it can be but safely.


Crazy -
Don't worry my man, you will get to see it all finished one day. When it is ready I hope to see some of you guys coming out to support me/it on race days :D

The car once finished WILL be 100%(ish :wink:) street legal as it was here just before the start of the project.

Image


It was fully road legal with MOT and TAX then...and it will be when it's finished. As a road going car it will obviously be a total pain in the arse nightmare thing but it won't be driven regularly. The main reason for building race cars that can still be road legal is for testing purposes. This allows you to make repairs and test, mods and test or even run in and map engine work without the need to book into expensive trackdays or test days. Obviously for proper set-up and race testing it'll need to go to the circuit but for anything else the road is just fine. It just makes sense really and this is the approach we take as often as we can.


ludey -
I'll come back to you with the weight of it as it stands now.
As it's off to have the cage work started at the end of the week I need to crack on and get rid of a few more bits before corner weighting it.
I just want a record of weight and how much the cage will add (we have a rough idea). This will all come in useful during the build as I will be working towards as close to a 50/50 weight distribution as I can.
I have lots of plans for the suspension which I won't go into yet but lets just say....those cast suspension arms and subframes are damn heavy :wink:

Obviously as it stands right now if you bolted some seats in it and went out for a drive you would be in real trouble should the worst happen but the new cage will basically cover all of that...and much much more.....which you will see when it's all in there. :D


BenDAve -
Stubborn is my middle name....just ask my missus :lol:
As well you know with just a small amount of modification the Lude has always been more than a match for a similarly modified special R badged Honda so why would I want to go down that route LOL
Seriously, if I wanted an easy life it would have been much much simpler just to junk the Lude and buy a cheap JDM Teg, spend a few quid on it and go racing. Unfortunately for me.... I have this inbuilt need for a challenge all the time and as I'd already started with the Lude....well you can see where that has got me so far.

In all honesty it wasn't meant to go this far. The intention was for it to be out racing this year with the H25, a few new parts to the cage, some weight loss and a few other bits and pieces. The H25 engine was super strong and torque was superb but I've had a few niggles along the way..(one of them being a failed piston :roll:) .. with those problems putting things behind and the offer of a re-spray to good to miss, I decided if it was going to be done at all it was going to be done from scratch.
No doubt I'll live to regret that but if it takes another year to complete then so be it. I want it right 8)


Thanks
Rich

User avatar
Buzzonion Vtec
Posts: 214
Joined: Sat Jan 28, 2012 10:29 am
My Generation: 4G

Re: Thread Building - Please don't reply just yet ;-)

Post by Buzzonion Vtec » Sun Jan 29, 2012 6:27 pm

COMMENTS

MaDMaXX wrote:Heh, all things like this start out as a few improvements and a clean up, as did my project thread which has now been off the road for the last 18 months :roll:

But as you said, if you're going to do it right, then take the time over it, again, about 95% of my project has gone this way.


Buzzonion Vtec wrote:LOL it all started when I bought the car in Sept 2000 and said to myself all I want to do to this is fit an exhaust and an air filter...... been a never ending quest to get it finished since that day really :lol:

kawa wrote:First time I've seen this thead, WOW!! 8)

Makes most of us look like were just skimming across the surface :lol: looking forward to the finished article!! 8)

Frank wrote:well if you had just fitted an exhaust and filter i wouldnt be sitting here thinking no matter how mcuh a spend its never gonna be as good as yours so whats the point lol. someone create a project thread with just an air filter so i can say ive more mods than someone

cant wait to see this man its awesome

MaDMaXX wrote:
Buzzonion Vtec wrote:LOL it all started when I bought the car in Sept 2000 and said to myself all I want to do to this is fit an exhaust and an air filter...... been a never ending quest to get it finished since that day really :lol:

Gah :( yes, isn't it :(

Nucleustylz lude wrote:Wow, still more metal coming out! :shock:

Loving this build. Gonna be interesting come weigh-in time. :wink:

So true with a true project, it never ends. I can't see myself ever selling my lude now and still have a mass of plans for it.

Of course no comparison to your plans it will be a beast when it's done.

I for one would be glad to come along and support ya at a race or two. Support for the ludes!

So will it be in the same class as Kris' Civic then? And running the same races?

saks bb4 wrote:This is gonna turn out amazing......... 8)

tonydpp wrote:ok i have to confess now,i've stoped watching porn and started reading this.
as a petrolhead an mechanic that i am,if i was living near to your garage i would come to help just for the pleasure of it to see this lude in its full glory.mate keep those updates coming and if you have the pations to write the full details,please do because i for one,will be following this thread closely.

keithb wrote:'love it'

Hey Buzz are the Vitaloni wing mirrors going back on? I remember seeing them fitted many years ago at a Honda Revs meet, and have loved them ever since (still on the look out for some donor mirror plinths to fit a set to my 5th!) :D

azzshyguy wrote:I think that is the first time ive liked the eurofront lip on a lude,,,it beautiful....very much enjoyed the thread. [smilie=hate-ok.gif]

BenA wrote:Perhaps this thread makes it clear why I get up at 5am and drive my car 90 miles to let this chap work on it, rather than take it to someone local :D

Top work as ever Mr V, the benchmark as always 8)

dlongmu wrote:OK, I need to ask, if going from fully laden BB4 without cruise control, but with sunroof - to a prelude with the interior stripped out, one bucket seat and thats about yer lot, and a few bits of needless metal pulled along with AC etc. ... would I acctually notice a difference?! :? Thing is at the moment, my buddy in his R34 GT-T (tested 300bhp, filter exhaust) is only a shade faster from 3rd gear on, he barely gets past. But in 1st/2nd the grunt that is the rb25 pulls away clean. I want to know if I should stick with NA, strip it out to buggery and add a set of big cams, or should I just keep it laden and use a smallish turbo setup?

Performance Autoworks wrote:In a word YES.

Weight is the enemy full stop.
If you want to spend 3k+ on a turbo setup (done properly) you can of course keep all your comforts.
However...weight reduction for the most part can be done for free. Obviously the more weight you lose the faster your car will accelerate..the more you remove the more you will notice the difference :D

dlongmu wrote:Frankly I'd quite like to go as far as you have, becuase ive removed parts of the interior on cars before and low and behold, no difference except it looks uglier :lol: But where do you hide all the wires from the front?! And also, where could I get a suitable lightweight rollcage to make it safe again?


Also you have a tuned H22 right? Would a pair of cams and an ecu tune up really give me much of an edge? The price for a real n/a tune, high compression pistons, balancing, valves, cams, port'n'polish, ecu tune up will surely be breaching on that of boosting? and potentially be even less reliable no?

Thanks for advice!

stoocake wrote:With weight saving, you need to go big before you'll notice a difference really. However, it is free (or can even net you money if you sell the parts off).

I fully support the 'add lightness' attitude...my personal approach would always be get the car as light as possible before spending money modifying the engine or anything. Get it light, work on the suspension and brakes, and then start looking at increasing power.

Richy, awesome project this - car looks ace and your workmanship even better.

Looking forward to the updates. Any word on when the cage will be done?

Kris! wrote:
stoocake wrote: Any word on when the cage will be done?
I'm sure I can hear the sound of distant Tig welding as we speak Stoo :lol:

.

User avatar
Buzzonion Vtec
Posts: 214
Joined: Sat Jan 28, 2012 10:29 am
My Generation: 4G

Re: Thread Building - Please don't reply just yet ;-)

Post by Buzzonion Vtec » Sun Jan 29, 2012 6:32 pm

REPLY


Sorry for slow replies and updates guys :oops:
Unfortunately the car is at the go slow stage with lots of minor / time consuming / uninteresting work going on to get the shell fully ready for the cage work.

Have been in further discussions with my very special cage builders and we have now fully nailed down the cage design with the help of some stress evaluation. We've also discussed further weight reductions to the basic shell as the cage is going in - much of which can't be done until some of the cagework is in to keep the structure solid and square - think along the lines of centre tunnel, a-pillars, front firewall, boot floor and rear inner arches and you'll get the picture :wink:

Answers to a few questions / points.

Keithb
Afraid to say that yep the mirrors are going back on, yet to find anything that looks as nice, weigh as little and give as good rearward visibility as these.
Only real way to do it would be to make some custom base plates. Mine aren't exactly pretty up close but they fill the big hole left by the OE ones and are light :lol:

BenA
Cheers mate, to be fair though are you sure it's not because no-one else will talk Mustangs with you :wink:

dlongmu
As Stoo said really, you can remove bits and pieces which will make a small difference but to really get some proper very noticable improvements you have to be pretty full on and brutal. The more weight you remove the easier it is for the engine's power to move the car. It's really that simple...... well it is until you then want to even out the weight distribution to optimise chassis balance for improved cornering ability.
Lightweight rollcages are the holy grail. Weight is the enemy but strength, rigidity and protection are your bestest friend. Unfortunately these two don't get on with each other too well unless you are very very well off :lol: The lightest rollcages are cromoly but this is very very high end stuff which needs to be fully certificated for acceptance (mainly to prove materials used and correct installation methods). These still total a fair amount of weight but a full FIA international spec cage of this material would typically be 20% lighter than the CDS (cold drawn steel) which mine is being made in.
A basic bolt in cusco type cage is much lighter but I wouldn't want to be involved in a decent sized accident with one fitted to a much lightened shell.

N/A tuning is expensive but so is turbo tuning when it's done right. Say for an initial outlay of 3-4k then yes the turbo car will give more power than 3-4ks worth of NA tuning. But as I've always said, power figures aren't everything.
Give me 2 identical Ludes both with 250bhp, one with a turbo and one NA - I know which will be quicker around 90% of circuits in the UK and it won't be the one with a hairdryer bolted to it. Reliability of both types of build would be on a par with each other tbh. Obviously if you go to the extremes of either type then reliability will suffer.
It's all down to personal taste, use the car will be put to and budget.

A pair of cams (combined with I,H,E) and an ECU should see a nett gain of 20-30 bhp over standard. Even a reasonably light (but not mega light) 230bhp well driven Lude will have the edge on more cars than you might think.


Stoo
Bang on the money.
As you say, quite often you can earn from "adding lightness" by simply selling on the stuff you have no use for anymore. Having said that, I couldn't be bothered with much of it so it went in the skip :lol:
Cheers for your comments mate, TBH I'm looking forward to the updates too 8)
Work is underway on the cage...car was delivered to them last Saturday, it will take as long as it takes...I'm in no mad rush for it and there is ALOT of work to be done.
Seam welding the shell, roll cage build, further shell work, interior and engine bay paintwork etc.

Got a few pics of the last things I did and the car loaded up ready to go. i'll get those up soon


Kris
Knowing the guys that are doing it... I wouldn't be surprised if they are still at it at this time of night.


I'm quite excited don't you know :lol:


Rich

User avatar
Buzzonion Vtec
Posts: 214
Joined: Sat Jan 28, 2012 10:29 am
My Generation: 4G

More weight loss - plan of attack

Post by Buzzonion Vtec » Sun Jan 29, 2012 6:33 pm

Update 3 – Originally Posted - Sun Jun 07, 2009 10:45 am

http://preludeuk.forumup.com/viewtopic. ... =preludeuk


Apologies for my tardiness in keeping you all informed of the ongoing build :oops:

Time for a little update I reckon :D 8)

Some of this is a little delayed in being posted up as there always seems to be something else taking up my time.. trouble is the longer you leave it then the more there is to post to get up to date...viscous circle :lol:


So here we go then....progress so far starting with a few shots of things that are about to change and things that I needed to get done before a Terry kindly delivered the car to the guys at Custom Fabrications for the cage and shell prep.

As always this is just a selection of some of the key photographs of the work in progress - the rest can be found in my galleries documenting the build here -
01 - Initial Strip Down
02 - Body Prep & Paint
03 - Stage2 Weight Loss & Cage Prep


Multi-skinned rear panel to get the weight saving treatment

Image


Lower B-Pillar will be removed once cage structure is in place

Image


Multi skinned central tunnel will be reduced to single skin

Image


Multi skins on bulkhead to be removed as it no longer needs to take the weight of heavy heater boxes

Image


Steering column support and column will be receiving attention to reduce weight

Image


Front and rear cross members will all be receiving the weight reduction and stiffening process but for now here's a couple of "before" shots

Image
Image


Fuel tank removed for access to rear chassis legs and crossmembers ready for seam welding.
Note: Already started to burn off the underseal in some places.

Image


Full underside view with tank, fuel lines and brake lines removed, handbrake cables yet to be removed.

Image


Rear panel and boot floor - It won't look like this for much longer. Note the awkward shape the rear ARB has to follow to clear the spare wheel well.

Image

Image


A shot of the rear chassis cross member and in the background the chassis leg - all this to be seam welded....amongst other things :wink:

Image


Car is now just a basic rolling shell, it was left this way simply for ease of transport, all suspension will be removed at the first opportunity.

Image


The day Project SCRAP went out of my immediate control.
All loaded up and on it's way to Custom Fabrications for the cage build and further special weight saving procedures to the shell.

Image


Next post I'll work on bringing you all bang up to date with the progress.


Cheers
Rich
Last edited by Buzzonion Vtec on Sun Jan 29, 2012 10:17 pm, edited 1 time in total.

User avatar
Buzzonion Vtec
Posts: 214
Joined: Sat Jan 28, 2012 10:29 am
My Generation: 4G

Custom Fabrication roll cage and body prep 1

Post by Buzzonion Vtec » Sun Jan 29, 2012 6:34 pm

Update 4 – Originally Posted - Sun Jun 07, 2009 10:48 am

http://preludeuk.forumup.com/viewtopic. ... =preludeuk


Custom Fabrications work on Project SCRAP

Image


As much as I'd love to be able sit back at the end of this project and have all of the satisfaction of knowing that I did everything on the car myself there comes a point where it's far better to hand it over to someone that specializes in a specific field of expertise. The area in question is motorsport bodyshell preparation and fabrication work.

Let the one off custom cage and bodyshell prep commence.


Well after one of two delays in getting the car up to the guys at Custom Fabrications and after having another discussion or two about the cage design, further weight saving and seat mounts etc, Project SCRAP was left in their very very capable hands.
I really cannot express how involved Custom Fabrications wanted me to be with all aspects of the design and functionality of not only the cage but the whole car structure, seat mounts and further weight reduction ideas.
Some might think that the roll cage and level of shell prep is "over the top" for what is essentially a clubmans motorsport car and maybe they have a point. There are lots of cars out there racing and performing extremely well with what you would call basic cages (bolt in or weld in) and believe me I have no problem with that whatsoever. What I want however, is for the car to be as light and as structurally stiff as possible and also to offer me the upmost in protection should the worst happen, as far as I'm concerned bolt in cages can only offer so much before they are compromised and in terms of shell rigidity you cannot beat triangulation and multiple pickup points...I don't like compromise :twisted:

Custom Fabrications is a new company in it's own right started by Simon and Andy who are two of the highest grade Prodrive fabricators. I know all too well what these guys are capable of producing, what with their involvement in motorsport at the highest level most notably WRC, Touring Cars (right from the supertouring era) all the way through to Le Mans GT cars, there really isn't much that they haven't done.

What struck me most about meeting them for the first time was their down to earth no bullshit outlook (much like my own) and more to the point they actively sought my input so that they could be sure I would be happy with their work. In my experience this really doesn't happen too often these days, most companies you deal with will TELL you want they think you should have rather than take the time to discuss your options. With all of that said, the basic outline of what I wanted to achieve discussed, the budget discussed and the car delivered to their workshop I then very much instructed them to "go for it and do whatever they think would benefit the car (within reason)" - I had/have total faith in them.

Again here's a selection of pictures to bring you up to date on progress - the rest are on my build gallery
04 - Custom Fabrication 01


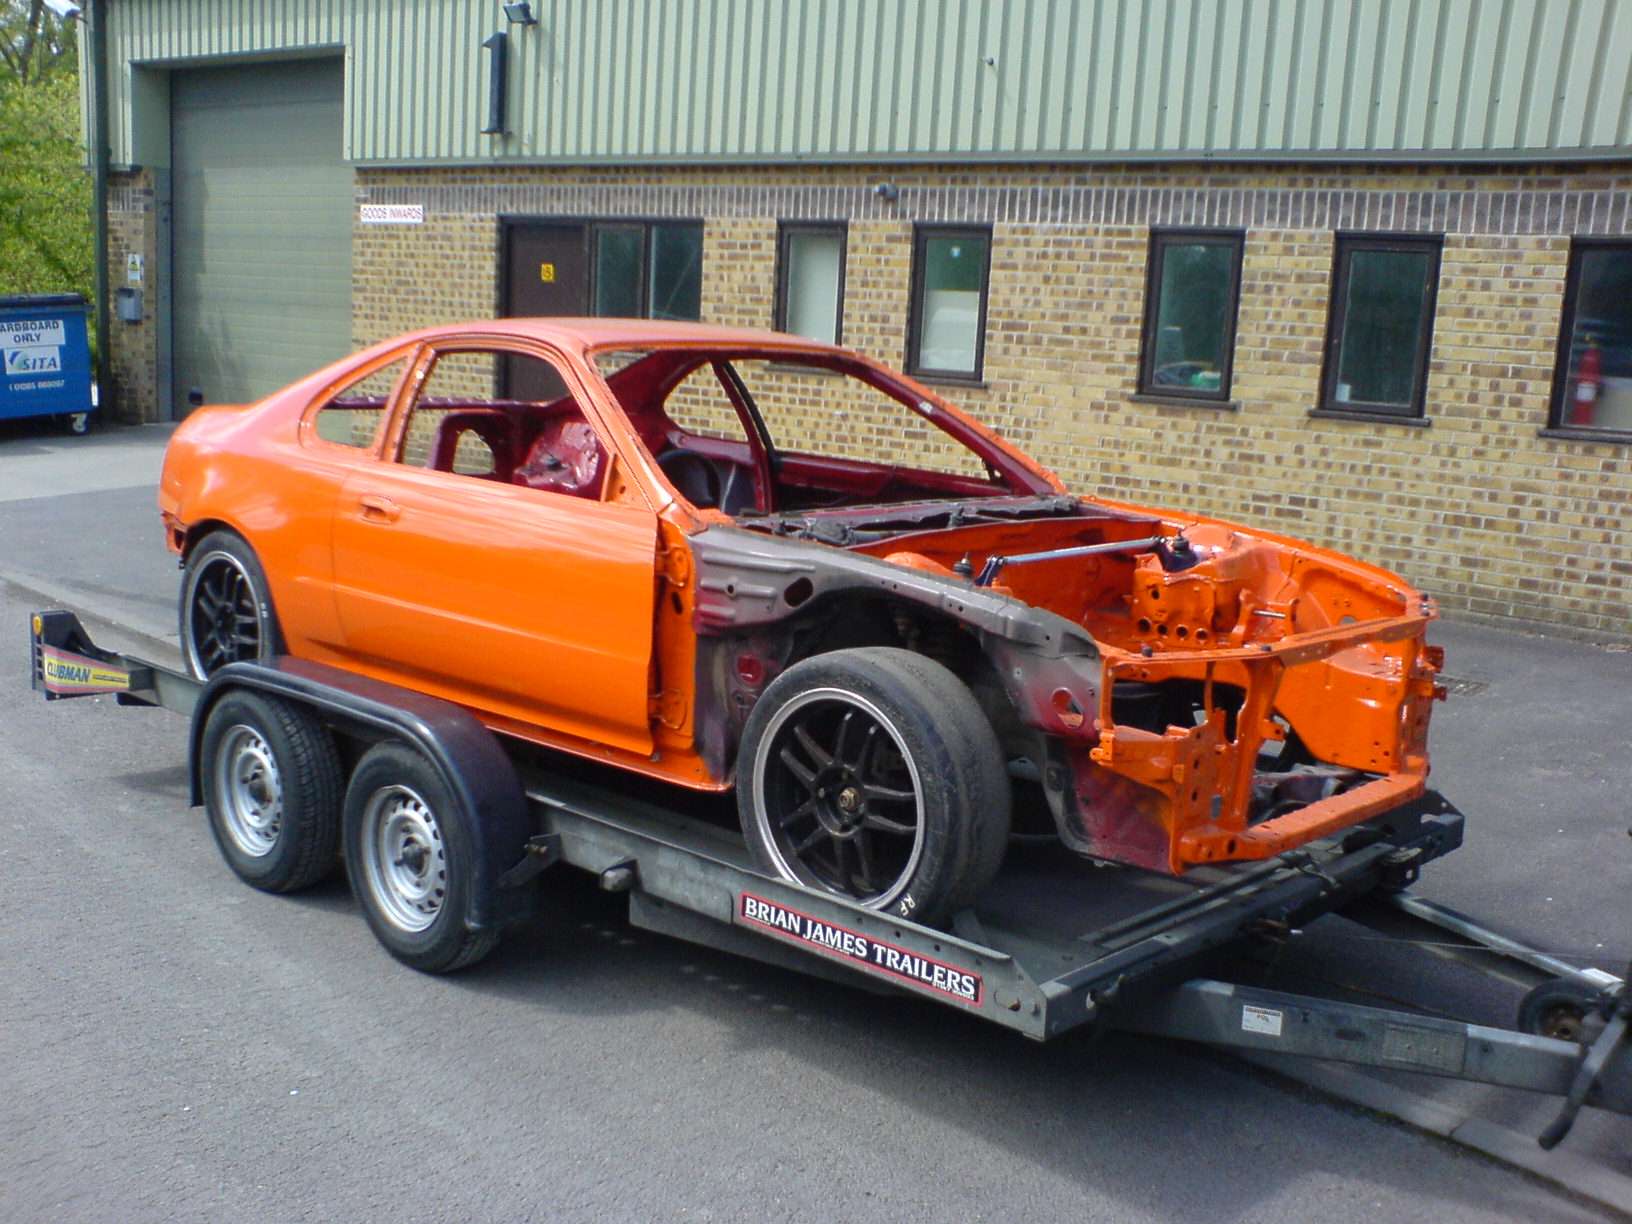
SCRAP parked up in the "build area" at Custom Fabrications workshop shortly after they took delivery.
Note: The front strut brace is purely there as a clearance reference point at this stage.

Image

Image


Doors off and front suspension all removed ready for the work to start. Rear suspension removed shortly after and car sat on stands all round.

Image


All seam sealer needs to be burnt away to ensure no contamination during TiG welding of the panel seams. Nasty process but needs to be done this way as scraping and wire brushing the sealant off doesn't get right into the panel joint. Can get away with this to a certain extent with MiG but TiG needs cleanliness

Image
Image


New lightweight fabricated seat mounts custom made and tacked in place. Original plan was to use CDS tubing but the guys thought this was a much better and lighter option. Looks bloody cool as hell too 8)
Note also that seam sealer has been removed inside ready for welding.

Image

Image


The cage build begins with main hoop, front legs, harness bar, door bars and the first of many diagonals and triangulation braces. At this stage everything is just being tacked into position to evaluate the fitment and allow for adjustments as required.

Image

Image

Image


Note the accuracy of the notching work to get such a tight fitment of tube to tube - no need for heavy gap filling MiG welding here

Image


Test installation of driver's seat. I was requested to go for a test fitting to ensure seat position was right for me and that clearance was good around my body. With a small adjustment of the seat height and distance rearward a few minor alterations will be required to the cage tubing. Most cage builders don't go to this level of ensuring the end build is right for the driver.

Image


Considerably more tubes now 8). Upper and lower rear diagonals through to rear strut towers, plus "pit prop" tube at the front of the forward leg down past door bars. These will be "wrapped" to adjoin onto the door bars.
You may be wondering why I've opted for a passenger seat mount? Having the facility to carry a passenger keeps options open for road mapping and fine tuning and also for driver instruction or "demo laps" if required. The pros far outweigh the cons of carrying the small extra weight of the mounts.

Image


Another couple of views of the "Pit props" and door bars plus the dash bar can be seen in place.
Note also how the front legs don't just run down to the floor, they are actually cut into the inner sill structure which will of course be fully reinforced during the final build up and weld in of the cage.

Image

Image


Main hoop lower cluster (N/S)

Image


Views of the O/S central "cluster". Maximum head protection and a very high quality finish at the tube joins. This is all just "tacked" into position at this stage

Image

Image


Boot floor completely removed along with rear panel additional skins.
With this removed (neatly I might add), it exposes the rear chassis cross member which will be receiving some additional reinforcing and bracing to the cage/rear strut brace.

Image

Image

Image


Chassis crossmember - The beginings of linking the chassis to the cage structure. Note this area and the hole below it will have tubes running through and welded to the car structure.

Image


Rear "diagonals" loading will be spread around the strut towers aiming at a central focal point rather than the traditional single pickup point. Of course the whole area will be reinforced at final fit up time. This is how the true professionals do it.

Image


Majority of cage in position for test fit (all spot welded). From this stage there are still another 8-10 tubes to install to get the finished article and that's before you add all the ties, gussets and wraps :shock:
Fantastic workmanship by the guys at Custom Fabrications

Image


Once the guys were happy with the fit and positioning of the all the major cage framework the next step was simple...........


Off with it's roof to enable the disassembly of the cage in sections and also allows them to be 100% certain that all the hard to access sections will be welded perfectly. They give themselves no margin for error which is very reasuring. The roof removal was an option and to fair the cage can be done with the roof in situ but as it's easy enough to remove and there further weight savings to be had from within the roof "rails"...I gave them the green light to go ahead.

Image


That's the most up to date picture I have at the moment, still got all the seam welding to do and some further weight reducing measures to take as the cage gets re-installed.
I think you'll agree that the level of workmanship is amazing and not only that but the level of communication has also been superb.

If anybody wishes to discuss future roll cage projects, custom builds or pretty much any high quality fabrication work I can 100% recommend the guys at Custom Fabrications 8)
If you are serious about getting in touch with them then you can do so through us @ Performance Autoworks
via PM on here - username Performance Autoworks,
our email - info@performance-autoworks.co.uk
or give us a bell - 01285 711733 and we will arrange it for you.


As always, any questions and comments are welcome

Thanks for looking 8)


Rich
Last edited by Buzzonion Vtec on Sun Jan 29, 2012 10:19 pm, edited 1 time in total.

User avatar
Buzzonion Vtec
Posts: 214
Joined: Sat Jan 28, 2012 10:29 am
My Generation: 4G

Re: Thread Building - Please don't reply just yet ;-)

Post by Buzzonion Vtec » Sun Jan 29, 2012 6:35 pm

COMMENTS

MaDMaXX wrote:Rich there are some amazing shots there, you're so right about the attention to detail and quality of work on the cage. It's not often you can so clearly see just how much work and precision has gone into something like that just from the photos.

Really looking forward to what has to be one of the most dedicated and true race Preludes i've ever seen, even to the point where i'm wanting to try out that second seat you've got mounts for ;)

Keep us updated best you can, i'm loving the work you're putting in here.

Hyabusa Hunter wrote:dude, 1 question man, why did you get it painted before you did all this? the engine bay, the roof :?: :?:

surely the painting should have been done last :? :?:

uknowiama wrote:Impressive work. Looking forward to seeing and hearing it driven in anger. 8)

Kris! wrote:
Hyabusa Hunter wrote:dude, 1 question man, why did you get it painted before you did all this? the engine bay, the roof :?: :?:

surely the painting should have been done last :? :?:

I can answer that one for you.

The rear arches were rusty and the paint was dull, stone chipped and in a bit of a sorry state. I worked for a bodyshop that decided to close its doors back in February, so I used the last few days it was open to paint the Lude free of charge as a thank you for the work done on my Civic over the years.

It was agreed that it was the wrong way to do it, but its now a good starting base for when it needs to be repainted in the future as all the hard prep work has been done (and it gave Richy a kick up the arse to get the project on the move again) :lol:

:wink:

Mart609 wrote:EPIC - thats the only thing thats describes this thread 8)

mercutio wrote:great work matey

Hyabusa Hunter wrote:just read that you going to TiG weld the seams, damn good luck, u have more balls then i do or did (im fully seam welded already)
i went the TiG welding route 1st but gave up soon afterwards. you will see why.......... :(

Crazy_C wrote:God damn man, that is looking SERIOUSLY awesome!! I do love Project SCRAP immensely, and I reckon you should do a track day for PUK members who get to have a go in SCRAP's passenger seat :D £5 a go, I'd pay and sure loads of others would too!! :D

But I agree with the Hunter - wouldn't the welding and putting all those bars in have affected the paint, or is there more painting to come?? ;) :D

.

User avatar
Buzzonion Vtec
Posts: 214
Joined: Sat Jan 28, 2012 10:29 am
My Generation: 4G

Re: Thread Building - Please don't reply just yet ;-)

Post by Buzzonion Vtec » Sun Jan 29, 2012 6:36 pm

REPLY

Kris! wrote:
Hyabusa Hunter wrote:dude, 1 question man, why did you get it painted before you did all this? the engine bay, the roof :?: :?:

surely the painting should have been done last :? :?:

I can answer that one for you. <snip>

Thanks for stepping in there Kris :D

Basically what Kris has said is true and you are of course totally right H/Hunter. Definately not the ideal way of going about things but I couldn't really turn the offer down....tbh I think even if I had Kris would have just stlen the car away from me and painted it anyway.
The engine bay has now been decided to be a different colour anyway along with the interior so it's really no big deal.
The roof paintwork will be pretty much unaffected by it's removal and as it'll only need to be spot welded at the front and rear screen ends with the rest of it bonded the only bit's that will need paint are the bits that you can't see anyway.

Hyabusa Hunter wrote: just read that you going to TiG weld the seams, damn good luck, u have more balls then i do or did (im fully seam welded already)
i went the TiG welding route 1st but gave up soon afterwards. you will see why...... :(
I've got absolutely no worries about the seam welding mate... I'm not doing it :lol:
The guys at Custom Fabrications who are building the cage are doing it all at the same time and they have no problem with TiG welding it at all. You no doubt had problems because you still had seam sealer in the joints which would badly affect the welding process... hence why all of mine has been burnt out rather than scraped or wire brushed. It is the only way.
These guys have got more TiG seam welded shells and roll cages under their belts than most due to their top end involvement in international motorsport shell preparation. They TiG everything...and I mean everything....in fact I don't even think they've even got a MiG welder :lol:

Like I said, I'm not personally building this cage or carry out the latest round of weight saving and seam welding. This is all down to the guys at Custom Fabrications who I've struck up a long term business relationship with. I've done quite a few weld in cages in the past and would have tackled this one were it not for the fact that you cannot buy one off the shelf. Probably just as well anyway because once the spec was initially discussed it soon moved along to the much more integrated spec that you see now.


Rich

User avatar
Buzzonion Vtec
Posts: 214
Joined: Sat Jan 28, 2012 10:29 am
My Generation: 4G

Re: Thread Building - Please don't reply just yet ;-)

Post by Buzzonion Vtec » Sun Jan 29, 2012 6:37 pm

COMMENTS
Hyabusa Hunter wrote:
You no doubt had problems because you still had seam sealer in the joints which would badly affect the welding process... hence why all of mine has been burnt out rather than scraped or wire brushed. It is the only way.
i burnt all mine out aswell buddy, took all i can off without burning due to the smell and smoke and then attacted the rest with heat to melt it out. Im a fully coded TiG welder and i know. it just was much easier and way way way way faster to MiG it and cheaper (consumables).

Damn dude they are doing an awesome job :wink: i love the way they have connected the rear struts to the rear lower crossmember.

.

User avatar
Buzzonion Vtec
Posts: 214
Joined: Sat Jan 28, 2012 10:29 am
My Generation: 4G

Re: Thread Building - Please don't reply just yet ;-)

Post by Buzzonion Vtec » Sun Jan 29, 2012 6:38 pm

REPLY

Crazy_C wrote:God damn man, that is looking SERIOUSLY awesome!! I do love Project SCRAP immensely, and I reckon you should do a track day for PUK members who get to have a go in SCRAP's passenger seat :D £5 a go, I'd pay and sure loads of others would too!! :D

But I agree with the Hunter - wouldn't the welding and putting all those bars in have affected the paint, or is there more painting to come?? ;) :D

:lol: I'm sure lots of people would be happy to only pay £5 a time for some passenger rides.... it'll cost that in fuel per 2 laps of somewhere like Combe alone !!

Perhaps a sponsorship deal with PUK members to help cover the racing costs would be a thought. Members that are part of it get a free passenger session on a trackday and PUK gets a decent sized logo or two on the car.

The interior paint is obviously affected but that's irrelevant as it was always going to be painted a different colour inside anyway. The engine bay will be matching the interior so will need painting again as well but no big deal.
The exterior paintwork is unaffected, the wings, doors, bootlid and roof are off and out of the way...that just leaves the rear quarter panels exposed which are nowhere near anything that's being welded.
I've been up to see the car during the build and they haven't put a single mark on it. Professionals you see 8)


Hyabusa Hunter wrote: i burnt all mine out aswell buddy, took all i can off without burning due to the smell and smoke and then attacted the rest with heat to melt it out. Im a fully coded TiG welder and i know. it just was much easier and way way way way faster to MiG it and cheaper (consumables).

Damn dude they are doing an awesome job :wink: i love the way they have connected the rear struts to the rear lower crossmember.

Sorry, don't get me wrong I wasn't trying to diss you or your skills...hope it didn't come across that way. I have only seen some of your thread and it was the seam welding bit I saw and it just looked like you'd scraped your sealant off that's all.
I have total faith in the guys doing the work...like I said, they've got many many years experience and this particular build is a doddle for them in comparison to what they normally get up to with race car builds.

They are indeed doing an awesome job, we've had lot's of discussions along the way and many options to think about, still toying with a few little ideas even now but the majority is sorted.
The bracing of the whole rear end was important to me due to the sheer loads that the car has taken over the years and will be asked to take over many more. I cannot accept any chassis flex upsetting my suspension settings.


Rich

Post Reply

Return to “Lude Profiles”