

oh yes I see..
Um tricky one, rivet gun?
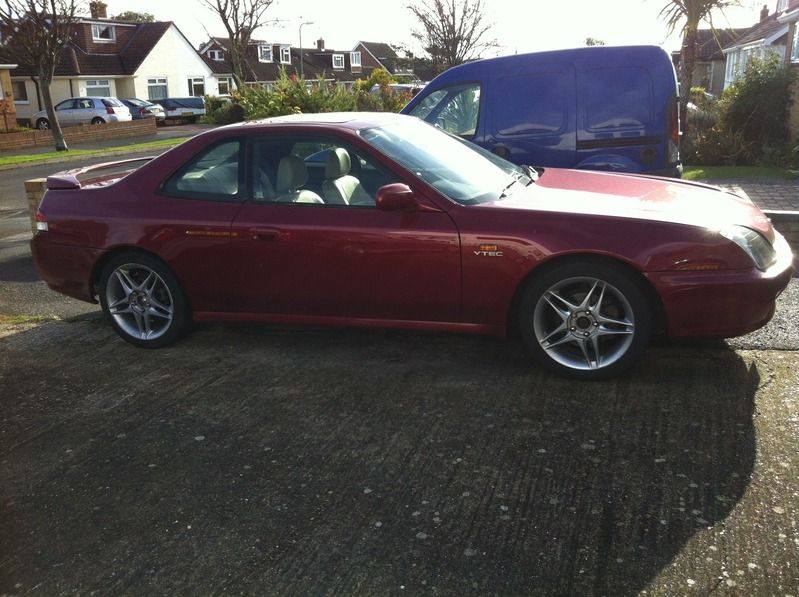
Congratulations to vtecmec for winning May/June's Lude Of The Month, with his DIY Turbo BB1 build.
>>> Click Here For Profile <<<

>>> Click Here For Profile <<<
Bio's 'Lude


Re: Bio's 'Lude
Hmm didn't think of that actually.
I'm actually thinking drill out the existing (as you suggest) and replace with a new larger self tapping screw and a bit of loctite or something. It should be sufficient to hold it in place if it grabs well enough into the metal. Not ideal I admit, and I'd prefer a bolt really.
Of course the other other option is to maybe drill a large access hole inside the car on the interior skin, but that's probably not the best of my ideas ever
I know what you mean about chasing the rust though. I'm just trying to make her run for a couple more years before I think about a new one, unless a very good cheap Type-S comes up or something.
1998 5th Gen 2.2 VTi Manual H22A5 BB8
Re: Bio's 'Lude
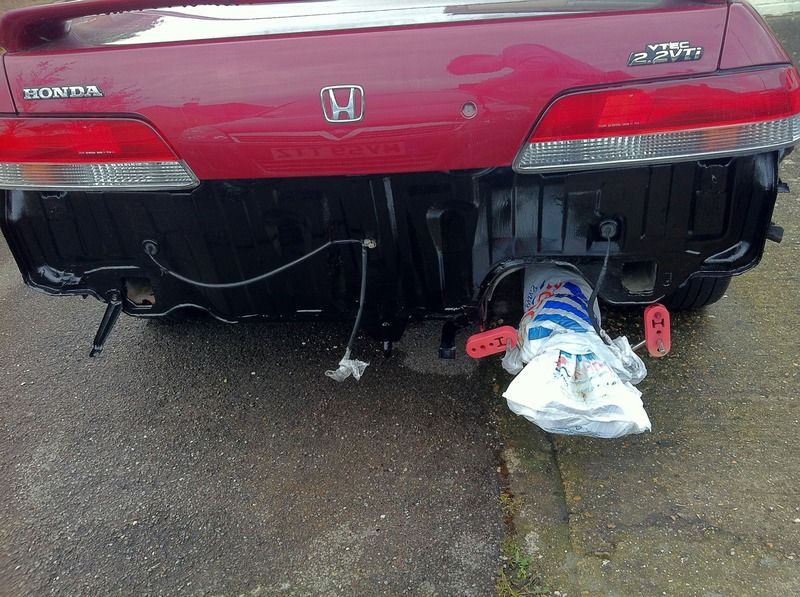
So I found a solution for the snapped off bolts!
Had to drill out the existing with a 9mm bit (really hard to find size btw) and fit an M6 blind nut. Then I used some of the stainless M6 bolts I had for the rad mounts in the engine bay to secure the bar back in place.
For anyone that has to do this, spend more on the tool! This one while it works, got me 2 nuts before the thread that inserts into the tool side snapped on the bit. Luckily replacements are pennies, but still crap!
Also there are 3 sheets of metal that those bolts go through because of the way it's folded!
Sadly I don't have any pictures because I was hitting it hard one of the evenings but needless to say, it works fine
I also finished under-sealing the rear of the motor over all the treated rust. I did apply paint over the Hydrate before using the Dynax UB to ensure there was a further barrier over the treatments I made.
The Dynax goes on like molasses. It's very thick, slightly nasty stuff but it feels like it will do the job. I put on 2 coats as per recommendations:
One thing I will say is try not to get it on your bodywork!
I managed to get some on the boot lid by accident, BH recommend using White Spirit to remove it
Turns out a clay bar and some effort works just as well
So she's back on the road for now after a short stint off. Fingers crossed the treatments last a good couple of years.
Next up will be treating the lower drivers arch area as well as under sealing inside the arches to get a good protection in time for winter. I also want to get S50 sprayed into all the panels in the rear of the car to give it some extra protection
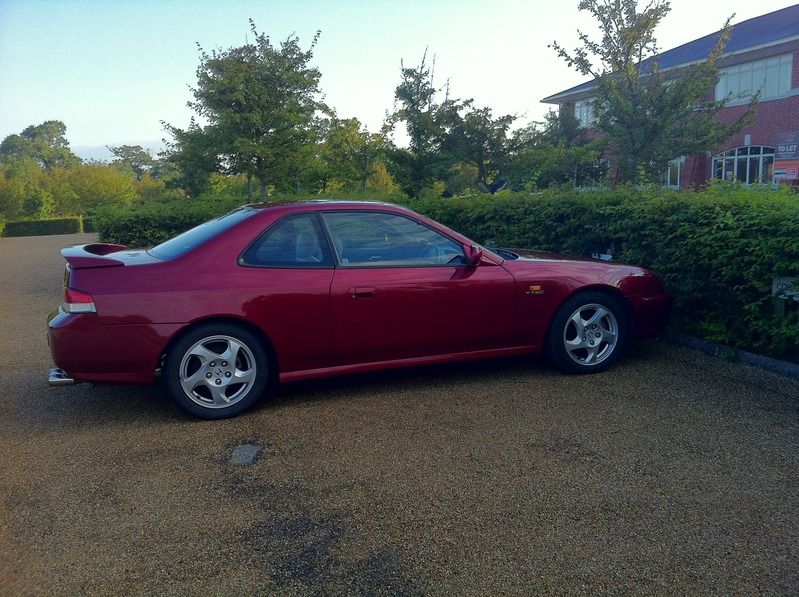
Unfortunately the colour looks a little weird in this shot on account of the over-cast ness that morning (it was about 6:30am) outside of my offices.
Also the nobbers that replaced my front tyres put the fronts on the wrong way round so now I have mis-matched wheels!
Had to drill out the existing with a 9mm bit (really hard to find size btw) and fit an M6 blind nut. Then I used some of the stainless M6 bolts I had for the rad mounts in the engine bay to secure the bar back in place.
For anyone that has to do this, spend more on the tool! This one while it works, got me 2 nuts before the thread that inserts into the tool side snapped on the bit. Luckily replacements are pennies, but still crap!
Also there are 3 sheets of metal that those bolts go through because of the way it's folded!
Sadly I don't have any pictures because I was hitting it hard one of the evenings but needless to say, it works fine
I also finished under-sealing the rear of the motor over all the treated rust. I did apply paint over the Hydrate before using the Dynax UB to ensure there was a further barrier over the treatments I made.
The Dynax goes on like molasses. It's very thick, slightly nasty stuff but it feels like it will do the job. I put on 2 coats as per recommendations:
One thing I will say is try not to get it on your bodywork!
I managed to get some on the boot lid by accident, BH recommend using White Spirit to remove it
Turns out a clay bar and some effort works just as well
So she's back on the road for now after a short stint off. Fingers crossed the treatments last a good couple of years.
Next up will be treating the lower drivers arch area as well as under sealing inside the arches to get a good protection in time for winter. I also want to get S50 sprayed into all the panels in the rear of the car to give it some extra protection
Unfortunately the colour looks a little weird in this shot on account of the over-cast ness that morning (it was about 6:30am) outside of my offices.
Also the nobbers that replaced my front tyres put the fronts on the wrong way round so now I have mis-matched wheels!
1998 5th Gen 2.2 VTi Manual H22A5 BB8
-
mercutio

- LotM Winner
- Posts: 14958
- Joined: Sun Aug 08, 2010 8:45 pm
- My Generation: 5G
- Location: Sunny Manchester
- Has thanked: 1 time
- Been thanked: 3 times
- Contact:
make them change them
bristol_bb4 wrote:ahhh a 5th gen, i love 5th gens
Dino wrote:I loves the 5th gen really.... just dont quote me on it...
4thgenphil wrote:Mines 4 1/4 unches mate, sorry
http://www.ludegeneration.co.uk/profile ... -t618.html
Re: Bio's 'Lude
So my obsession with keeping the car protected from rust as long as possible continued this weekend.
I was going to go to JAE but realised my rear tyres weren't too great on the legality front so while I save a little bit of dosh to get that sorted, I figured I'd spend the rather beautiful weekend working on the car.
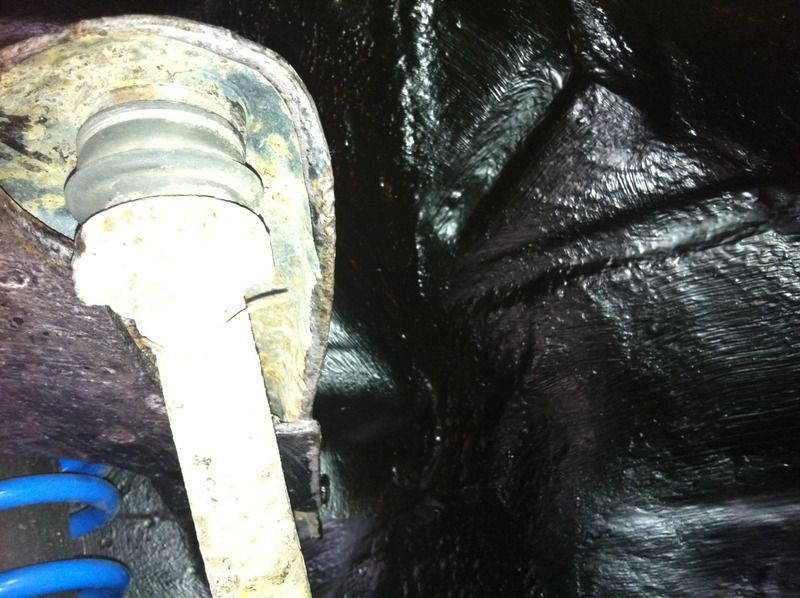
I'd noticed that the arches were starting to show signs in places so I figured I'd check to see just how bad it was and gave the inner arch on the drivers side a wash off (I'll do passenger over the course of the week after work and get a lift with the missus).
To my surprise washing revealed that most of the existing under seal had peeled over the years to leave the arch pretty damn unprotected!

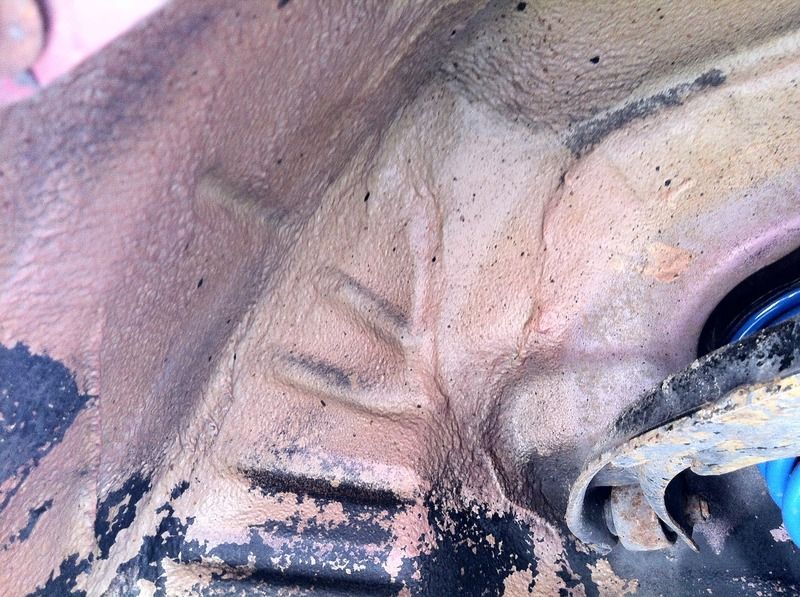
(You can see my pretty much brand new Honda Access suspension here rather well)
I also noticed this part of the drivers rear looking very unprotected and a prime space for rust to creep in at that panel join;
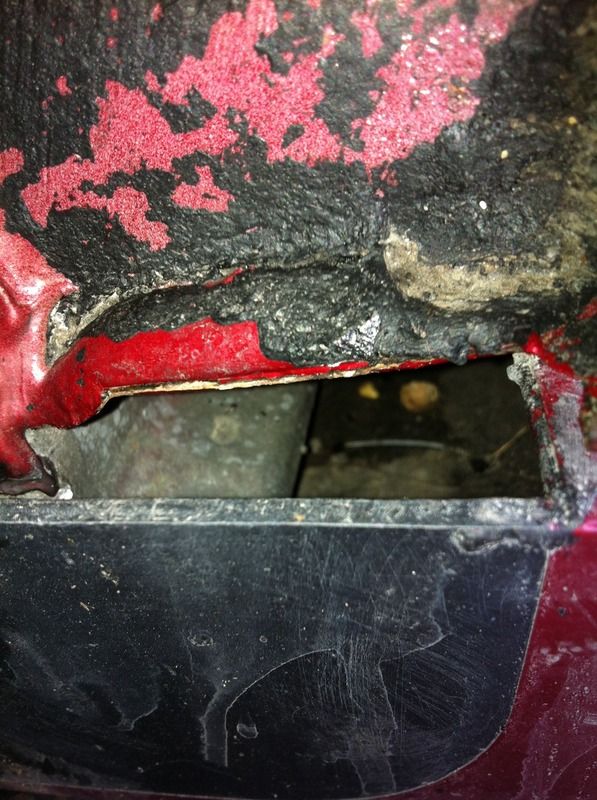
I've not had the skirts off, but I did try they just won't budge, but looking at that photo the sill looks in pretty good nick.
If anyone has any tips for pushing them off when they feel pretty darn stuck I'd appreciate it because I'll dynax the crap out of those too!
I was going to go to JAE but realised my rear tyres weren't too great on the legality front so while I save a little bit of dosh to get that sorted, I figured I'd spend the rather beautiful weekend working on the car.
I'd noticed that the arches were starting to show signs in places so I figured I'd check to see just how bad it was and gave the inner arch on the drivers side a wash off (I'll do passenger over the course of the week after work and get a lift with the missus).
To my surprise washing revealed that most of the existing under seal had peeled over the years to leave the arch pretty damn unprotected!
(You can see my pretty much brand new Honda Access suspension here rather well
I also noticed this part of the drivers rear looking very unprotected and a prime space for rust to creep in at that panel join;
I've not had the skirts off, but I did try they just won't budge, but looking at that photo the sill looks in pretty good nick.
If anyone has any tips for pushing them off when they feel pretty darn stuck I'd appreciate it because I'll dynax the crap out of those too!
1998 5th Gen 2.2 VTi Manual H22A5 BB8
Re: Bio's 'Lude
So I finished the Dynax UB-ing of the rear arches and I'm confident that they should now last the winter (sorry for the bad quality, phone camera + dark place = fail
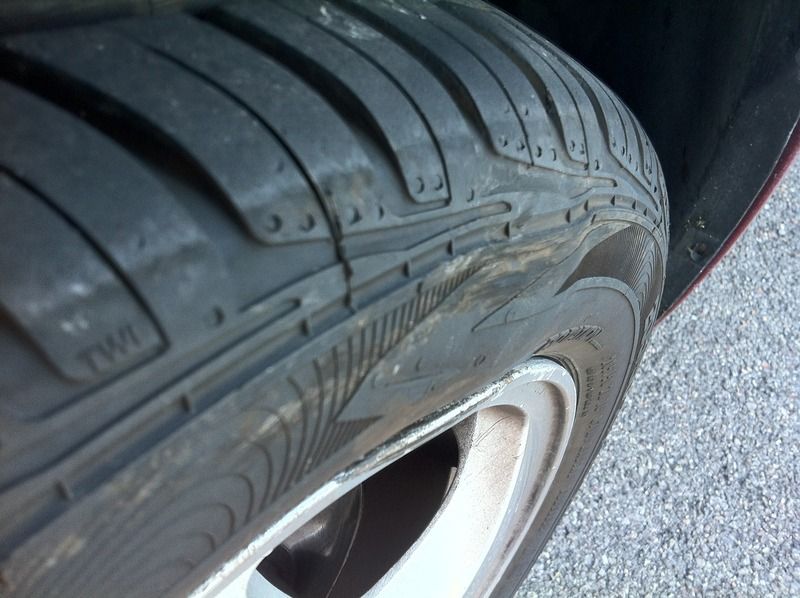
Shortly after however I managed to damage a wheel in an epic pothole that I was forced into down a back road by an on coming truck and did a little bit of damage to the tyre, and the rim edge;
So instead of getting it repaired and paying out over £100 for a new Rainsport 2, I managed to win some ATR alloys from eBay for £100 with Tyres that had loads of tread, OK they aren't Rainsports, but they'll do my MOT and the winter just fine so long as I don't go stupid with them. They also looked pretty good in the pics.
I drove all the way to Essex and back in one night turning up there at about 7PM. It was raining but I gave them the once over and I thought they looked fine except 2 had lost pressure and they were a little scuffed. But for £100 who can complain right?
Went to put them onto the car and to my horror I found;
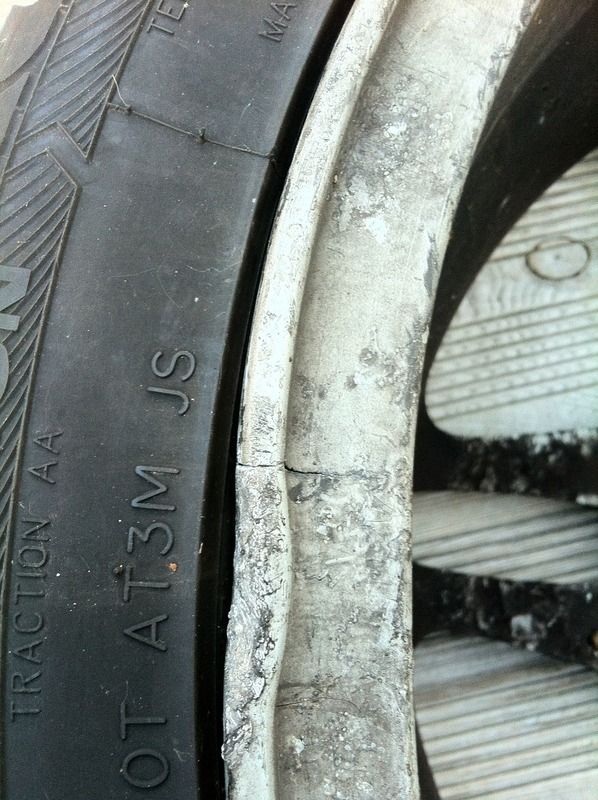
Right the way through.
Ended up taking it to The Wheel Specialist in Fareham and was charged, you guessed it ~£100 to repair the crack once all was said and done.
Go to fit them then find the other one that was low, was actually a nail in the tyre. *sigh*
A further £15 later and these "bargain" wheels aren't such a bargain!
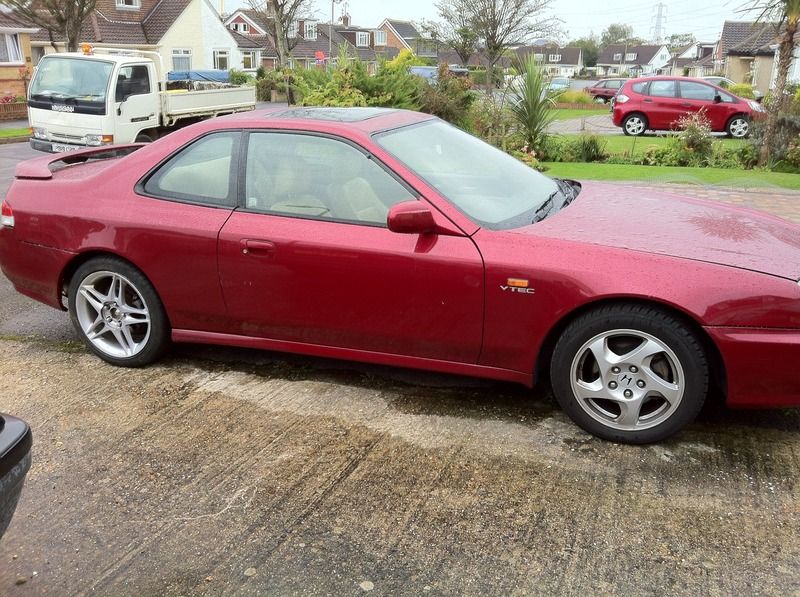
Eventually got them sorted though;
2 Slight issues though:
The centre caps are pretty beat up so will need re-furbing
The wheel nuts from the existing are actually too tall to allow me to fit the centres anyway!
So if anyone has some suggestions on good wheel nuts that work with ATR alloys please do say
Shortly after however I managed to damage a wheel in an epic pothole that I was forced into down a back road by an on coming truck and did a little bit of damage to the tyre, and the rim edge;
So instead of getting it repaired and paying out over £100 for a new Rainsport 2, I managed to win some ATR alloys from eBay for £100 with Tyres that had loads of tread, OK they aren't Rainsports, but they'll do my MOT and the winter just fine so long as I don't go stupid with them. They also looked pretty good in the pics.
I drove all the way to Essex and back in one night turning up there at about 7PM. It was raining but I gave them the once over and I thought they looked fine except 2 had lost pressure and they were a little scuffed. But for £100 who can complain right?
Went to put them onto the car and to my horror I found;
Right the way through.
Ended up taking it to The Wheel Specialist in Fareham and was charged, you guessed it ~£100 to repair the crack once all was said and done.
Go to fit them then find the other one that was low, was actually a nail in the tyre. *sigh*
A further £15 later and these "bargain" wheels aren't such a bargain!
Eventually got them sorted though;
2 Slight issues though:
The centre caps are pretty beat up so will need re-furbing
The wheel nuts from the existing are actually too tall to allow me to fit the centres anyway!
So if anyone has some suggestions on good wheel nuts that work with ATR alloys please do say
1998 5th Gen 2.2 VTi Manual H22A5 BB8

Re: Bio's 'Lude
I'd entirely possible I'm being a spaz. I'll check again later just in case.
1998 5th Gen 2.2 VTi Manual H22A5 BB8