Page 1 of 14

Never Ending Story... Prelude race car build.

Posted: Sun Jan 29, 2012 6:04 pm
by Buzzonion Vtec
Hmmmm right then...where to start?

I guess the easiest thing to do is to firstly introduce the car to those that don't know it before moving onto the more juicy details of the build thread.


Many of you probably already know the car pretty well but I'm also fairly sure there will be quite a few that know nothing about it at all !!

Currently the car is undergoing a major major re-vamp, actually more thana re-vamp...it's a whole new build :shock: ...more of that later ;)

What I thought I'd do here is give a brief history of the car and it's full spec prior to the start of the all new project.

I bought my Milano Red BB4 as a fresh grade 4 import with 58,000 genuine kms on the clock way back in Sept 2000 with the sole intention on just doing a couple of minor mods to it and then leaving it alone......
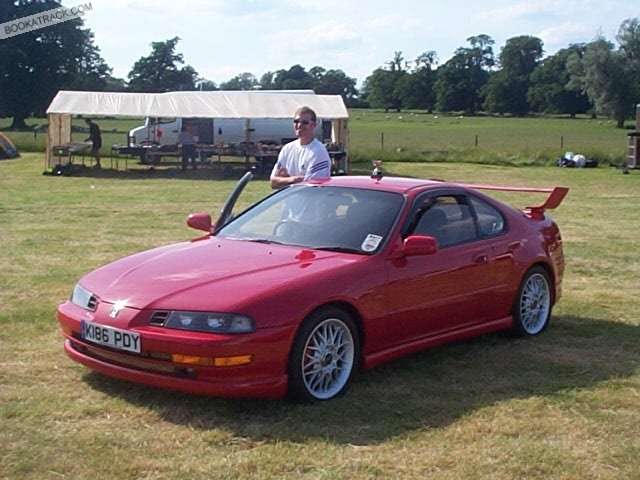
Early on in the ownership (Euro lip kit and wing came with the car from Japan)

Image


Started with the usual intake and exhaust - bear in mind that there really wasn't very much around for Ludes in the UK back then - then added lowering springs and a decent set of brake pads. That was about all I wanted to do initially and keep it a decent sensible road car.....then I started to track it (like I had all my previous cars), she has seen action at very nearly all of the UK circuits many times and has also 6 full days of Spa Francorchamps track time too. My local circuit is Castle Combe which I love dearly and ranks as one of my best places to test chassis development.
During all these years of track time the mods just kept building and building until now.....

I'm now starting with an almost totally clean sheet of paper all over again for a whole new purpose, no longer a road converted trackday car...she is being built to race 8)


In it's time the car has had several different rear wings including this one that proved to be properly effective

Image

Image


It's also had several engines, many suspension changes, lots of weight saving and completed in excess of 45 track days including several trips to Spa Francorchamps.

Engines
OEM JDM H22a - later modded with headwork and cams

H23VTEC Build (covered around 15 trackdays and 12,000 miles)
Image

H22a7 ATR engine running ITBs
Image

And the latest spec
Full forged, darton sleeved, high comp, big valve, 9k rpm H25 on ITBs
Image

Yet to be dyno'd but with conservative road map it has felt awesome. Currently fully stripped due to a forging fault with one of the pistons but will go back together as pretty much the same spec.


Some pics of the car in action during it's last few outings

Image

Image

Image


It's final look before the start of the project


( note the speakers/stereo in this picture were removed very shortly after the first bolt in cage was fitted)

Image

Image

Image


And a brief rundown on the spec of the car (as of it's last proper usage on track)
Engine
1992 Honda Prelude Si VTEC BB4
H22a7 Accord Type-R engine - 233bhp, 172lbft
TWM Individual Throttle Bodies
Mugen Header
Greddy Evo exhaust
Skunk2 Adj Cam Gears
Autronic programable ECU
JDM M2B4 LSD Transmission
Mocal oil cooler system

Suspension
Dampertech/Gaz custom coilover suspension (several spring rate options)
Neuspeed uprated ARBs front and rear (mounts stiffened)
Modified upper control arms for increased camber front and rear
Energy Suspension Poly Bushes
Power steering removed

Brakes
No ABS
Front - Hi-Spec 325x30mm 2 piece discs and "Monster4" calipers with Pagid RS15 pads
Rear - OE discs with Pagid pads
Goodrich braided lines
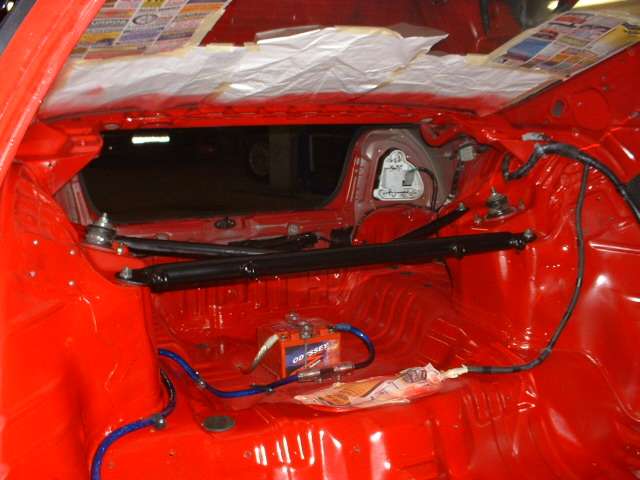
Interior
Fully stripped
Sparco Evo seats
Luke Harnesses
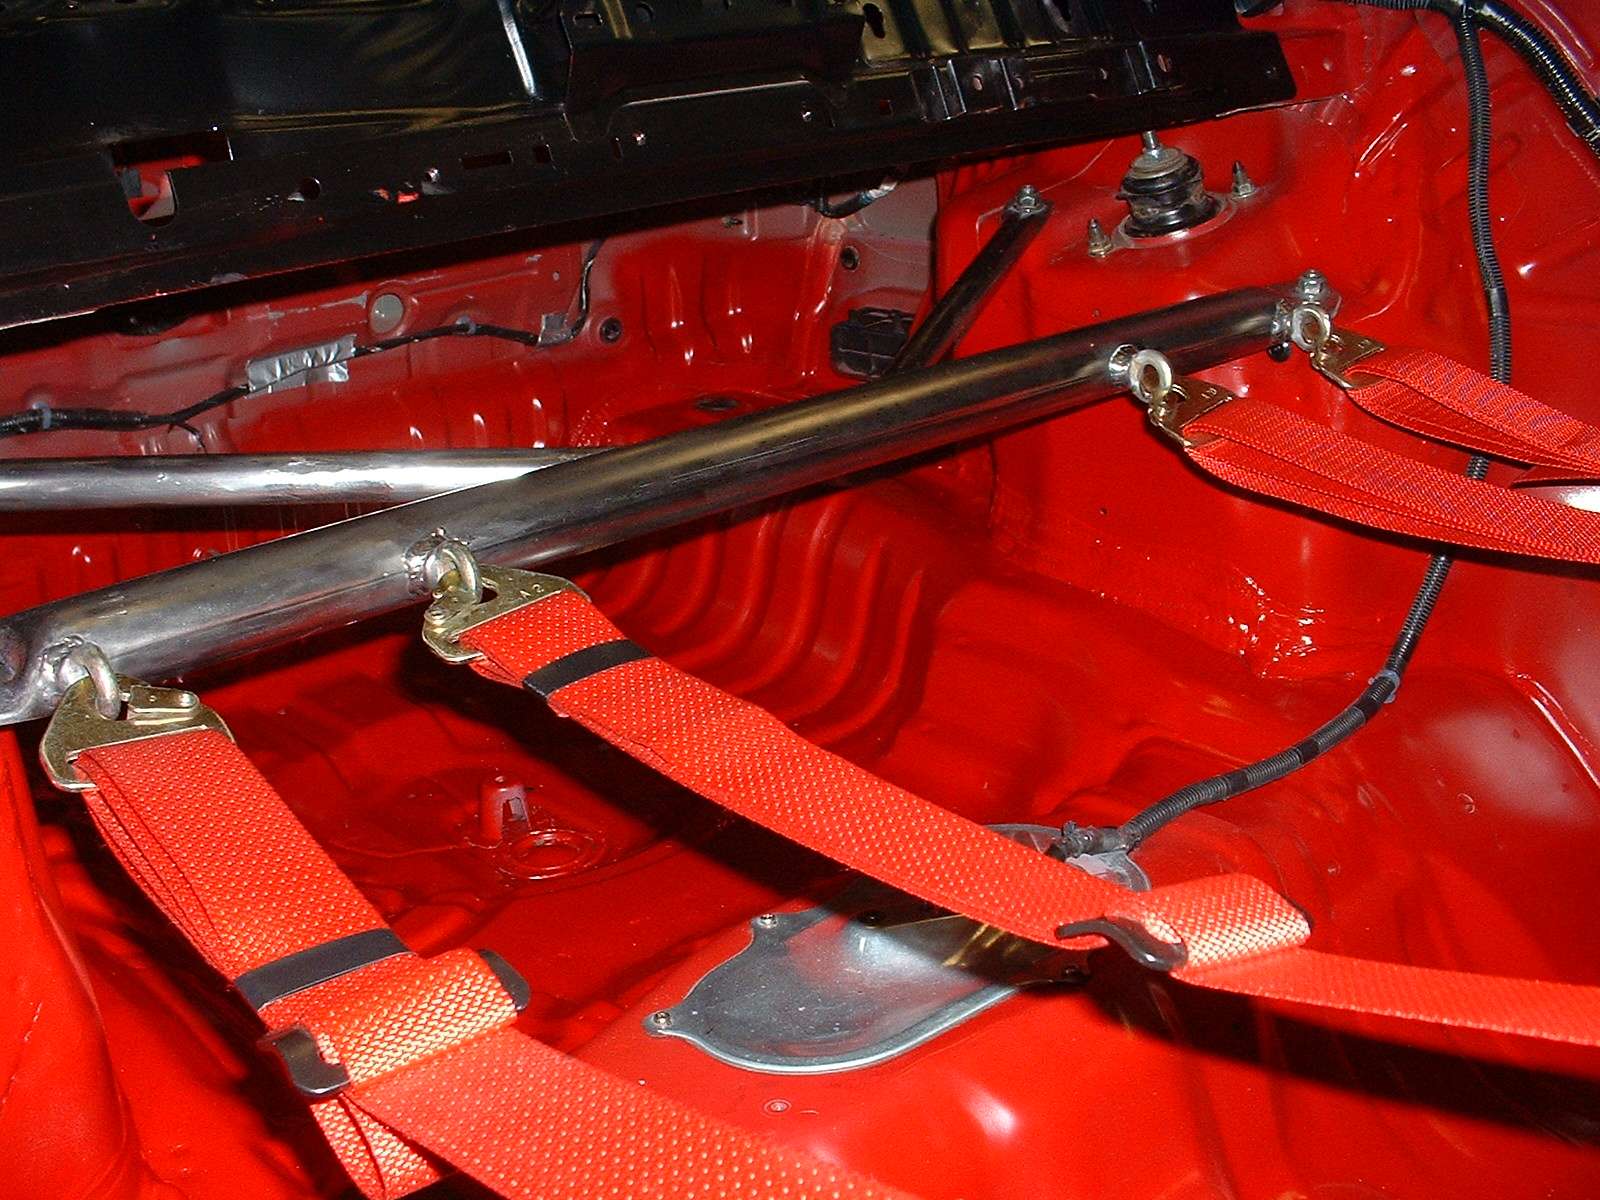
Custom built multipoint bolt in roll cage and additional bracing
Custom rear strut brace and harness bar
SPA gauges and shift lights

Exterior
Original option Honda Euro lip/skirt kit
OE Honda rear spoiler
Carbon Bonnet
Carbon front splitter
Lots of invisible weight saving measures
Lightweight door mirrors
Rota wheels 7.5x17 (choice of two)


In it's time I was often asked if the wing actually did anything or the other usual one was FWD cars shouldn't have a wing on them....well in answer to that.

Yep the wing was fully effective, though you can't just expect to botl on a wing and it'll work right away. The structure it sits on needs to be able to support the forces acting on it without flexing and the suspension spring rates need to be taken into consideration to prevent the forces acting on it from creating front end instabilities and understeer - the front splitter also helped with that.
It's always a trade off - the car was able to sustain a higher speed through fast corners with the wing but the trade off was drag and medium speed corner initial turn in. Overall stability was improved also.

I did an interesting back to back comparison of with wing and without during a 2 day test at Spa. I've taken the fastest lap I did with each setup and combined them in one video so you can see the pros and cons.

Have a look here - http://bookatrack.com/-PFrichyv28602417 ... o/x-ms-wmv

And some of the "low aero" moments here - http://bookatrack.com/-PFrichyv28602417 ... o/x-ms-wmv

That was back in 2005, the last time the wing saw active service...after that I worked on further suspension development and set up to find a happy balance on the circuits that I visit most.


Also here's a couple more little videos you might like - an onboard lap and some external ITB goodness from Castle Combe


Anyway that's the rundown on how things stood before the project got underway. I say project but really I guess I mean projectS because I've still got the engine to build again as well - good thing with that is pretty much all the hard work I've already done...it'll just be a case of fitting the new pistons and rebuilding it again.

Now that the introduction to the car has been done... I'll get on with the project thread to keep you updated as to what's going on :D


Rich

Re: Thread Building - Please don't reply just yet ;-)

Posted: Sun Jan 29, 2012 6:11 pm
by Buzzonion Vtec
Ok then - Introductions done lets get on with the "Project" part.

Now there were a couple of ways I could have done this.
A) Just lift all of my update posts out of the P.UK thread and fire them in here
Or
B) Lift virtually the whole thread out and fire it in here :shock:


I have decided on "B" - Yes there's a lot more of it and yes there is some off topic banter but in fairness that quite often encouraged me to press on with the build and it shows the enthusiasm of the members who took an interest. The other key point in lifting the thread over is because there are lots of questions, answers and a few discussions relating to many of my updates which I think are pretty valid to the thread.

So I guess I'll stop waffling now and get on with it..........onwards and upwards as they say 8-)


Rich

Initial Strip Down and Weight Loss + Re-spray 1

Posted: Sun Jan 29, 2012 6:12 pm
by Buzzonion Vtec
Update 1 – Originally Posted - Tue Feb 17, 2009 1:43 am

http://preludeuk.forumup.com/viewtopic. ... =preludeuk

This is the full documented build story for my 1992 JDM BB4 Prelude race car

Or

Project S.C.R.A.P (Specially Created Race Altered Prelude) as it's become affectionately known :lol:

Image


I apologise in advance for this being a long post :oops:
I guess I just wanted to document the progress of the Project from the beginning and get bang up to date all in this first post. Trust me... progress won't look anywhere near as fast from here on in :lol:

Once upon a time the car was well known as BRB (Big Red Bus) but unfortunately as with all Milano red Ludes...it started going quite heavily into the way of the Pink.
Something needed to be done and so it begins......


Don't really know where to start with this but I suppose to cut a longish story short - plans to develop the track lude into a race car for the Nippon Challenge took a few turns for the worse and what with trying to run the business and put customer cars first nothing was really getting done.
Neglect and a lack of enthusiasm had set in :(

So after a couple of slightly boozy sessions and some "encouragement" I decided enough was enough. If this car was going to go racing it needed to be torn apart and started again from scratch, built with lots of fresh ideas and fresh motivation.


14th Jan 2009 - evening
So here starts the story of the build - or rather strip and build

First things first - Engine and 'box out

Once that was out of the way I tossed a coin to decide which end of the car I was going to start at. It was tails so logically I started at the back
:D


Bumper, spoiler, lights etc removed

Image


Now I don't know if you guys have felt the actual weight (rather than the spring assisted weight) of a Prelude bootlid? Lets just say with the multi skins and lock gubbins it's not light !!
You can still see the old support structure for the big wing in this pic

Image


Behind the No.Plate surround

Image


With some quality time spent with my trusty disc cutter and power file I ended up with something substantially lighter and quite flexible :wink:

Image

Image


With the skeleton structure gone and also the heavy hinge assemblies from inside the car the bootlid will now be secured via pins at the front and springs at the back.

Image


Job done.... now onto the bumper
The mounting bracket has been removed and will be replaced with a much lighter system later on but in the meantime the trusty disc cutter came out again to remove the excess overlap that hides behind the Euro lip. The same thing was also done to the front bumper but I forgot to take any pics of that :oops:

Image


Next up ... strip the interior (what's left of it anyway)

Seats - although the seats are very lightweight Sparco Evos there is still a fair bit of weight to them thanks to the fully adjustable factory/side mount hybrids I made. The original fitting of the seats was done this way to allow cruising and track driving positions plus allow other users to have a drive. It also allowed for easier access into the back when I needed to.
These mounts will be up for sale and replaced with very low fixed system during the build.

Image


Roll cage removed next.
I built the cage from scratch in 2005 as nobody had an off the shelf Prelude cage available. I felt due to the amount of trackdays the car was doing that it should have a cage installed and although reasonably heavy (around 35kg) the extra rigidity it gave compensated for that. As a bonus it also allowed me to use full slicks on track rather than semi-slicks (most TDO's have this rule in place)
This complete bolt in cage will be up for sale as an all new lighter weight weld in FIA approved cage which hooks up to front and rear turrets will be installed.

Image


The cage mounts will also need to be removed which will be a bit of a task

Image


Next on the agenda was the doors :D
First all the rubbers, glass, central locking, window regulators, window chanels, wiring and mirrors were removed

Image

Image


We'll come back to the doors in a while :wink:


Next up was removal of the complete dashboard, heater blower motor, A/C evaporator housing and climate control/heater matrix housings. Some of the wiring was junked during this process. The whole heater assembly (3 parts) weighs in at an astonishing 18kg ...the wheely bin took the brunt of the weight ok though :D

Image


Next was the pedal box and complete interior wiring loom - which has already in the past received some fairly major reduction - was next to be removed. The whole car loom will be stripped of all wiring that isn't 100% necessary, this from previous experience can shed a whole heap of weight...anywhere between 15 to 25 kilos depending on remaining systems.

Image


Ok then...back to the doors
They're heavy right? Damn right they are but most of that weight is used for support of things that I won't be needing. There is also a dirty great big side impact bar sat inside the doors, that's great for a road car but as this will have door bars as part of the cage structure there's really no need to double up on this protection.
Out comes the trusty disc cutter and power file again 8)

Image

Image


The door openings will be covered in again with carbon sheet like I had there previously. This needs to be done or run and edge protection strip all the way around to comply with MSA/FIA regulations.


Engine bay / front panel next.
Basically all the unnecessary brackets/fittings removed from the engine bay and front panel, wiring removed, brake servo and lines, clutch cylinders etc etc etc. I think the only things left in were steering column coupling and the fuel feed and return lines. All brake lines will be re-done and routed through the car via a bias controller. Engine and front end wiring looms will be stripped of anything unnecessary.
Before

Image

Didn't get a dedicated "after" shot but you'll be able to see in a later unrelated picture.


Bonnet next.
Hang on....it's a carbon bonnet, surely it's light enough already?
Errrrrrr nope :lol:
Most carbon bonnets are actually mostly fiberglass with a carbon fibre top layer or two. This is fine as it keeps costs down but in some areas (namely the very front latch section) the composite is very thick and heavy to be sure that the bonnet won't simply rip open off the standard catch. Also you'll usually find the same kind of skeleton as the OE steel bonnet in an effort to keep the composite bonnet rigid. This all adds weight so....you guessed it...disc cutter time.

Image

Image

Unfortunately I didn't get a shot of the very thick "latch" section that I removed after that picture was taken but it was approx 10mm thick !!


Bit more flexible now - you can also see the emptied engine bay.

Image


The last thing to happen before the rolling shell left me was to remove the remaining glass. All glass except windscreen will be replaced with polycarbonate during the build.

Image

Image


That was the pic I took of the car and indeed the last time I saw the car in the flesh until today.
The Lude was shipped off to sunny Chepstow where Kris would take on the bodywork prep ready for Mark to carry out the re-spray.
I'd love to say I've done everything on the car but bodywork just does my head head. I've got very little patience for all that rubbing down, filling and flatting malarky...so I left that for those that have.

The following pics are courtesy of Kris who I can't thank enough for taking it on at a time when both he and Mark could probably have done without it. To be fair though...it's partly his fault because he's the one that fuelled the fire to get on with it by getting me drunk :lol:


Although fading badly the paintwork in general was not too shabby considering the Ludes age. For the most part it just needed flatting back for a good key for the new paint although some minor dents also needed some filling

Image

Image

Image

Image


You can see from this pic that the bonnet has also been heavily flatted back. This is because it was suffering (like so many other carbon bonnets) from the dreaded milky laquer. It was hoped that a heavy flat back and a re-laquer would sort it out .... if it didn't work it was just going to be painted black anyway.

Image


Wings removed to gain access to the door shuts and a-pillars.

Image


There are of course the usual areas that needed attention......such as the arches :roll:
They weren't the worst I'd seen by a long way but the last year or two of neglect had taken it's toll and the dreaded rust had started creaping.

Image

Image

Image


Engine bay de-greased, flatted and masked

Image


As you can see, the bumpers and Euro lip kit required quite a bit of work due to the sheer amount of abuse that the poor things have suffered over the years on track. TBH I'm actually amazed that they've survived this long :shock:

Image


Ready for painting

Image

Image

Image


So.......... bid a fond goodbye to Milano Red and welcome in the new dawn with......


Performance Autoworks Orange

Image

Image

Image

Image


Should sit very nicely on the grid next season along with Kris' Civic

Image


Oh and what became of the faded and milky carbon bonnet??
Judge for yourselves 8)

Image

Image

Image


Not had chance to get any pics of the Lude since I got it back earlier today but I have to say I'm more than happy with it. I know Kris has been worried and wasn't particularly happy about some bit's of dirt in the paint and a couple of areas that didn't turn out 100% but in fairness I never wanted (or expected) a concourse show car finish. This is a race car build....can't afford to be too precious about it 8)

Sorry once again for the long post.... we're up to date now so any further posts should be...sorry....WILL be considerably shorter.

Thanks for looking 8)

Re: Thread Building - Please don't reply just yet ;-)

Posted: Sun Jan 29, 2012 6:14 pm
by Buzzonion Vtec
COMMENTS


Rowan wrote:Hot stuff dude! gonna be a hell of a car!

Crazy_C wrote:Damn man, that takes puts a helluva lot of shame to my "lightweight" lude!!!

But don't leave that car near me in that colour or I will attack it with "01"s on the doors, Confederate flag on the roof and a certain melodic horn :twisted: :lol: :twisted:

Looks sweet as nut though man, loving it!!

paul bristol uk wrote:Wow! I am loving this thread!

uknowiama wrote:Nice one! 8) Good work, well done both :!:

nitin_s1 wrote:Im gona look forward to reading from this thread.. I'm not that technically minded but i love looking at all the pics :D :D
Keep it up.. :wink:

Lude-Dude wrote:nice thread, also good to know you can flat back and relaquer carbon bonnets.

RattyMcClelland wrote:Thats sweet..yet again. How much weight overall do you think you have saved then? Surly must be close to 1060kg. Thats mighty impressive though even taking it as far as choping unecessary metal. :lol:

bucks420 wrote:think i'l be keeping an eye on this, looks like its guna be a beast 8) . keep up the good work dude [smilie=hate-ok.gif]

Taffylude wrote:Fantastic mate, simply fantastic. A perfect example of a 'proper' weight saving exercise, and grounds-up build 8) . The respray in orange looks awesome, and I can't wait to see both you & Kris performing in the Nippon series, it will be good to see a Prelude finally getting some of the limelight :D Have you had the Lude weighed yet since the weight saving? Would be real interesting to hear what you managed to get it down too.

Just a couple of questions:

1. Did you ever consider a C/F boot, or does the weight saving you've done on the OEM one get it into the same kind of weight range?

2. So is the end finish on the C/F bonnet just a result of flatting it back, and getting it re-laquered? My C/F sunroof has a few milky spots on it, so will be looking at getting something similar done.

I can't wait until you get to the engine spec for this beast [smilie=hate-cool.gif]

Mart609 wrote:going to be keeping a close eye on this thread, this is simply awesome 8)

stk prelude wrote:hey richie ill have come see you soon mate.. when i get some money ...
i got my self a AEM stand alone ecu... off a nice guy off here.. u still thinking on doing mappin... think dino said something about it..
i hope to be buying some cams soon.. need ur advice on what cams and cams stuff i need. speak soon mate

btw mate the car looks awesome... i love it.... i mean I LOVE IT!!

matt

MaDMaXX wrote:That's awesome work Buzz, i love threads like this, plenty of pics and plenty of info showing the different stages 8)

Why were the front wings removed?
At least everything happened a lot quicker than it did in my project :oops: Though i had a lot less time and knowledge i guess :oops:

As Taffy said, that's some extreme weight saving and well worth it for the track, you got balls for some of the things you cut out of that poor car :)

JayJay wrote:Great post, I'll definately be watching this thread! Looking forward to the engine specs :wink: :D

mercutio wrote:this is great buzz its gonna be really special and well worth it cant wait for the next installment 8)

Nucleustylz lude wrote:Tis' alright I guess... :P

Extreme weight saving indeed, that bonnet looks scary on the one bonnet stay! :shock:

Love the new battle paint, very fitting for your business. But you know you preferred the Milano Pink! :P

Eagerly await some engine build pics/info. :D


.

Re: Thread Building - Please don't reply just yet ;-)

Posted: Sun Jan 29, 2012 6:15 pm
by Buzzonion Vtec
REPLY


Thanks for your comments chaps 8)
I'll be looking forward to your support when I hit the dark moments of the build. I've been there enough times in the past to know that during builds like this there WILL be times when you wonder why you are bothering but knowing that there's a good bunch of people behind you helps keep the spirits up 8)

Couple of questions / points to answer then....

Lude-Dude -- Yep faded/milky carbon bonnets etc can be resurected 8)
Depending on how bad they are will depend on how much work is needed but basically it needed to be flatted back until the majority of the milky blooms had dissapeared then it was wet flatted with a finer grade and a couple of coats of laquer to seal it all.
TBH a "see what happens" attitude was taken to see if it could be done, if the worst came to the worst it was gonna be painted black anyway but thankfully it came out looking great 8)
Shame I've not got any decent before pics to show just how bad the bonnet had got.


Ratty - Afraid I don't really know just how much weight has come out of it during this round of weight saving...I can tell you that things like the door bars are 4-5kg each, heater assembly inc controls circa 18kg.
I've always had this ambition to get the Lude down to 1000kg all up but no idea at the moment how sucessfull I'll be. The aim to build it under the min weight regs which will allow me to add balast in favoured places to get the corner weights right.... only time will tell.

I've been taking weight out and inevitably adding some unfortunately (cage, bracing etc) for many years on and off so I kinda lost track of half the things I've done now :lol:

Here's a few previous weight saving measures


Carbon door cards - speakers were removed after this was taken circa 4 years ago

Image


Rear seat support/bulkhead removed

Image


Rear inner quarter panels, rear shelf and roof rails removed

Image
Image
Image
Image


Front bumper mounts...before and after

Image
Image


Power steering removed - air con long gone - ( There was a how to here before fotopic went tits up - http://buzzinvtec.fotopic.net/c228802.html )

Image

Tons of other smaller items have gone along the way including wiring, brackets, etc etc.


Taffy -- Cheers 8) I'm now doing what I've always wanted to do...set about the car with no compromises. Re Nippon, looking forward to getting the car finished and out there competing. As you say nobody really took the Lude to heart and went racing with it... I could've made my life nice and easy, sold the Lude and gone and bought a Teg or Civ........ Too easy and no real challenge :lol:

Car hasn't been weighed for years tbh...I think the last time it was up around 1180(ish) kg all up. Not much point in weighing the car again now until it's pretty much done, then it will be fully corner weighted so we'll have a good accurate reading of all up weight and just as importantly where that weight is. Unfortunately while always striving to shed weight there are things which inevitably bulk it back up again - things like the cage, bracing, darton sleeved block etc are all weight gainers unfortunately.
Considered a carbon bootlid but rejected the idea on the grounds that a) they are way too expensive and b) they are too heavy :lol:

I've given a rundown on c/f re-laquer earlier in this post so unless your sunroof bung is in seriously bad shape you ought to be able to rescue it from the milky blooms :D

I'll get on and give you all an engine build write-up as soon as I can...just need to get all the pics uploaded first. It will give you a pretty good idea of what is involved but obviously there are certain things that I may keep close to my chest for the time being :wink:


STK - Cheers fella 8)
We've been mapping since day one mate :lol: but I guess you mean with AEM?
We've got the software/leads etc for the following Autronic, Omex, Hondata, Motec but nothing for AEM at the mo. If you want your's sorted it'll be no problem as long as you can supply software and lead.
Give us a shout when you're ready to talk cams etc you know where I am 8)


Madmaxx - Thanks 8)
Front wings were removed to allow access to door shuts / lower a-pillar for prepping and painting. There wouldn't be any need to do this on a standard factory colour re-spray but as mine was going for a colour change these bits would stand out like a sore thumb.
Interior is yet to be painted but will be once the new cage is fabricated and welded into place. Will either be orange or black inside..not decided yet but will most likely be orange.

Progress on the strip, prep and painting have been pretty quick that's for sure but remember it's far from a concourse show finish like yours for example. Finishes like that take time and patience as does the way you are going through yours making it perfect.
As with most race cars... this will be far from "perfect" in terms of fit and finish of certain things and the paintwork as it stands I am more than happy with. Not perfect, but if it was I'd end up getting precious about it :lol:


Nucleustylz -- You have no idea how hard a decision it was to go ahead with the orange. I've loved the look of the car in Milano red for years but figured that I should let that part of the car's life be history and hold on to those fond memories. This is like a new chapter or a rebirth so the time was right to swap to another colour and the orange works well with the company as you say. It's a bloody difficult colour to photograph though...it always looks different to real life :lol:

Thanks again fellas - will keep you updated as much as I can but don't go expecting the same sort of pace as the build so far :lol:

Cheers
Rich

Re: Thread Building - Please don't reply just yet ;-)

Posted: Sun Jan 29, 2012 6:18 pm
by Buzzonion Vtec
COMMENTS

noremorse wrote:awesome thread, just loving reading through it, and will be keeping a close eye on it! good luck mate!

the car looks great in that color! 8)

MaDMaXX wrote:Yup, fantastic job and weight saving extreme's where i wouldn't even think to go, like rear inner quarters :shock:

I wouldn't call mine Concourse, well, the body shop guys certainly wouldn't ;) but i think it's nice :)
Good luck and keep it up, looking forward to the next update.

TopPrelude wrote:Really enjoyed reading this thread. The car is looking awesome and the progress is well documented. The only question i have is that you've gone to so much trouble stripping the Lude to save weight, but have kept the car audio/speakers in the doors. Just feel it contradics the weight saving. Well done on what you've achieved so far, can't 'weight' to see the end result.

Taffylude wrote:
Buzzonion Vtec wrote:speakers were removed after this was taken circa 4 years ago
:wink:

Re: Thread Building - Please don't reply just yet ;-)

Posted: Sun Jan 29, 2012 6:19 pm
by Buzzonion Vtec
REPLY

TopPrelude wrote:Really enjoyed reading this thread........... but have kept the car audio/speakers in the doors. Just feel it contradics the weight saving. Well done on what you've achieved so far, can't 'weight' to see the end result.
LOL, has someone been skip reading and just looking at the big shiny pictures??? :wink: :lol:
As Taffy rightly pointed out, I've actually stated that the audio was removed around 4 or 5 years ago when the cage went in...needed to shed some of the added weight from the cage.

As I've also mentioned, there's loads of other smaller areas that received the weight saving treatment but it's all been over a period of years that I've owned the car and many bits didn't get any picture shots cos on their own they weren't worth it.

Re: Thread Building - Please don't reply just yet ;-)

Posted: Sun Jan 29, 2012 6:20 pm
by Buzzonion Vtec
COMMENTS


BZRKbb2 wrote:Man that's looking great :)

I've just recently started to clean out my recently purchased JDM lightweight, (with a blown H22a on the road home *sigh*) but I'm not going as hardcore on it as you...

props to you!

jezer101 wrote:I was thinking of cutting out the rear inner quarters, manily to gain acess to repair my car, but also thought i could do it as weight saving. But then i thought i wouldn't be able to use the rear seatbelts as where they mount it would be a bit weak.

With the rear shelf, did you just put the strut across, or is there something else higher up? Would a simple strut brace suffice :lol: if i cut mine out.

With the front bumper crash bar that you cut down, could you get away with not using this completely?

Liking the boot idea, and as i have a spare might have ago :wink:

tonydpp wrote:you should name this thread-
'THE BIRTH OF A MONSTER'
this is just off the scale mate,cant wait to see the progress of this
car.
you were wright,this is a 'real challenge' and it will all be worth
every second that you spent on the car when its finished.
another thing,i wish every posting was as long yours.i know i like em
and i think other people like em aswell so to my opinion the longer the better.

mills wrote:its taken me 20 minutes to read through this :lol:

great thread, looking forward to the next chapter :wink:

rob quilter wrote:Nice one mate, i appreciste the time effort and money going into a project like that. I can't wait to see the car finished! 8)

TopPrelude wrote:
Taffylude wrote:
Buzzonion Vtec wrote:speakers were removed after this was taken circa 4 years ago
:wink:
Ooops, maybe if I stop skim reading the thread it might prevent making a prat out of myself :oops:

Bri wrote:I wouldnt worry Alex I do it all the time :lol:

What a project this is :shock: . Wow is all I can think ATM

Love it 8) 8)

GIXER wrote:This car is a large part of the reason I chucked the towel in with my track prepared Lude and gave it to my son :lol: Every time I did something to mine to edge it a little closer to Richy's I'd find that he'd moved the goal posts again [smilie=hate-wall.gif] :lol:

Having had the pleasure (apart from that lap at Anglesey :shock: ) of spending some time in the passenger seat I can assure you that Richy is quite capable of getting the best out of it when it's finished 8)

scots atr wrote:ANY IDEA WHAT THE WEIGHT SAVINGS ARE WHEN PUTTING IN THE POLY WINDOWS AND WHAT THICKNESS 3 OR 4MM THINKING OF DOING MY TRACK LUDE

Re: Thread Building - Please don't reply just yet ;-)

Posted: Sun Jan 29, 2012 6:22 pm
by Buzzonion Vtec
REPLY


Firstly... apologies guys for not keeping up to date with the thread.
Not had much spare time recently as work has been absolutely manic what with the motorsport season starting and us running more and more cars in various sprints, hill climbs and race series around the country.

First things first let me just cover the questions and comments that have been posted since my last visit.


Jezer101 -
You're quite right, if you are still planning to use the rear seat belts then cutting out the rear inner quarters would be a big no no. Well actually having said that, you could cut them out to do whatever repair you need to do and then re-weld them back into place, provided that was done properly there would be no probs with still using the seat belts at all.

With regards to the cutting out of the rear seat stays and shelf. I would say that although it all looks pretty flimsy it would also be considered bracing across the car. I would personally only go that far if you plan to run with a cage and decent solid rear strut brace.
Also if you cut out much of the rear shelf as I did then you will also need to strengthen the boot hinge fixings by triangulating them to the arches otherwise they flex too much.

The bumper bar/mount could if you wanted to be completely removed but you will need to consider just how you are going to keep the reasonably rigid on the front of the car. The bumper is quite heavy when compared to say a Civic as ours have all the indicators etc fitted within them. I also chose to modify and lighten the bumper mounts in the way I did as I run with an enclosed front splitter which does create quite considerable pressure on the bumper.


tonydpp, mills, rob and bri --
Thanks for your comments, very much appreciated, I will try to keep you all informed in as much detail as I can during the build. There are many many ideas and plans that I've been working on with this project that should hopefully overcome many of the limitations that I have discovered about the Lude's design and suitability for my intended purpose. Quite alot of things will in fairness remain as Honda intended as it is very good for the most part.
It will all be very time consuming and some things may get compromised in the name of build time but these will all be revisited further down the line if needs be.
As I have said previously, unfortunately my "free" time is pretty scarce these days so work will continue in fits and starts so to speak. There may be a few weeks worth of evenings and weekends where things crack on followed by months of not actually doing a single thing to it...that's just the way it has to be when you put customers first.


GIXER -
LOL, I think the longest time the goalposts stayed in the same place (while she was being regularly used at least) was for a few months back in 2005.
Since 2006 it really hasn't seen much action at all but has seen development in fit and starts, such as the ITBs, some head development and engine management. Since the ATR piston let go though which was the best part of a year ago now unfortunately it took a back seat and only had work done in small amounts at any one time. Some niggles with the H25 engine development meant it needed a strip down and at that point the decision was made to gut the car and start again from scratch.


scots atr -
Weight savings of polycarbonate windows over glass are quite considerable especially if you consider all the window regulators, motors
etc that will also be removed. I'm afraid I can't give you exact weight savings but you'd be looking at around a 1/4 of the weight...probably less than that tbh.
4mm would be the choice generally associated with fixed windows.


Rich

Further weight reduction and 'shell prep

Posted: Sun Jan 29, 2012 6:23 pm
by Buzzonion Vtec
Update 2 – Originally Posted - Sun Apr 12, 2009 9:31 pm

http://preludeuk.forumup.com/viewtopic. ... =preludeuk

Ok so it's a been a little while since I've updated this thread...several reasons for that really.

a) Not a huge amount of dramatically interesting stuff has been done
b) Been a very busy few weeks so not had much time to get all the pics up and descriptions.

Had a really good discussion with my roll cage builders so that we all got to understand exactly what I wanted from the car. We talked about several material options from cds to cromoly but in the end the decision was made to stick with cds for cost and we would then all work towards reducing weight elsewhere in the car to compensate. They are very confident that the final weight of the cage build will be well within our proposed weights anyway. The shell is also going to be seem welded by them as tbh honest what they are going to charge me is such a decent price it just not make sense for me to spend my time doing it.

The car will be taken to them next Saturday and I have no idea then how long they'll have it...I've said no rush so I'll get it back when it's good and ready.

Anyway, here's some pics of where it's at now.


Previously modified (strengthened) boot hinge support, inner arch and jack retainer. The bootlid in no longer hinged so all of this can be removed

Image


A bit of time with mr disc cutter, mr power file and mr spot weld drill later.......

Image

Image


N/S/R inner arch received the same treatment

Image

Image


Next I needed to tackle all the previous roll cage welded in floor and arch mounts (6 in total).
I guess they could have been left in place but I am trying to shed as much weight as possible and these feet mounts are heavy dead weight. As I'm sure you can imagine this was quite a time consuming and messy job..

Image

Image


Next a bit more trimming of the inner rear quarters and also the total removal of the original seat mount frames.
The single drivers seat will be mounted on MSA/FIA approved cds tube set lower than standard and a little further back to aid with weight distribution.
Disc cutter took care of the inner quarter and the spot weld drill took care of the 100 spot welds holding the seat mount frames to the floor

Image

Image

Image

Image


With the seat rails mount frames gone it was time to tackle the front bulhead. The pics don't really show
them up very well but across the face of the bulkhead where things like heater system, wiring loom, ecu etc etc were all fixed there are 47 captive bolts and several metal brackets that simply won't be needed any more. Time to get busy again...

Image

Image


All brackets and bolts removed that won't be re-used

Image

Image


Another couple of piles of unrequired Prelude... it all adds up..

Image

Image


Work in progress....

Image


Where the old heavy welded in cage mounts had been removed I needed to repair/seal the floor and arch sections with much thinner gauge steel welded back into place. 6 cage mounts = 6 repair plates.

Image

Image


I then cleaned out all the mess (again)

Image


And then primed and painted the areas that I'd been working on just to protect them from the damp getting into it and causing rust issues later on. This is by no means the finished painting as the inside will basically get ruined by the cage install anyway. The interior paint finishing will be taken care of professionally and will be an all new colour as red and orange just don't work together lol

Image

Image

Image

Image


Here's a couple of shots of something that will in all likelihood be changed quite dramatically. I plan to remove the spare wheel well and flat floor it for several reasons.
The rear antiroll roll bar options for Preludes are very limited and so without the need for lots of awkward bends to get around the spare wheel well I can open up my choices by using some much easier to get hold of straighter shaped ARBs. Measurements and sizing have been done so I'll have plenty of options open to me.
Another reason is to open the possibility of running a full and proper rear diffuser running straight from the flat underside of the fuel tank. This may not be done immediately but the flat floor will give me the option.
How it looks now .. I need to aim to get this done during this week before it goes off for the cage fitment.

Image

Image

Image


Thanks for looking, obviously a very very long way to go yet but once the cage is in and it's painted I can at long last start building it back up instead of ripping it further apart.

More updates as and when I can :D


Rich