Anyhow, just glad I do these regular checks as I caught it before it got worse and stranded me somewhere. So I set about removing the old radiator and trying to find a replacement. Quick ebay search - turned up a cheap £30 radiator - I thought win - win. But on examining the diagram realised the fan bolt locations were in different locations. So no joy. The two rads for sale on ebay which matched mine suddenly jumped to £110 or so.
To try source one locally and quickly, I got one from my local motor factors for £97 all in. It was for a manual only which is nice - no extra pipes on the bottom for the auto box.
To help people find the correct radiator - I think my original was a Denso (1995 UK Spec). This is what seems to make the difference between types. Either Toyo or Denso. Anyway, things to look out for are the spacings between the fan bolts at the top. One pair should be 16cm apart, and the other pair 19.5cms apart. The core only is 375mm by 700mm. Posts are 620 apart on the bottom and 625 apart on the top.

Anyway, whilst I was at it - I thought it would be a good time to clean up the crossmember - which you can only really get to when the radiator and fans are out, and replace the hoses with some silicon ones I bought previously.
De-rusted (deox gel) and primed (BH Zinc Paint) and painted in Engine enamel paint.

Then I cleaned (Surfex HD) both fans - derusted the metal one - and painted in engine enamel paint. Then refit to my new radiator with new shiny bolts.

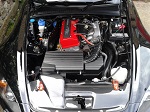
Its all back together now, with new coolant. I opened the heater to max HOT setting, opened the bleed bolt on the thermostat and poured in new 50/50 coolant with a funnel into the rad cap. I slowly filled until fluid overflowed out the bleed bolt, and tightened it up. At this time the radiator is about full too. I then started the car and left the cap off the rad for it to burb a bit. After 5 mins, I closed the cap and I opened the bleed bolt and watched the air bubble out the bleeder for about 10-15mins. This eventually slowed to next to nothing. I will check the level tomorrow morning when its cold and top up if necessary.
Job done! And its had a bit of paint and restoration in the process.