
i'm struggling to find any guide that's not a redneck youtube vid or a guide that's actually for a civic
Congratulations to vtecmec for winning May/June's Lude Of The Month, with his DIY Turbo BB1 build.
>>> Click Here For Profile <<<

>>> Click Here For Profile <<<
Changing a 4g steering gaitor
-
Drax

- Moderator
- Posts: 6268
- Joined: Wed Dec 22, 2010 4:05 pm
- My Generation: 4G
- Location: Wrexham, North Wales
- Has thanked: 16 times
- Been thanked: 381 times
Changing a 4g steering gaitor
anyone here done this themselves?
i'm struggling to find any guide that's not a redneck youtube vid or a guide that's actually for a civic
i'm struggling to find any guide that's not a redneck youtube vid or a guide that's actually for a civic
2.2 JDM DOHC SI-VTEC LSD TCS 4WS ABS BB1 MANUAL 1992

FOR PAUL
FOR PAUL
-
uberNoobZA

- Posts: 430
- Joined: Mon Feb 22, 2016 2:49 pm
- My Generation: 4G
- Location: Oxford / Sanctuary / Azeroth
- Has thanked: 17 times
- Been thanked: 14 times
-
uberNoobZA
- Posts: 430
- Joined: Mon Feb 22, 2016 2:49 pm
- My Generation: 4G
- Location: Oxford / Sanctuary / Azeroth
- Has thanked: 17 times
- Been thanked: 14 times
Aw crap - I did write a guide for this, but it was for a Civic 
I have done it before though, so let me know if you have any questions. It's simple enough.
I'm gonna go by my lockup later today to get the front lower control arms off for their bushing, so I'm happy to quickly pop off my gear gaiter to see if I can remember the exact steps required.
Do you have any specific questions on doing this yet, or are you just after a general guide ?
-
uberNoobZA
- Posts: 430
- Joined: Mon Feb 22, 2016 2:49 pm
- My Generation: 4G
- Location: Oxford / Sanctuary / Azeroth
- Has thanked: 17 times
- Been thanked: 14 times
From what I can remember, basic process is this (assuming you have stock gearknob)-
- Use trim removal tool or large flat screw driver to unclip the top of the gear gaiter from the bottom of the gear knob (insert tool / screw drivers between the two and twist it) - I can take a picture later to show what I mean
- Move gear gaiter out of the way (slide it down) so it doesn't catch when you twist the gear knob off, and twist the gear knob off (anti clockwise when looking down on gearknob)
- Slide front seats all t he way back and remove the 4 screws on each side of the front part of the center console trim (i.e. the trim around the gear level)
- Remove 2 screws holding the top part of the stereo surround in place (will have to take a picture of this to show you)
- Lift trim up (it can catch on handbrake if your handbrake is very tight
- Flip trim over and you should see 3(I think) screws holding the base of the gear geater in place, remove these screws and you can remove the base gear gaiter from the rest of the trim
- (I can't remember how to separate the gear gaiter from the thing it's stuck on, so will need to check this for you)
- Turn gear gaiter inside out, so that you can get to the tie wrap that holds the top of the gear gaiter in place - cut this tie wrap
- Fitting the replacement gear gaiter will simply be the reverse of the above process - remember to replace the tie wrap on the inside of the top of the gear gaiter BEFORE fitting the gear gaiter back to the center console trim

-
uberNoobZA
- Posts: 430
- Joined: Mon Feb 22, 2016 2:49 pm
- My Generation: 4G
- Location: Oxford / Sanctuary / Azeroth
- Has thanked: 17 times
- Been thanked: 14 times
-
uberNoobZA
- Posts: 430
- Joined: Mon Feb 22, 2016 2:49 pm
- My Generation: 4G
- Location: Oxford / Sanctuary / Azeroth
- Has thanked: 17 times
- Been thanked: 14 times
Now that I know what you're talking about... Yeah I have done one of these (2 actually - did both sides). It is a simple enough process (even for a novice like me)
I used a video guide I found online, it MIGHT have been this one here (yes I know it's for a Civic, but i's pretty much the exact same process) -
You will need to get your tracking (alignment) done after replacing this, even if you follow the recommendations in this video about taking note of locking nut position.
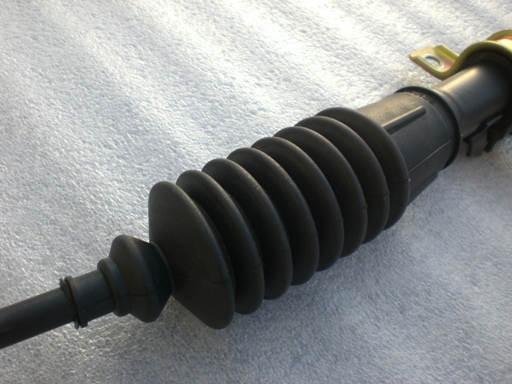
The only difficult part for me was getting the little breather pipes refitted after the new boots were in place. I had to try and use very thin needle nosed pliers and just got lucky. Instead of using the ring clamp, I used a cable tie to hold the difficult to fit breather pipes in place. So far, the breather pipes are still in place
The boots I used are these - https://www.ebay.co.uk/itm/FIRST-LINE-F ... SwZlZaFvvr
I used a video guide I found online, it MIGHT have been this one here (yes I know it's for a Civic, but i's pretty much the exact same process) -
You will need to get your tracking (alignment) done after replacing this, even if you follow the recommendations in this video about taking note of locking nut position.
The only difficult part for me was getting the little breather pipes refitted after the new boots were in place. I had to try and use very thin needle nosed pliers and just got lucky. Instead of using the ring clamp, I used a cable tie to hold the difficult to fit breather pipes in place. So far, the breather pipes are still in place
The boots I used are these - https://www.ebay.co.uk/itm/FIRST-LINE-F ... SwZlZaFvvr
Last edited by uberNoobZA on Tue Mar 27, 2018 3:38 pm, edited 1 time in total.
-
uberNoobZA
- Posts: 430
- Joined: Mon Feb 22, 2016 2:49 pm
- My Generation: 4G
- Location: Oxford / Sanctuary / Azeroth
- Has thanked: 17 times
- Been thanked: 14 times