
shame as that mold looked ace
Congratulations to vtecmec for winning May/June's Lude Of The Month, with his DIY Turbo BB1 build.
>>> Click Here For Profile <<<

>>> Click Here For Profile <<<
CF bonnet spoiler - mould finish :) & damaged :(
-
4thgenphil

- Supporter 2016
- Posts: 6661
- Joined: Tue Aug 03, 2010 4:15 pm
- My Generation: 4G
- Location: filming two girls one cup 2
- Has thanked: 5 times
- Been thanked: 29 times

I stand by that, the fibre glass moulds I've made havent been anywhere near as good as the ones I've made with this stuff.
All I'm planning is to patch the back the strengthen it and stop the crack from getting worse then need to smooth out the crack so it doesn't show on the parts that come out
All I'm planning is to patch the back the strengthen it and stop the crack from getting worse
PAW rebuilt 98 prelude 228bhp & 171lb/ft R.I.P.
PAW rebuilt 01 ATR 238bhp & 164lb/ft sold
Monte Carlo Blue 02 S2K
PAW rebuilt 01 ATR 238bhp & 164lb/ft sold
Monte Carlo Blue 02 S2K
-
mercutio

- LotM Winner
- Posts: 14958
- Joined: Sun Aug 08, 2010 8:45 pm
- My Generation: 5G
- Location: Sunny Manchester
- Has thanked: 1 time
- Been thanked: 4 times
- Contact:
maybe you should put a layer of glass fibre over the back of the mould to strengthen it
bristol_bb4 wrote:ahhh a 5th gen, i love 5th gens
Dino wrote:I loves the 5th gen really.... just dont quote me on it...
4thgenphil wrote:Mines 4 1/4 unches mate, sorry
http://www.ludegeneration.co.uk/profile ... -t618.html
-
vti2003

- LotM Winner
- Posts: 197
- Joined: Fri Sep 16, 2011 2:20 pm
- My Generation: 5G
- Location: West Sussex
Difficult one this.
Without seeing it in person the two options I would be looking at are :
1) Stop drill the cracks at each end if they dont go to the edges. Patch repair on the back couple of plies thick. Cure that off. Grind the crack out into a v shape right through the original plies but not into the plies on the back and fill with resin. One repair ply over the top to let you sand profile back in. Sand flush once cured.
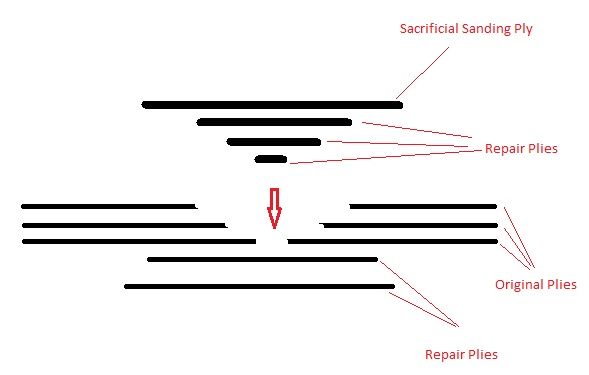
2) More complicated but stronger : Stop drill cracks. 2 x repair plies on the back. Cure off. Step sand the original plies back. If you haven't done this before then what you are doing is replacing the original plies with repair plies but not proud of the surface except for 1 sanding ply. Pic below describes it better. You need to sand each original ply back then "stepout" as in diagram. Sounds impossible but it isn't
The sacrificial sanding ply enables you to restore the contour without weakening the repair.
Crap diagram, hastily drawn!!
The repair plies should fit into the steps exactly.
Vac bag with LOW vac on the shape you have there. Something like 5-8 inhg I would think.
Once cured resand profile. It will be stronger than the original.
If you haven't stepsanded before then try and learn on your scrap bits. That's the key to cash as you can do completely flush, high strength repairs on anything then.
Hope that helps you out
Without seeing it in person the two options I would be looking at are :
1) Stop drill the cracks at each end if they dont go to the edges. Patch repair on the back couple of plies thick. Cure that off. Grind the crack out into a v shape right through the original plies but not into the plies on the back and fill with resin. One repair ply over the top to let you sand profile back in. Sand flush once cured.
2) More complicated but stronger : Stop drill cracks. 2 x repair plies on the back. Cure off. Step sand the original plies back. If you haven't done this before then what you are doing is replacing the original plies with repair plies but not proud of the surface except for 1 sanding ply. Pic below describes it better. You need to sand each original ply back then "stepout" as in diagram. Sounds impossible but it isn't
The sacrificial sanding ply enables you to restore the contour without weakening the repair.
Crap diagram, hastily drawn!!
The repair plies should fit into the steps exactly.
Vac bag with LOW vac on the shape you have there. Something like 5-8 inhg I would think.
Once cured resand profile. It will be stronger than the original.
If you haven't stepsanded before then try and learn on your scrap bits. That's the key to cash as you can do completely flush, high strength repairs on anything then.
Hope that helps you out
^^^ epic! Just what I was looking for mate. Only thing is the mould isn't layered it, it's tooling gel (epoxy based, good gloss & rigid) and glass reinforced putty which is pretty strong & rigid too (obviously not strong enough mind). Think it's cracked where the were some bleed points I'd missed when taking it back from the edge of the part.
I guess the above process could still be used for this setup as the putty gives a good surface to key with...
BTW, can you be my mentor please
I guess the above process could still be used for this setup as the putty gives a good surface to key with...
BTW, can you be my mentor please
PAW rebuilt 98 prelude 228bhp & 171lb/ft R.I.P.
PAW rebuilt 01 ATR 238bhp & 164lb/ft sold
Monte Carlo Blue 02 S2K
PAW rebuilt 01 ATR 238bhp & 164lb/ft sold
Monte Carlo Blue 02 S2K
Cool, I'll give option 1 a bash tomorrow then

... but until thenvti2003 wrote:When you have been doing this for 20 years you are gonna know a damn sight more than me the speed you are teaching yourself!
PAW rebuilt 98 prelude 228bhp & 171lb/ft R.I.P.
PAW rebuilt 01 ATR 238bhp & 164lb/ft sold
Monte Carlo Blue 02 S2K
PAW rebuilt 01 ATR 238bhp & 164lb/ft sold
Monte Carlo Blue 02 S2K