This may not be the right way, there may be better ways, but hopefully this will give someone a bit of confidence if they want to give it a go.
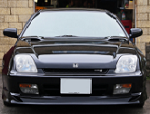
First off my cam cover is letting the bay down big time –

Now as it will take me a few days to do, my plan was to buy a cheap cam cover off ebay, use this as a practice run, then swap them covers over so I can have a go at the one on my car and still use the car it has the spare on it.
So ebay got me this for £25. I figure I can easily make this back by selling it refurbished when I have finished –

It a dodgy purple/black not very good paint job. First off was to degrease it. I used Bilt Hamber’s Surfex HD as it is water soluble and easy to work with. Dilute a strong mix of roughly 1:3 with water. Put in bucket, sprayed on and agitated with a couple of brushes –

And then onto the back –

After a good scrub, I ended up with this –


Next up was to dab on the Nitromors paint stripper. Notice the patio umbrella to keep the sun off as you are not supposed to let this dry.

This then got really messy when I put the second coat on. If you doing an OEM cover, you could probably scrape most off with a blade without the need for paint stripper, and then the last of paint stripper won’t make this sort of mess. I think it was down to the paint that was on it and perhaps the primer underneath.

I managed to wipe most of this off and then put another coat on

Which I then attacked with the pressure washer with a dirt blaster attachment to give me this –

At this point I decided to sand and polish up the letters using sand paper then wet and dry on a sanding block. I figured if do this now, there will be less effort required when sanding again later so reducing the chances of catching the new paint –

Now the goodies. Some blue masking tape, a scalpel, ipa & wipes, Bilt Hamber Etchweld (acid etch primer) and VHT red wrinkle.

I decided to go all out with the OEM style and mask off the circular lip at the base of the holes, took a bit of effort but managed to get some reasonably round cuts with the scalpel. All taped up and ready.

I then gave the cover a good wipe down with IPA and laid on a fine coat of BH primer

Applied a couple of more coats, roughly 15 minutes apart, until I had a good base

Left it for an hour or so (actually went to Sainsburys to pick up some shopping) and then applied the first of three layers of the VHT (horizontal)

5 minutes later applied a vertical layer, and then after another 5 minutes applied a diagonal layer –

At this point, the instructions say leave to dry for at least 24 hrs and then place in an over for 20 minutes to cure. Now first it won’t fit in our oven and secondly the missus would have killed me, so that idea was out the window.
So thought sod it and after about 10 minutes, went at it with a heat gun. I started off from a distance and nothing happened. I then it got quite close to the paint and kept it moving evenly. Then all of a sudden it changes appearance, starts to kind of dry off and the wrinkles start to form. At the right angle you can control this with the heat gun and go fir an even finish

I noticed it was bit thinner on the vertical edges, so just applied a bit more VHT, hit it with the heat gun again and got a reasonable finish. Out in the sun then to continue drying –

A close up of the wrinkles, looks almost like a finger print or worm trails in sand


I shaved the paint off the letters with a razor blade and then the following day masked them up ready for sanding. Hit them with a sanding block, sand paper, then some wet and dry (wet) to finish it off. Make sure a sanding block is used to keep a flat face so you only sand the raised letters –

Took off the remaining masking tape and job done


I’ve just got to get some gasket seal so I can swap this over with my cover on the car and I can then have another go and hopefully improve on the job i’ve done. The paint still feels a bit soft but being on the car will have same effect as curing it in an over, so it won’t take long to fully harden.
When I’ve done the other cam cover, I’ll put it back on with a new cam gasket, degrease this one and sell it on.
Hopefully this helps anyone who may be considering doing this. The paint stripping was messy, but the rest was relatively easy, almost therapeutic. The scary bit will be swapping them over on the car, I’ve bought a torque wrench so hopefully wont snap any bolts!