Congratulations to vtecmec for winning May/June's Lude Of The Month, with his DIY Turbo BB1 build.

>>> Click Here For Profile <<<

Image

Confused's Prelude Rebuild Thread

Tell us about your old honda preludes that you used to own.
User avatar
Confused
Posts: 749
Joined: Fri Jan 27, 2012 11:44 am
My Generation: 4G
Location: Notts / Essex
Has thanked: 3 times
Been thanked: 11 times
Contact:

Post by Confused » Thu Apr 20, 2017 4:57 pm

29th January 2007

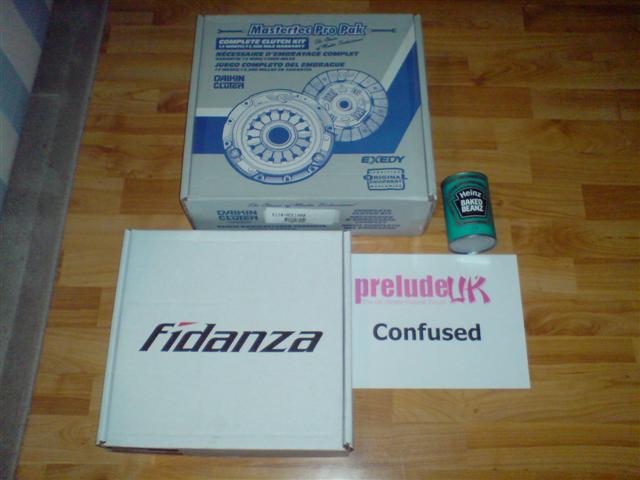
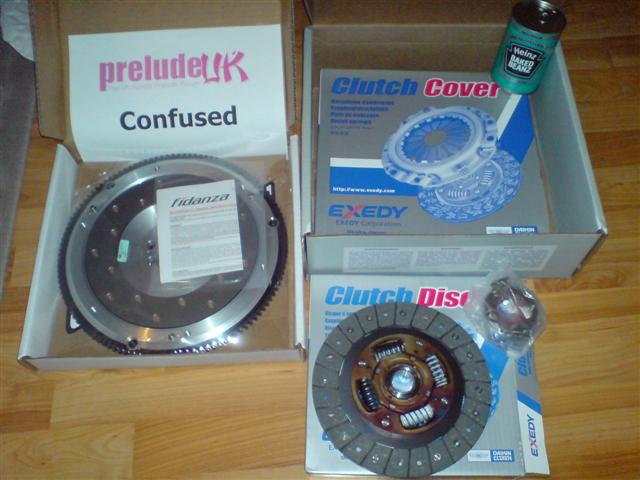
Bolted the headlight to the car on Saturday, and found that it's aim is quite a lot higher than the original light...! So, back to the drawing board to adjust it slightly ;)

Good news however is that the engine bay is all painted up! Which means I can now start bolting things back in! (Once I've stripped them off the donor, that is). Annoyingly I'm not going to get a chance to work on it next weekend, so it's going to be a VERY long 2 week wait until I can do anything else! :(

Image

Image

I've also cleaned up the insides of the wings/bonnet, removing the little spots of rust that were there. No point in doing this and not removing every spot of rust on the entire car! ;)

User avatar
Confused
Posts: 749
Joined: Fri Jan 27, 2012 11:44 am
My Generation: 4G
Location: Notts / Essex
Has thanked: 3 times
Been thanked: 11 times
Contact:

Post by Confused » Thu Apr 20, 2017 4:58 pm

13th February 2007

Finished stripping out all the wiring on Saturday :)

Image


Also went round the bodywork of the whole car and circled every single dent, no matter how large or small - so my car's currently looks like a target range! ;)

Image

Image

Also ground back and rust treated the rest of the body. Hopefully it will be rolled outside next Saturday, and the donor bought inside to strip the engine/box/loom from :)

User avatar
Confused
Posts: 749
Joined: Fri Jan 27, 2012 11:44 am
My Generation: 4G
Location: Notts / Essex
Has thanked: 3 times
Been thanked: 11 times
Contact:

Post by Confused » Thu Apr 20, 2017 4:58 pm

19th February 2007

All the dents have now been removed! :D Only took ~1:30 to remove about 20 dents from all over the car! It's amazing how well and quickly these dent removal guys can do their stuff!

The rusty bits on the sills (although not going to be visible, and not structural) have now been repaired, and the whole sills have been rust treated and undersealed :)

Image

Image

I've also swapped boot lids for the JDM one, rather than modifying the UKDM one to take the JDM numberplate surround (all the mounting holes are in different places), and it's now sitting outside.

Image

The donor has been brought inside, and I've started to strip down the engine bay, in order to remove the engine/gearbox :)

Image
When it was wheeled inside.

Image
And about an hour or so later.


Hopefully engine will be ready to come out next weekend :) I've also got a new Exedy clutch and 8lbs flywheel on it's way from the US :)

User avatar
Confused
Posts: 749
Joined: Fri Jan 27, 2012 11:44 am
My Generation: 4G
Location: Notts / Essex
Has thanked: 3 times
Been thanked: 11 times
Contact:

Post by Confused » Thu Apr 20, 2017 4:59 pm

21st February 2007

I have some new goodies! :D

Image

Image

Fidanza 8lbs lightened flywheel - CHECK

Exedy OEM replacement clutch kit - CHECK

Laminated flooring - CHECK

Tin of beans - CHECK

(and my printer has decided it doesn't want to print any blue!)

User avatar
Confused
Posts: 749
Joined: Fri Jan 27, 2012 11:44 am
My Generation: 4G
Location: Notts / Essex
Has thanked: 3 times
Been thanked: 11 times
Contact:

Post by Confused » Thu Apr 20, 2017 5:00 pm

25th February 2007

Yesterday I was stripping down the green one some more.

At start of the day:

Image

And out we go!

Image

There's a bit more room there now to get the rest out!

Image

Dashboard, heater, wiring coming out:

Image

Here's a lovely sight - 4.4 litres and ~400bhp of VTEC goodness!

Image


Tune in this time next week for more! ;)

User avatar
Confused
Posts: 749
Joined: Fri Jan 27, 2012 11:44 am
My Generation: 4G
Location: Notts / Essex
Has thanked: 3 times
Been thanked: 11 times
Contact:

Post by Confused » Thu Apr 20, 2017 5:00 pm

3rd March 2007

No piccies today :(

However, I finished strupping the wiring etc out of the donor, and due to a slight mishap and forgetting to tape up a hole in mine, stripped out the sound deadening from the donor too!

I then put mine back in the garage, and started putting the sound deadening and wiring loom back in.


I'll probably be posting the same pictures I have already, but in the opposite order soon! ;)

User avatar
Confused
Posts: 749
Joined: Fri Jan 27, 2012 11:44 am
My Generation: 4G
Location: Notts / Essex
Has thanked: 3 times
Been thanked: 11 times
Contact:

Post by Confused » Thu Apr 20, 2017 5:01 pm

12th March 2007

Another update :)

Spent Saturday cleaning and installing the following:

Heater core, blower & air-con evaporator.
Clutch pedal & master cylinder
Accelerator & Brake pedal, brake servo and master cylinder
All brake pipes reconnected to master cylinder and ABS unit.
Installed air-con pipes from evaporator to front panel.
Rubbed down, rust-treated and painted front and rear cross-member.

In addition, every bracket I've reinstalled has been rubbed down, rust-treated and resprayed! Most nuts and bolts have been replaced with clean ones, too!

My spoiler has also been returned to me, complete with a LED brake light, and straightened out from where it was twisted due to having been repaired badly in the past. The "feet" have also now been moulded to fit my boot lid exactly, with an even gap either side to the bodywork :)


No piccies, as I was so engrossed in just doing it! ;)

User avatar
Confused
Posts: 749
Joined: Fri Jan 27, 2012 11:44 am
My Generation: 4G
Location: Notts / Essex
Has thanked: 3 times
Been thanked: 11 times
Contact:

Post by Confused » Thu Apr 20, 2017 5:01 pm

19th March 2007

Another update - this time with pictures! ;)

Here's how the engine bay now looks - slightly less white as there's things in there now! ;)

General overview:
Image

Driver's side bulkhead - brake/clutch system, vacuum pipework, strut brace bracket, which necessitated the clutch master cylinder bracket being adapted and it moved elsewhere!
Image

ABS system, fuel pipes, air con pipes, clean & non-rusty crossmember :)
Image

Air con pipes, rest of wiring loom including a load of relays, washer bottle lid (as it's held by the air con bracket, I needed both to line up the air con pipe ;)
Image

And all the wiring and heater system back inside :)
Image


There's not much more to go back in the engine bay before the engine does - so next job is to start to clean up the engine/gearbox, and get the clutch/flywheel swapped, and change cambelt and auto-tensioner unit.


So next weekend you'll hopefully see some graphic engine pictures! ;)

User avatar
Confused
Posts: 749
Joined: Fri Jan 27, 2012 11:44 am
My Generation: 4G
Location: Notts / Essex
Has thanked: 3 times
Been thanked: 11 times
Contact:

Post by Confused » Thu Apr 20, 2017 5:05 pm

21st March 2007

Just got off the phone with my dad, yesterday evening he did the following:

Swap cambelt auto-tensioner.
Install new cambelt and balancer belt.
Clean up & paint rear side of engine.
Clean up and paint inlet manifold.

I also had a delivery today :)

Image

BMC CDA 150-85 and a Pipercross Breather Filter (came as a pair from eBay)

Now to try to find a place to fit it - according to JohnnyB it's quite a bit larger than his BMC CDA, and he struggled to find a place to put it :?

Image

That's sitting on top of a sheet of A4 paper, as a size reference...!

User avatar
Confused
Posts: 749
Joined: Fri Jan 27, 2012 11:44 am
My Generation: 4G
Location: Notts / Essex
Has thanked: 3 times
Been thanked: 11 times
Contact:

Post by Confused » Thu Apr 20, 2017 5:05 pm

21st March 2007

Just had another call from my dad, he's swapped the flywheel, and upon comparing the new clutch with the one that came out, the new friction disk is 8mm smaller than the old one :?

Upon checking the part number of the clutch kit I've been sent (HCK1000) with Exedy's website, it's listed as being for a 98-02 Accord 2.3L. Exedy list the KHC03 for the Prelude.

So I called GripForce Clutches in the States, and they said categorically that it is 100% compatible, and the HCK1000 supersedes the KHC03, and that the friction disk has been shrunk by 7mm.

Needless to say I'm still not convinced, so will be contacting a couple of UK suppliers of Exedy clutches tomorrow to see what they say, so I may need to get an additional friction disk of the right size. This does mean that my dad can't mate the engine & gearbox back up again tonight, as he'd planned on :(

Just as I thought it was all going so well :(

Post Reply

Return to “Gone but not forgotten”