Congratulations to vtecmec for winning May/June's Lude Of The Month, with his DIY Turbo BB1 build.

>>> Click Here For Profile <<<

Image

whats the chances?

Oooooo .... shiny!
User avatar
lucas
Posts: 1061
Joined: Sat Jan 28, 2012 3:27 pm
My Generation: 4G
XBOX GamerTag: I Lucas L
Location: Glasgow
Has thanked: 1 time
Been thanked: 5 times
Contact:

Post by lucas » Sat May 11, 2013 1:16 am

Claymore I think you are the closest member to me :D
Im in coatbridge ;)

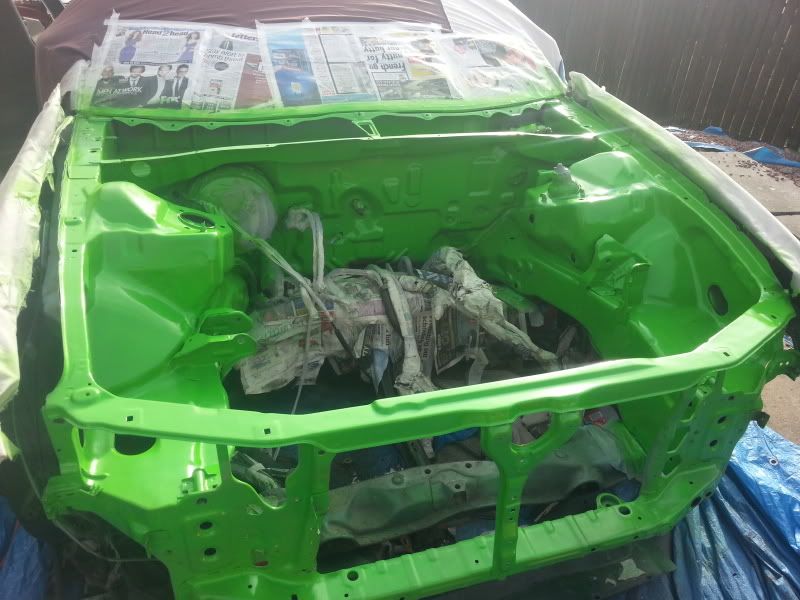
Anyway... theres a place in chapelhall called scotpaints and they can make up rattle cans in any colour.. and they are specialists paints with very high quality cans, with really good tips, not as good as a compressor and a gun bit close enough ;)

I done my full engine bay with two 500mm cans ;)
Image

Image
Image

User avatar
claymore68
Posts: 366
Joined: Sun Jan 13, 2013 5:24 pm
My Generation: 5G
PSN GamerTag: claymore68
Has thanked: 3 times
Been thanked: 4 times
Contact:

Post by claymore68 » Sat May 11, 2013 8:34 am

+rep done and well deserved too :)
Its a work in progress
Image

macky_6
Posts: 1654
Joined: Fri Jan 27, 2012 10:25 pm
My Generation: 5G
Location: Glasgow

Post by macky_6 » Sat May 11, 2013 9:56 am

That's some job @lucas 8-)

The cans at Rattrays have the same adjustable flow tips :twisted:
Image

User avatar
claymore68
Posts: 366
Joined: Sun Jan 13, 2013 5:24 pm
My Generation: 5G
PSN GamerTag: claymore68
Has thanked: 3 times
Been thanked: 4 times
Contact:

Post by claymore68 » Wed May 15, 2013 12:05 am

anyone know if your supposed to flatten metallic paint before lacquer goes on as it looks a little rough?
as always any advice appreciated . Scotpaint couldnt find a match for the paint so ended up at Rattrays , good lads in there so thanks Macky
Its a work in progress
Image

User avatar
Crazy_C
Posts: 1814
Joined: Tue Aug 03, 2010 4:42 pm
My Generation: 3G
Location: The Asylum
Contact:

Post by Crazy_C » Wed May 15, 2013 12:11 am

I usually flat with 1500 and then 2000 if the paint has come out on the rough side.
4thgenphil wrote:you're odd and that made me crap myself!
RattyMcClelland wrote:Dom with a fag in his mouth. A rare sight. :lol:
nitin_s1 wrote:I am Nitin, motha fucka!
mart609 wrote:It wasn't a good look standing around stratching my nuts every 5 minutes. Never again :lol:
Image
Image

Image

User avatar
claymore68
Posts: 366
Joined: Sun Jan 13, 2013 5:24 pm
My Generation: 5G
PSN GamerTag: claymore68
Has thanked: 3 times
Been thanked: 4 times
Contact:

Post by claymore68 » Wed May 15, 2013 12:16 am

Crazy_C wrote:I usually flat with 1500 and then 2000 if the paint has come out on the rough side.
Is that even with metallic? as theres a lot of different advice on the web :?
Cheers
Its a work in progress
Image

User avatar
claymore68
Posts: 366
Joined: Sun Jan 13, 2013 5:24 pm
My Generation: 5G
PSN GamerTag: claymore68
Has thanked: 3 times
Been thanked: 4 times
Contact:

Post by claymore68 » Thu May 16, 2013 5:02 pm

Afternoon guys, Ive looked on web and read up on how to remove oem side skirts, however they dont seem to want to come off the car and im a little nervous about putting to much force on to them as I want to paint them and reuse , so has anyone got words of wisdom as to how much force I can use , also any other advice pls.
Cheers
Its a work in progress
Image

User avatar
RattyMcClelland
Moderator
Posts: 9208
Joined: Wed Aug 04, 2010 10:02 pm
My Generation: 5G
PSN GamerTag: RattyMcClelland
Location: Leicestershire
Been thanked: 203 times

Post by RattyMcClelland » Thu May 16, 2013 5:14 pm

Undo all clips under and at the sides then slide forwards to the front of the car with force.
Image

User avatar
claymore68
Posts: 366
Joined: Sun Jan 13, 2013 5:24 pm
My Generation: 5G
PSN GamerTag: claymore68
Has thanked: 3 times
Been thanked: 4 times
Contact:

Post by claymore68 » Thu May 16, 2013 5:19 pm

RattyMcClelland wrote:Undo all clips under and at the sides then slide forwards to the front of the car with force.
done that dam thing wont budge, and ive checked all the fixings are out, was wondering what 15 years of corrosion has done to the clips?
Its a work in progress
Image

User avatar
claymore68
Posts: 366
Joined: Sun Jan 13, 2013 5:24 pm
My Generation: 5G
PSN GamerTag: claymore68
Has thanked: 3 times
Been thanked: 4 times
Contact:

Post by claymore68 » Thu May 16, 2013 5:32 pm

thanks Ratty, used a big bit of wood and away it came the back clip section was corroded and jammed so cheers :D
Its a work in progress
Image

Post Reply

Return to “Body Work / Detailing”