Congratulations to vtecmec for winning May/June's Lude Of The Month, with his DIY Turbo BB1 build.

>>> Click Here For Profile <<<

Image

BIG ISSUES IN LITTLE JAPAN

Chassis/Brakes/Steering/Wheels discussion
Lude-baz
Posts: 88
Joined: Mon Sep 16, 2013 11:50 pm
My Generation: 4G

Post by Lude-baz » Mon Sep 23, 2013 1:39 pm

I see I need to get a 36mm socket anyone near amersham bucks, got one? And marlin what upper arm will need to be removed where would I find this and what it look like thank you

User avatar
Merlin
Moderator
Posts: 12393
Joined: Fri Aug 06, 2010 9:04 am
My Generation: 5G
PSN GamerTag: Merlinbadman
Location: Edinburgh
Has thanked: 68 times
Been thanked: 303 times

Post by Merlin » Mon Sep 23, 2013 1:51 pm

I got my 36mm socket from my local motor factors for £8. There is only one upper arm, it is fairly obvious where it attaches to.

Also download a copy of the service manual if you haven't already. It is a must for doing DIY ;)
Image
BA8......... BB4......... BB8.........The JDM Muscle Bus

Lude-baz
Posts: 88
Joined: Mon Sep 16, 2013 11:50 pm
My Generation: 4G

Post by Lude-baz » Mon Sep 23, 2013 3:45 pm

Lol can someone be a gentleman or a lovely lady and send me a picture of what merlin talking about upper arm tht needs to be removed I can't see that service manual on my iPhone as it doesn't work all help appriciated and I don't have a computer to see it for myself

User avatar
Merlin
Moderator
Posts: 12393
Joined: Fri Aug 06, 2010 9:04 am
My Generation: 5G
PSN GamerTag: Merlinbadman
Location: Edinburgh
Has thanked: 68 times
Been thanked: 303 times

Post by Merlin » Mon Sep 23, 2013 4:04 pm

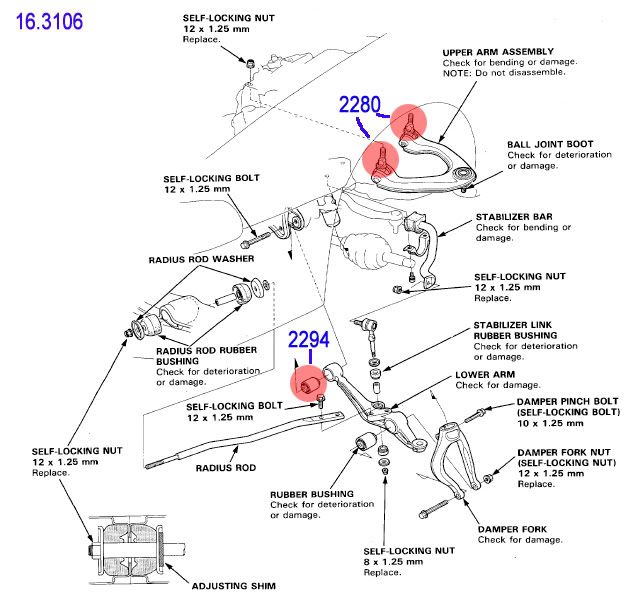
You can see the top arm in this pic. In fact the two highlighted bits at the top are the ones you want to undo from inside the engine bay.

Image
http://www.ludegeneration.co.uk/honda-p ... -t580.html
Image
BA8......... BB4......... BB8.........The JDM Muscle Bus

Lude-baz
Posts: 88
Joined: Mon Sep 16, 2013 11:50 pm
My Generation: 4G

Post by Lude-baz » Mon Sep 23, 2013 4:21 pm

Sorted il have a look merlin thanks mate so its those 2 and the damper fork and hub nut il need to remove

User avatar
Merlin
Moderator
Posts: 12393
Joined: Fri Aug 06, 2010 9:04 am
My Generation: 5G
PSN GamerTag: Merlinbadman
Location: Edinburgh
Has thanked: 68 times
Been thanked: 303 times

Post by Merlin » Mon Sep 23, 2013 4:25 pm

Yup. Then the drive shaft will clear the knuckle.
Image
BA8......... BB4......... BB8.........The JDM Muscle Bus

Lude-baz
Posts: 88
Joined: Mon Sep 16, 2013 11:50 pm
My Generation: 4G

Post by Lude-baz » Mon Sep 23, 2013 5:28 pm

Thanks il do that any problems and il come back here by the way what mm nut is on the upper arm

User avatar
Merlin
Moderator
Posts: 12393
Joined: Fri Aug 06, 2010 9:04 am
My Generation: 5G
PSN GamerTag: Merlinbadman
Location: Edinburgh
Has thanked: 68 times
Been thanked: 303 times

Post by Merlin » Mon Sep 23, 2013 7:30 pm

14mm I think.
Image
BA8......... BB4......... BB8.........The JDM Muscle Bus

Lude-baz
Posts: 88
Joined: Mon Sep 16, 2013 11:50 pm
My Generation: 4G

Post by Lude-baz » Mon Sep 23, 2013 7:59 pm

Thanks merlin, you a life saver I'm going to attempt it on Wednesday hopefully ordered my cv boot and track rod to and my 36mm socket so will give it a go thanks again to all the others on here that helped to and thanks again to merlin ( you must be merlin the wizard of preludes lol)

Lude-baz
Posts: 88
Joined: Mon Sep 16, 2013 11:50 pm
My Generation: 4G

Re: BIG ISSUES IN LITTLE JAPAN

Post by Lude-baz » Tue Sep 24, 2013 3:20 pm

Hello guys I'm thinking ahead for tommoro, I need to do the cv boot, so would need to take off the cv joint, what would be best way to take it off the shaft, would it be place cv joint I'm vice taking care not to damage the teeth of the cv joint and whilst pulling on the shaft strike hammer on cv joint, would I need to tilt the joint to one side as I strike all advice much appriciated thanks

Post Reply

Return to “Chassis / Brakes / Steering / Wheels”