Congratulations to vtecmec for winning May/June's Lude Of The Month, with his DIY Turbo BB1 build.

>>> Click Here For Profile <<<

Image

Help! my needles gone out! And sticking!

To clarify - that's In Car Entertainment - not frozen water
User avatar
JEBB4
Supporter 2014
Posts: 1239
Joined: Tue Feb 18, 2014 7:28 pm
My Generation: 5G
Location: Australia
Has thanked: 89 times
Been thanked: 75 times

Help! my needles gone out! And sticking!

Post by JEBB4 » Fri Jul 18, 2014 8:01 am

So jumped in the lude last night after work and the needle for my speedo did not illuminate! :shock:

Image

is this just a case of a bulb needs changing? Or is it guna be a pain?

Any help greatly appreciated!
Last edited by JEBB4 on Sun Jan 18, 2015 10:32 am, edited 1 time in total.
Jamie P 2013 wrote:i like tits :D
My BB6 build
viewtopic.php?f=17&t=54187

My BB2 build (yang)(WRITTEN OFF AND SOLD)
viewtopic.php?f=17&t=18866

My BB4 build (yin) (SOLD TO DRAX)
viewtopic.php?f=17&t=12087&hilit=JEBB4+ ... ty#p203321

User avatar
Vtecmec
LotM Winner
Posts: 5490
Joined: Fri Aug 06, 2010 5:43 pm
My Generation: 4G
XBOX GamerTag: vtecmec
Location: East Midlands
Has thanked: 149 times
Been thanked: 441 times

Post by Vtecmec » Fri Jul 18, 2014 8:58 am

It's usually the capacator that's blown, I'm sure you can take the feed accross from the other needle with some wire. @Pushki

Check out the bottom of this page:

http://www.ludegeneration.co.uk/post207437.html#p207437

User avatar
Pushki
Supporter 2015
Posts: 2635
Joined: Sat Aug 07, 2010 9:21 pm
My Generation: 4G
PSN GamerTag: Luigi_Black
Location: Bluff Creek
Has thanked: 2 times
Been thanked: 10 times

Post by Pushki » Fri Jul 18, 2014 10:48 am

Capacitor fix...
Stan wrote:Stolen from HR....

Image

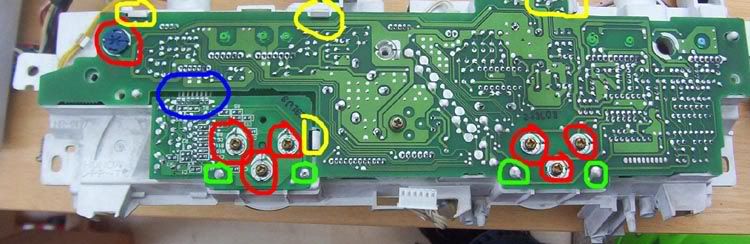
1. Remove the 6 Screws and the blue thing circled in Red (Dont worry about the screw in the middle as this holds a small heatsink onto a voltage regulator)

2. Release the plastic clips shown in Yellow (I think there is another one just off the pic on the far right)

3. Gently raise the large board upwards taking care to not damage the pins that go into the cluster that are under where the Green circles are

4. As you raise the larger board watch out for any cables that you may not have unplugged and the ribbon cable (dont bother trying to unplug it) highlighted with the Blue circle

5. When you have the larger board up a bit just lever up the smaller board (attached by the ribbon cable) and again watch the pins underneath the Green circles

Be careful with the pins I mention they connect to the needles inside the cluster

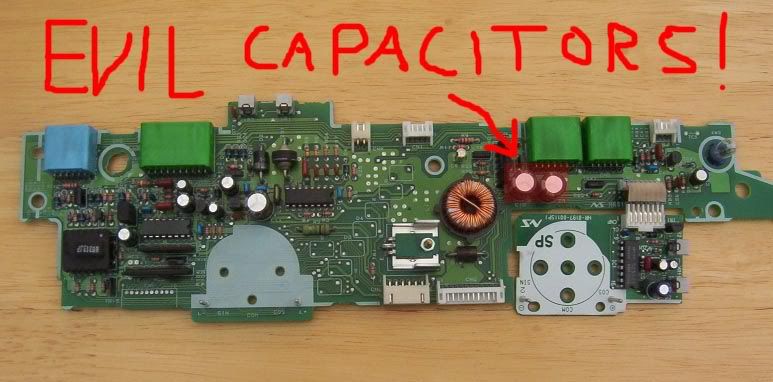
These are the bad capacitors:

Image

The best thing to do is take em both off the board by desoldering them as either one of them or both would have leaked nasty crap onto the tracks below!

When you have removed them use a multimeter with a continuity test feature to trace which tracks are too corroded to conduct then attempt to repair the tracks or bypass them with a short length of wire.

The best way to work out which ones they are is to follow them all the way to the points they terminate on the board and place the multimeter probes at the ends of them.


BTW the caps are fairly low profile (330 uF IIRC) so it might be worth checking the dimensions of em before getting a new set
Ghetto fix...
toffobob wrote:K first things first, thanks CUTZ, it never occured to me to try this!,

Ive had this problem for about a year now and when i thought the only way to fix was to resolder capacitors etc i gave up, but trying it this way works perfectly!

Heres a rough guide how to do it (took about an hour start to finish)

1. remove speaker grills
2. remove the cover above the dashlights (about 8 screws)
3. remove the rubber seal from the bottom of the dashlights
4. remove 4 screws from outer edges of the dashlight assembly
5. remove 1 screw from the centre divider of the glass
6. remove left side of dashglass first, its held in place with push clips at the top
7. unplug whichever plugs u can from the speedo/rev assembly as you can (its quite tight around there)
8. remove the cluster carefully (prising from the bottom and sliding up)

ok, now youve got the main cluster assembly out of the dash so here goes:

9. Undo the 3 screws circled:

Image

10. solder the wires as shown (make sure you put the wires to the same terminals that are coloured!)

Image

11. Job done, both dials are working!

Image
Image
ImageImageImage

User avatar
JEBB4
Supporter 2014
Posts: 1239
Joined: Tue Feb 18, 2014 7:28 pm
My Generation: 5G
Location: Australia
Has thanked: 89 times
Been thanked: 75 times

Post by JEBB4 » Fri Jul 18, 2014 11:40 pm

Cheers for that guys!

The bloody things started working again now :lol:

if it goes out for good ill get on that ghetto fix ;)
Jamie P 2013 wrote:i like tits :D
My BB6 build
viewtopic.php?f=17&t=54187

My BB2 build (yang)(WRITTEN OFF AND SOLD)
viewtopic.php?f=17&t=18866

My BB4 build (yin) (SOLD TO DRAX)
viewtopic.php?f=17&t=12087&hilit=JEBB4+ ... ty#p203321

User avatar
Pushki
Supporter 2015
Posts: 2635
Joined: Sat Aug 07, 2010 9:21 pm
My Generation: 4G
PSN GamerTag: Luigi_Black
Location: Bluff Creek
Has thanked: 2 times
Been thanked: 10 times

Post by Pushki » Sat Jul 19, 2014 12:35 am

Maybe this thread could be kept in the Wiki? @indigolemon @Merlin
I copied the information from PUK. I know it helped me when I had the same issue.

Credit to Stan, toffobob and Cutz.® ;)
Image
ImageImageImage

User avatar
Merlin
Moderator
Posts: 12393
Joined: Fri Aug 06, 2010 9:04 am
My Generation: 5G
PSN GamerTag: Merlinbadman
Location: Edinburgh
Has thanked: 68 times
Been thanked: 303 times

Post by Merlin » Sat Jul 19, 2014 6:09 pm

Pushki wrote:Maybe this thread could be kept in the Wiki?
Sorted.
Image
BA8......... BB4......... BB8.........The JDM Muscle Bus

User avatar
lucas
Posts: 1061
Joined: Sat Jan 28, 2012 3:27 pm
My Generation: 4G
XBOX GamerTag: I Lucas L
Location: Glasgow
Has thanked: 1 time
Been thanked: 5 times
Contact:

Post by lucas » Sat Jul 19, 2014 8:37 pm

Cheers guys ;)
I can fix mine now lol
Image

User avatar
JEBB4
Supporter 2014
Posts: 1239
Joined: Tue Feb 18, 2014 7:28 pm
My Generation: 5G
Location: Australia
Has thanked: 89 times
Been thanked: 75 times

Post by JEBB4 » Sun Jan 18, 2015 10:26 am

Image

I still haven't sorted this but a new fault has risen..

now tha speedo is telling me im doing 15mph when im sat still and speedo is not rising or falling as quickly as it should between 15 and 70 mph, then when you finally get it to 70 it jumps strait to about 90 and seems to work properly..

my first thought was the vss or actual dial being at fault and from what ive read on other forums it looks like it is to do with the dials..

has anyone on here had this issue?
Jamie P 2013 wrote:i like tits :D
My BB6 build
viewtopic.php?f=17&t=54187

My BB2 build (yang)(WRITTEN OFF AND SOLD)
viewtopic.php?f=17&t=18866

My BB4 build (yin) (SOLD TO DRAX)
viewtopic.php?f=17&t=12087&hilit=JEBB4+ ... ty#p203321

User avatar
Pushki
Supporter 2015
Posts: 2635
Joined: Sat Aug 07, 2010 9:21 pm
My Generation: 4G
PSN GamerTag: Luigi_Black
Location: Bluff Creek
Has thanked: 2 times
Been thanked: 10 times

Post by Pushki » Sun Jan 18, 2015 10:54 am

JEBB4 wrote:now tha speedo is telling me im doing 15mph when im sat still
Same symptoms I had. Try the fix above for the needle illumination.
This seemed to sort out all of my issues.

28kph while stationary. :?
Image
Image
ImageImageImage

User avatar
JEBB4
Supporter 2014
Posts: 1239
Joined: Tue Feb 18, 2014 7:28 pm
My Generation: 5G
Location: Australia
Has thanked: 89 times
Been thanked: 75 times

Post by JEBB4 » Sun Jan 18, 2015 11:10 am

Pushki wrote:
JEBB4 wrote:now tha speedo is telling me im doing 15mph when im sat still
Same symptoms I had. Try the fix above for the needle illumination.
This seemed to sort out all of my issues.
brilliant, I will get on that.... cheers :)
Jamie P 2013 wrote:i like tits :D
My BB6 build
viewtopic.php?f=17&t=54187

My BB2 build (yang)(WRITTEN OFF AND SOLD)
viewtopic.php?f=17&t=18866

My BB4 build (yin) (SOLD TO DRAX)
viewtopic.php?f=17&t=12087&hilit=JEBB4+ ... ty#p203321

Post Reply

Return to “Electrical / Lights / ICE”