

The original red paint on the valce cover was flaking off so I painted it in Ruby Red Pearl (R504P) to match my car's bodywork.
Last month I purchased a spare valve cover, originally from a 1994 Honda Prelude VTEC Si from threesixty (PUK member). I considered using the high temperature wrinkle red paint he supplied but in the end I chose to spray it Ruby Red Pearl to match my car's bodywork. This valve cover was fitted to my car while I worked on my original valve cover over a period of two weeks. The stages my valve cover went through were:
- Irrigated valve cover using a can of degreaser spray then rinsed with hot water.
- Stripped off the original paint using Nitromors All Purpose Paint & Varnish Remover then rinsed with boiling water from kettle.
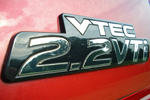
- Polished the DOHC VTEC lettering using sand paper & metal polish.
- Rubbed down the rest of the valve cover with sand paper to smooth the surface, cleaned with white spirits then soapy water before rinsing with boiling water from kettle.
- Blasted valve cover inside & out with a jet washer before giving final rinse with boiling water from kettle.
- Covered DOHC VTEC lettering, screw holes, oil cap orifice, PVC valve orifice & spark plug orifices with sticky paper labels. Wrapped rubber bands around the lips of the spark plug orifices.
- Applied two coats of U-Pol 1K Acid Etch Primer #8 then gave it a brief rub over with sand paper.
- Applied three coats of Ruby Red Pearl (R504P) paint.
- Removed protective sticky paper labels from DOHC VTEC lettering and the throttle cable clamp screws holes.
- Applied two coats of Pro XL Pro 2K clear lacquer.
- Removed rest of protective sticky paper labels & rubber bands.
- Polished out imperfections and gave it a coat of wax before fitting.


The Car Pride Engine Degreaser spray (400ml) cost me £1.00 from a high street pound shop. The Nitromors All Purpose Paint & Varnish Remover (500ml) was purchased from Halfords for £5.49. The U-Pol 1K Acid Etch Primer #8 (450ml), Ruby Red Pearl paint (400ml) & Pro XL Pro 2K clear lacquer (200ml) were purchased for £10.00 each from C & C Car Colours in Crawley.
I've since replaced four of the cylinder head cover's 6mm capped nuts with decorative metallic red items. There are eight in total, the other four are covered up, hidden away from show, so were not replaced. These cost me £1.00 each from Tegiwa Imports who were at Japanese Auto Extravaganza 2011 during September 2011. The equivalent Honda part number is 90213-PH3-000 and the official 2011 price listed by Honda is £2.12 each.


