Cheers
Congratulations to vtecmec for winning May/June's Lude Of The Month, with his DIY Turbo BB1 build.
>>> Click Here For Profile <<<

>>> Click Here For Profile <<<
5G Rear Bumper Removal?
-
rob quilter

- Supporter 2014
- Posts: 5331
- Joined: Mon Aug 09, 2010 1:40 pm
- My Generation: 5G
- PSN GamerTag: robquilter
- Location: Derby
5G Rear Bumper Removal?
Has anyone got a guide or give us any pointers for removing a 5g rear bumper?
Cheers

Cheers
PERFORMANCE PARTS FOR JAPANESE CARS - http://WWW.TOKYOSQUAD.COM
FOLLOW US ON FACEBOOK - http://WWW.FACEBOOK.COM/TOKYOSQUAD
FOLLOW US ON FACEBOOK - http://WWW.FACEBOOK.COM/TOKYOSQUAD
-
lewd lude lover

- Supporter 2015
- Posts: 5658
- Joined: Sat Aug 07, 2010 9:51 pm
- My Generation: 5G
- Has thanked: 25 times
- Been thanked: 17 times
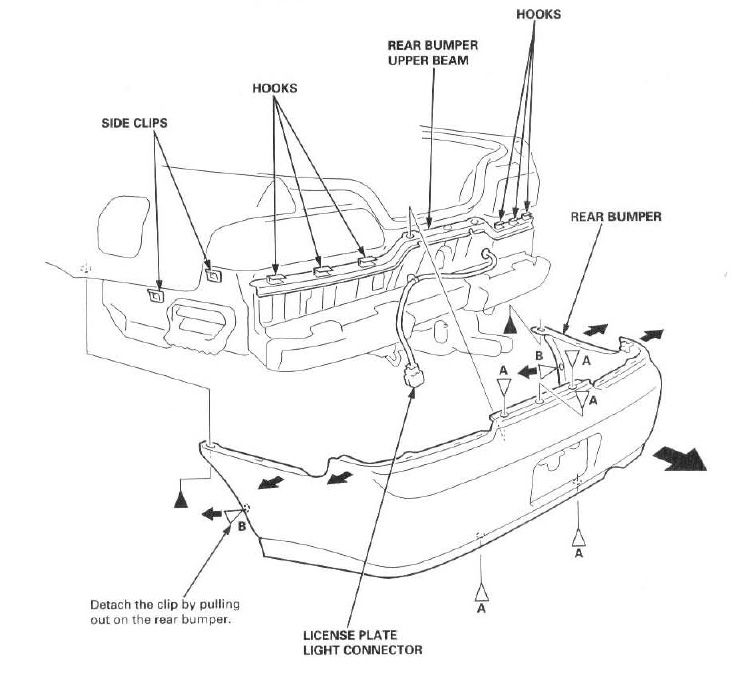
screw each side under the wheel arches.
three clips you can see when you open the boot.
get underneath and see whats attatched where. It depends on what setup you have as to whats what. some motegis have metal braces. some dont...
its easy though.
when you get everything undone you just need to pull out the sides and lift it off. there is a wire to the licence plate lamp...
Last edited by lewd lude lover on Thu May 24, 2012 7:14 pm, edited 1 time in total.
6th gen Prelude please Mr Honda. RWD 2.4 turbo lude.

-
rob quilter
- Supporter 2014
- Posts: 5331
- Joined: Mon Aug 09, 2010 1:40 pm
- My Generation: 5G
- PSN GamerTag: robquilter
- Location: Derby
Cheers dudes, going to adjust the bumper bar as I have a small gap between the bumper and rear quarters 

PERFORMANCE PARTS FOR JAPANESE CARS - http://WWW.TOKYOSQUAD.COM
FOLLOW US ON FACEBOOK - http://WWW.FACEBOOK.COM/TOKYOSQUAD
FOLLOW US ON FACEBOOK - http://WWW.FACEBOOK.COM/TOKYOSQUAD
-
RattyMcClelland

- Moderator
- Posts: 9208
- Joined: Wed Aug 04, 2010 10:02 pm
- My Generation: 5G
- PSN GamerTag: RattyMcClelland
- Location: Leicestershire
- Been thanked: 203 times

-
lewd lude lover
- Supporter 2015
- Posts: 5658
- Joined: Sat Aug 07, 2010 9:51 pm
- My Generation: 5G
- Has thanked: 25 times
- Been thanked: 17 times
-
Supermarine Blues

- Posts: 729
- Joined: Sat May 19, 2012 3:20 pm
- My Generation: 5G
- Location: Double wishbones, Hertford
- Been thanked: 4 times

-
rob quilter
- Supporter 2014
- Posts: 5331
- Joined: Mon Aug 09, 2010 1:40 pm
- My Generation: 5G
- PSN GamerTag: robquilter
- Location: Derby
Cheers Nitin, that would be helpfulnitin_s1 wrote:jobby, I forgot to send you some photos of those things that hold bumper from underneath. I'll get on it tomorrow.
PERFORMANCE PARTS FOR JAPANESE CARS - http://WWW.TOKYOSQUAD.COM
FOLLOW US ON FACEBOOK - http://WWW.FACEBOOK.COM/TOKYOSQUAD
FOLLOW US ON FACEBOOK - http://WWW.FACEBOOK.COM/TOKYOSQUAD