Written by Stan
You all know what it’s like, you’ve got your paintwork looking nice and clean, but you’re let down by all the rubber trim round the car that has turned a lovely shade of grey or even cracked off. In this guide I’m going to take you through repainting any areas of trim that have gone beyond saving (with some pics borrowed from PA.com), and in part B of the guide, I’ll give you a brief rundown on products you can use on trim that is still looking ok!
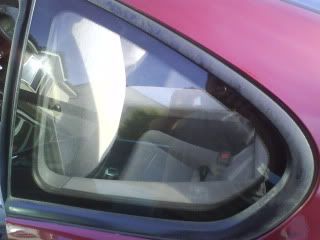
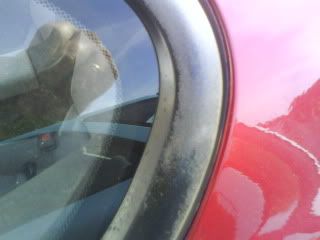
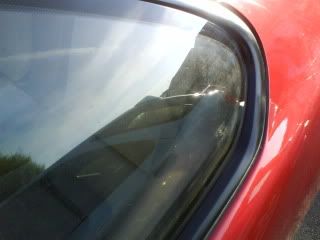
The only major trim problem that seems to occur on preludes that is hard to rectify with just chemical products is the dreaded rear quarter window flaking.
Not looking good hey? The trouble with this is that the paint has come off the trim, so although a temporary fix would be to apply a product like back to black (or your chosen choice of trim dressing), it will soon fade away because there is no rubber there to revive
So what’s the solution then? You’re gonna have to do a respray I’m afraid, but luckily it’s a simple job (half a day at most I would think), so unless you have a gf who you can’t get rid off for the day, or you think you’re a bit crap when it comes to spraying, you should hopefully be alright!

For this job you will need:
1 x Can of Urethane paint (in the colour of your choice). This is a flexible paint that is ideal for using on the trim. I would guess that you could get away with using regular car paint if you used a suitable primer beforehand, but this saves the needs to completely flatten the paint (as it goes on thicker than regular paint) and you don’t need to use a primer for it.
1 x Scotchbrite pad (green scouring pad) or sandpaper (about 1200 grit probably)
1 x roll of masking tape or blue 3M tape (code 3434 – peels off easier)
1 x newspaper to stop overspray!
1 x small bottle/can of wax and grease remover (you can use All Purpose Cleaner if you have any, and wipe off the residue with some Isopropyl Alcohol (IPA)
1 x old rag or cloth
Step 1
First thing before anything else is to mask up the area you’re going to work on. Not just for the paint but also because scotchbrite/sandpaper can scratch the paintwork. Start with masking around the window trim. Use your fingernail to pull back the trim to make sure the masking tape gets securely under the edges of it, you don’t want any visible paint at all. Then use a Stanley knife or similar to cut out tape so it fits the shape of the glass on and mask up the glass. Remember to take your time, the key to a good job is the prep that goes into it. The result should look like this.
 Step 2
Use your scotchbrite/sandpaper to scrub off all the dried rubber from the rear quarter window. Your finished product will look very scratched, but will feel smooth to the touch. Don’t worry about the scratches because as I said, the paint is very thick and will fill all the gaps. Once you have the desired finish use your wax/grease remover (or chose product of choice) to wipe down the rubber and clean up all the powder and dirt. Try to not get too much on the tape or paintwork, but do a final wipedown with some IPA if you are using All Purpose Cleaner – this will remove everything and will evaporate at the end, which most wax/grease removers do as well.
Step 3
Complete the masking of the car with newspaper. Cover both the glass and paintwork. Be very generous with the amount of area that you cover the car as over spray means extra work, again the prep is the key to an easy job!. Double check your original masking tape for looseness as the cleaner may have affected the adhesive. If necessary, reapply the masking tape. Make sure the tape is completely flat against the existing tape, because if there is a gap, the paint may find it’s way down due to gravity etc
Here is what you should end up with (and there has already been a coat of paint applied, but you get the idea of how much newspaper to use):
 Step 4
The painting!! Everyone has their own technique that they prefer. My preferred way is to dust over with one very light coat (normally so you still have some of the original surface showing through). Leave it for about 15 mins to become tacky. This will give your next coat a tacky surface to hold onto so that you can spray a heavier coat and not get runs in the paint. Always start spraying just before you are near the surface you are spraying, and move the can over and beyond the surface, then stop spraying. This ensures total coverage. After that second coat, wait about 20 mins between coats. 4 coats should get most of it covered though 5 or 6 if you have deep gaps to fill.
 Step 5
Remove the masking tape and newspaper! This can be done either when wet or dry as the paint shouldn’t run, but obviously it’s best to let it totally dry. If you do this while wet then be careful not to touch the paint – fingerprints aren’t a good look

.
If you do this when dry, then try to run around the trim gap with a Stanley knife first. This is because the paint may have bridged the gap between the trim and the masking tape, so when you remove the masking tape it may pull a bit of the paint with it, and you’ll end up with your window trim looking pretty much the same as it did before!
So hopefully after all this your window trim should look like:

As for maintaining the look, that is in the post below. Hope you are all tempted to have a go at reviving those manky window surrounds now!!