Congratulations to vtecmec for winning May/June's Lude Of The Month, with his DIY Turbo BB1 build.

>>> Click Here For Profile <<<

Image

How to: Air Con removal

As much of the Lude knowledge we have in one handy place
User avatar
NafemanNathan
LotM Winner
Posts: 20144
Joined: Sun Aug 08, 2010 9:37 pm
My Generation: 0G
Location: Yeovil, Somerset
Has thanked: 8 times
Been thanked: 121 times

How to: Air Con removal

Post by NafemanNathan » Tue Jan 31, 2012 1:15 pm

These are snippets taken from and old thread of mine on LB back when I removed mine. This really is a case of standing over your engine bay and tracking the pipework around the bay and seeing the best and easiest way to remove it. (Being our engine bays vary quite a bit depending on whether you have ABS, cruise control etc or not, means the methods used may very as well.) But honestly, if you have an ounce of technical know how, this is very simple to do :)

...Well the belt fit perfectly :D It's a "Gates" Micro-V XF belt from Motor Factors. And the code again was 6PK913.

Here's a picture of everything I removed from under the bonnet...

Image

And here's how much of a wait save it is :wink: ...

Image

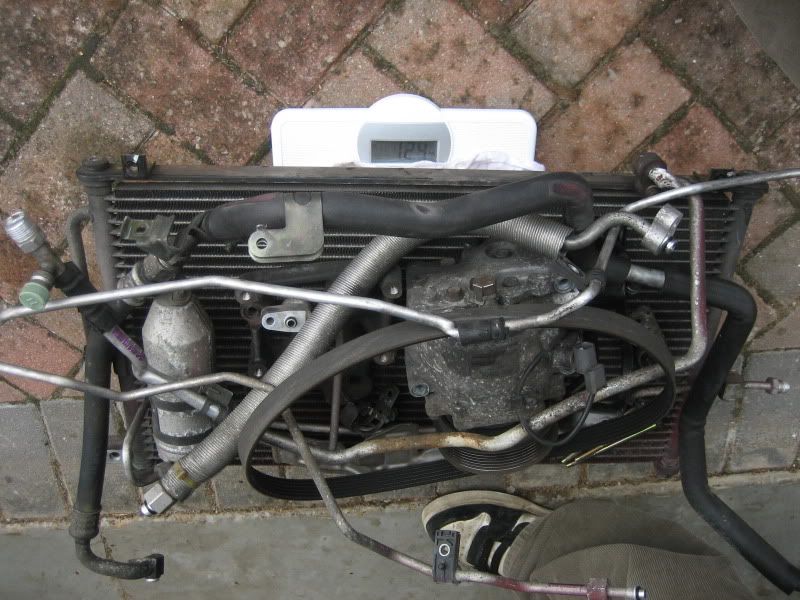
That's 12.4kg just in case you can't make it out :)

... It took me about an hour, but that's because I was cleaning as I was going :wink: ... That even included wire-brushing heads of bolts til they glowed :lol: I'd say you could easily do it within half an hour tho :)

I didn't cut any of the pipework either. I unscrewed all the connections and threaded them through, so that added time as well. I don't know why I didn't cut them as they're unusable now anyway, and I'm never putting it back again :lol: I'm just odd :P

The only thing that gave a bit of a fight as well so you know, was the larger of the two connections into the bulkhead... It was easy to start with, but then appeared to seize, as if the threads were chewed. But it turned out to be PTFE'd... and it lost in the end :wink: You just have to be persistent :D

One tip when releasing the gas (Not that I did as this is illegal :wink: ) Is to use the obvious release valve in front of the manifold/dizzy, and to use a 500ml bottle (I found an empty Cherry Coca-Cola one to work the best :wink: )... Push a small screw-driver in one side of the neck (about 2-3cm down) Then insert the neck of the bottle over the valve and use the end of the screw-driver to release the valve. I also bound the neck/valve in an old rag as well. That way, you prevent p!$$ing the compressed gas/fluid all over your engine :wink:

Then what I said on PUK...

You don't really need a how-to to remove the air-con. If you have an ounce of technical know-how it's easy. The only thing really is it's illegal to release the gas into the atmosphere. You're supposed to get it de-gassed by a professional (... The release valve is just behind the rad though if you were wondering ;-) ).

The pipes you can consider a right off and just flex/bend them to get them out. Everything else is unbolt-able to remove. Plain sailing really.

Mine was extra easy to remove as the only extra my car has was the aircon itself, but if you have luxuries like ABS and cruise-control then you may find things a little more awkward. All I suggest is standing over your engine bay and literally following the aircon parts to plan your methods.

And then what Merlin said on PUK...
Merlin wrote:As said the under bonnet is easy, just get rid of it. Do this first. Try and chop the pipes that go through the firewall as close to the fire wall as you can.

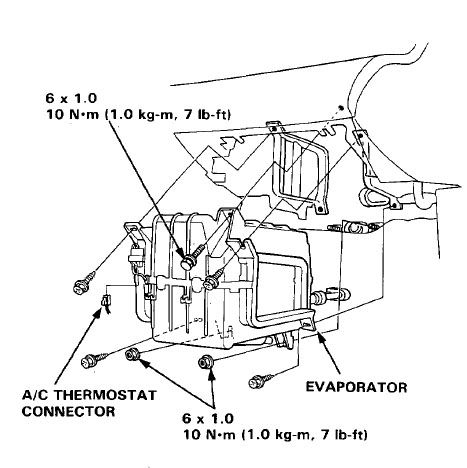
Under the dash you need to drop the glove box to get to the evaporator. The bolts for the evaporator are shown below:

Image

Once the bolts are out, grab the evaporator housing and pull as hard as you can. The evaporator housing will slide out bringing with it the pipes that go through the fire wall and the rubber grommet.

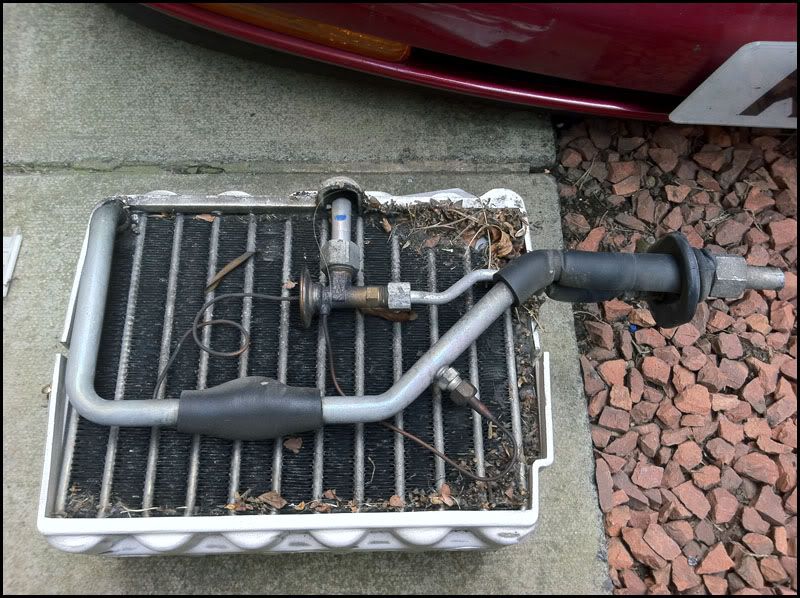
Open the evaporator housing and remove the internal contents:

Image

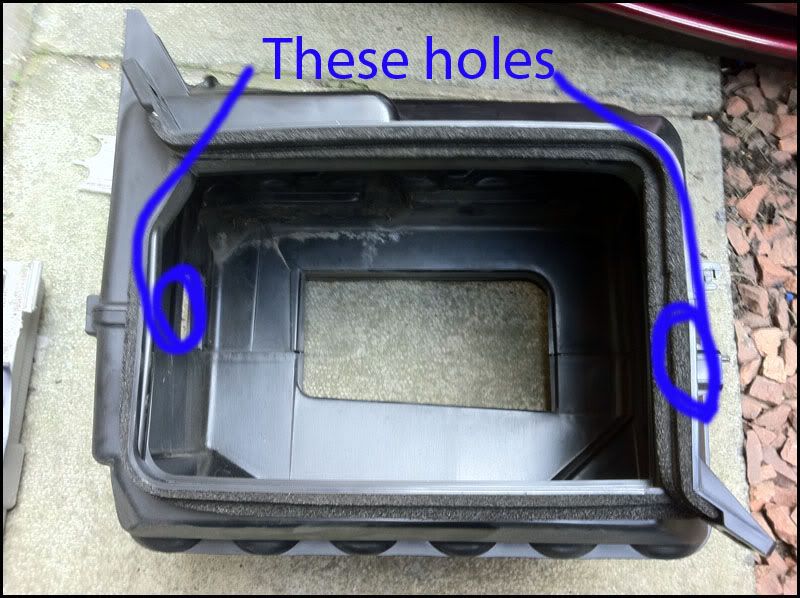
Duct tape the holes on the side of the evap unit and replace it under the dash. Duct tape the holes in the firewall.

Image


Remeber when removing the AC pump to remove the pump bracket :wink:


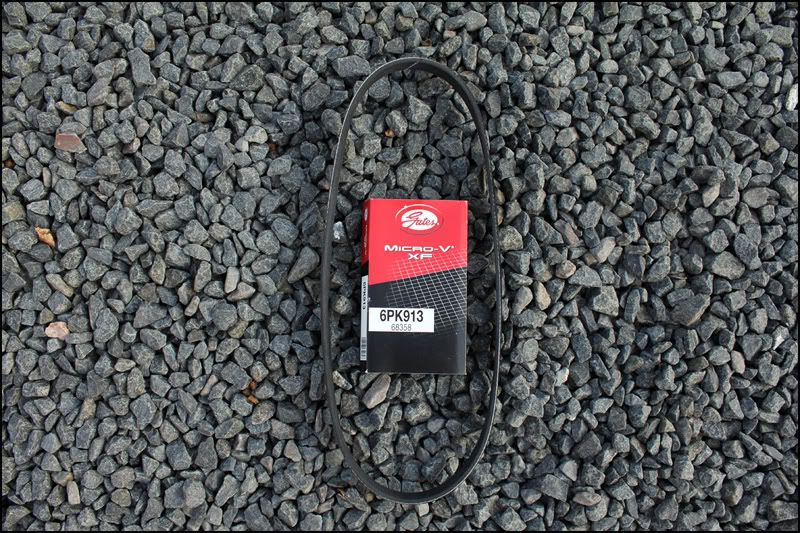
You need this belt (6PK913) to replace your old AC belt:

Image
Last edited by NafemanNathan on Tue Jan 31, 2012 1:22 pm, edited 2 times in total.

User avatar
Merlin
Moderator
Posts: 12292
Joined: Fri Aug 06, 2010 9:04 am
My Generation: 5G
PSN GamerTag: Merlinbadman
Location: Edinburgh
Has thanked: 29 times
Been thanked: 188 times

5th Gen Procedure

Post by Merlin » Tue Jan 31, 2012 1:19 pm

You can paste the bit I wrote about it on the bottom of your post if you like, then its a pretty much a complete guide. Then it can be wiki'd ;)

added
stk prelude wrote:I removed my A\C unit inside the car. 8-)

1. Remove glove box. (i got no air bags so helps to see ;) 8-) )

2. Cut & remove small plastic cross member directly behind glove box. (You don't need it for the glovebox)
Image

Image

3. Remove screws/nuts and wiring plugs holding the air con box in place - 10mm socket and about a foot long extension is needed for a couple bolts.

4.Remove the black box
Image

5. Remove metal clips and 2 screws holding the two halves of the box together.

6. Use a sharp blade to cut the foam sealing material at the joins for the two halves of the box.

7. Pull apart and remove the core.
Image

Image

8. Block off original air con pipe holes in the black box.. should be 3 holes (i cut down a hole/tube.. you'll see this when doing it.. then blocked that off.. makes it easier to get everything back in 8-) )
Image

9. Block off original air con pipe holes in the firewall.. i used the original grommet and some plastic bag and zip ties ;) :lol:
Image

Image

10. Then you need to put back the black box back in.. So basically 1-4 in reverse ;)

Anyway.. I weighed it.. it comes to 2.25kg
http://www.ludegeneration.co.uk/profile ... 4-380.html
Image
BA8......... BB4......... BB8.........The JDM Muscle Bus

User avatar
NafemanNathan
LotM Winner
Posts: 20144
Joined: Sun Aug 08, 2010 9:37 pm
My Generation: 0G
Location: Yeovil, Somerset
Has thanked: 8 times
Been thanked: 121 times

Post by NafemanNathan » Tue Jan 31, 2012 1:22 pm

Merlin wrote:You can paste the bit I wrote about it on the bottom of your post if you like, then its a pretty much a complete guide. Then it can be wiki'd ;)
Done ;-)

It's a bit of a mess at the moment, but I'll tidy it up when I've got more time. All the info's there for now :)

User avatar
Merlin
Moderator
Posts: 12292
Joined: Fri Aug 06, 2010 9:04 am
My Generation: 5G
PSN GamerTag: Merlinbadman
Location: Edinburgh
Has thanked: 29 times
Been thanked: 188 times

Post by Merlin » Tue Jan 31, 2012 1:34 pm

Cool, its linked in the wiki so feel free to amend your post at any time ;)
Image
BA8......... BB4......... BB8.........The JDM Muscle Bus

spudep91
Posts: 1127
Joined: Fri Jul 27, 2012 6:23 am
My Generation: 4G
PSN GamerTag: starletgt123
Has thanked: 3 times
Been thanked: 5 times

Post by spudep91 » Wed Aug 22, 2012 11:07 am

Hi was removing aircon there and just have to take the aircon rad out now and the pump. it looks a bit tight round the pump end do u have to take the altoneater and the other stuff round there to be abel to fit the belt thanks

User avatar
Merlin
Moderator
Posts: 12292
Joined: Fri Aug 06, 2010 9:04 am
My Generation: 5G
PSN GamerTag: Merlinbadman
Location: Edinburgh
Has thanked: 29 times
Been thanked: 188 times

Post by Merlin » Wed Aug 22, 2012 11:21 am

You dont need to remove the alternator to get the AC pump out. I would move the radiator out of the way to get access. There is enough length in the hoses to allow the rad to be turned sideways. This allows great access to the AC pump and bracket. Removing the rad altogether give the most amount of space though ;).

The PS pump will need to be slackened so that the old AC/alternator belt can be removed and the new alternator belt fitted.

Fitting the new belts is a lot easier on a car with no ABS 8-) My 5th was really fiddly while my BB4 4th gen was a piece of body lemonade.
Image
BA8......... BB4......... BB8.........The JDM Muscle Bus

User avatar
Lude-dude
Moderator
Posts: 2181
Joined: Tue Aug 03, 2010 10:39 pm
My Generation: 5G
XBOX GamerTag: Vtec Junky
PSN GamerTag: Rob7niner
Has thanked: 3 times
Been thanked: 3 times

Post by Lude-dude » Wed Aug 22, 2012 12:11 pm

I have a question on how to remove the under dash unit

in the manual it says to cut the plastc by the glovebox, dont really want to do this.

can it be removed without taking out the dashboard?
Image

H22a5 UKDM 2.2 VTI 244Bhp 180lbs/ft Crower stage 2
http://www.ludegeneration.co.uk/profile ... t3211.html

User avatar
Merlin
Moderator
Posts: 12292
Joined: Fri Aug 06, 2010 9:04 am
My Generation: 5G
PSN GamerTag: Merlinbadman
Location: Edinburgh
Has thanked: 29 times
Been thanked: 188 times

Post by Merlin » Wed Aug 22, 2012 12:15 pm

Lude-dude wrote:I have a question on how to remove the under dash unit
Just the evaporator? The 5G bible does say to cut the glove box cross brace and to discard in order to get access. There is no mention of replacing it with another. Do you have a pic of the cross brace? I can't figure it out in my head.
Image
BA8......... BB4......... BB8.........The JDM Muscle Bus

spudep91
Posts: 1127
Joined: Fri Jul 27, 2012 6:23 am
My Generation: 4G
PSN GamerTag: starletgt123
Has thanked: 3 times
Been thanked: 5 times

Post by spudep91 » Wed Aug 22, 2012 12:41 pm

My lude has abs :twisted:

User avatar
Lude-dude
Moderator
Posts: 2181
Joined: Tue Aug 03, 2010 10:39 pm
My Generation: 5G
XBOX GamerTag: Vtec Junky
PSN GamerTag: Rob7niner
Has thanked: 3 times
Been thanked: 3 times

Post by Lude-dude » Wed Aug 22, 2012 1:15 pm

Merlin wrote:
Lude-dude wrote:I have a question on how to remove the under dash unit
Just the evaporator? The 5G bible does say to cut the glove box cross brace and to discard in order to get access. There is no mention of replacing it with another. Do you have a pic of the cross brace? I can't figure it out in my head.
I will have to investigate :geek:
Image

H22a5 UKDM 2.2 VTI 244Bhp 180lbs/ft Crower stage 2
http://www.ludegeneration.co.uk/profile ... t3211.html

Post Reply

Return to “Guides / How to's / Tech Section”