
Matt wrote:Quote of the week, possibly longer.Nathan wrote:It's ok... I didn't have any ice cubes anywayI just had a tissue, my finger and a small bowl of water
... :-s
Congratulations to vtecmec for winning May/June's Lude Of The Month, with his DIY Turbo BB1 build.
>>> Click Here For Profile <<<

>>> Click Here For Profile <<<
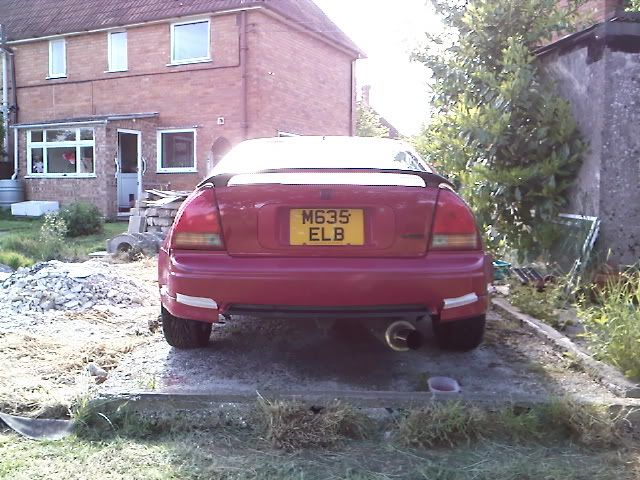
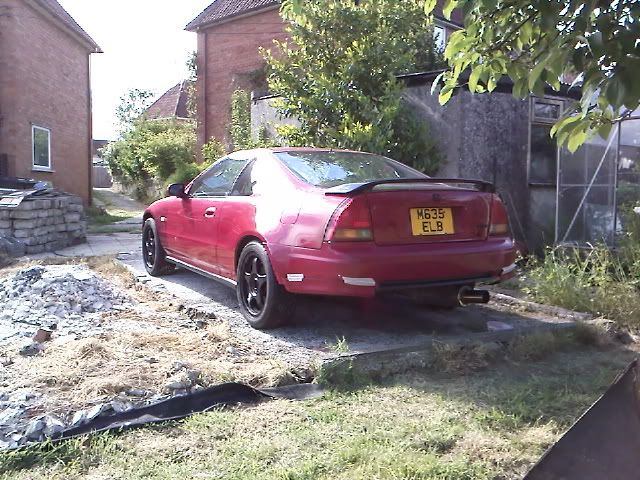
Nathan's Road-Legal/Track BB4
-
NafemanNathan

- LotM Winner
- Posts: 20144
- Joined: Sun Aug 08, 2010 9:37 pm
- My Generation: 0G
- Location: Yeovil, Somerset
- Has thanked: 8 times
- Been thanked: 124 times
Re: PLEASE DO NOT POST IN THIS THREAD YET (Under Constructio

-
NafemanNathan
- LotM Winner
- Posts: 20144
- Joined: Sun Aug 08, 2010 9:37 pm
- My Generation: 0G
- Location: Yeovil, Somerset
- Has thanked: 8 times
- Been thanked: 124 times
Re: PLEASE DO NOT POST IN THIS THREAD YET (Under Constructio
Floydie wrote:Nathan wrote:It's ok... I didn't have any ice cubes anywayI love this club!Matt wrote:Quote of the week, possibly longer.
-
NafemanNathan
- LotM Winner
- Posts: 20144
- Joined: Sun Aug 08, 2010 9:37 pm
- My Generation: 0G
- Location: Yeovil, Somerset
- Has thanked: 8 times
- Been thanked: 124 times
-
NafemanNathan
- LotM Winner
- Posts: 20144
- Joined: Sun Aug 08, 2010 9:37 pm
- My Generation: 0G
- Location: Yeovil, Somerset
- Has thanked: 8 times
- Been thanked: 124 times
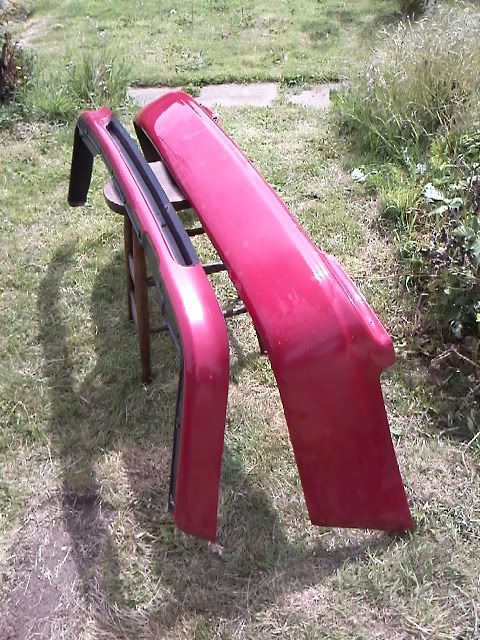
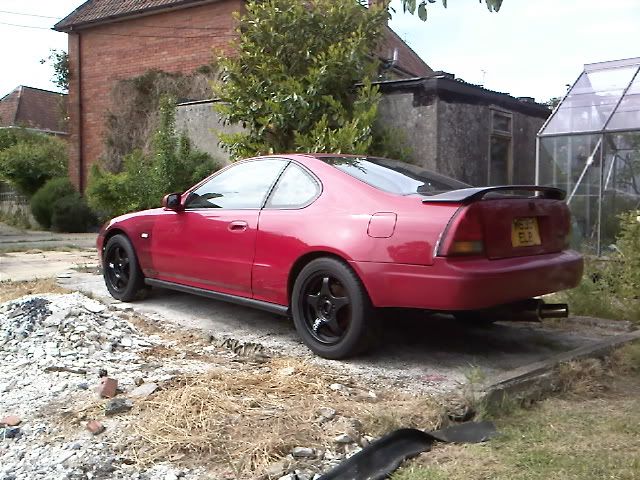
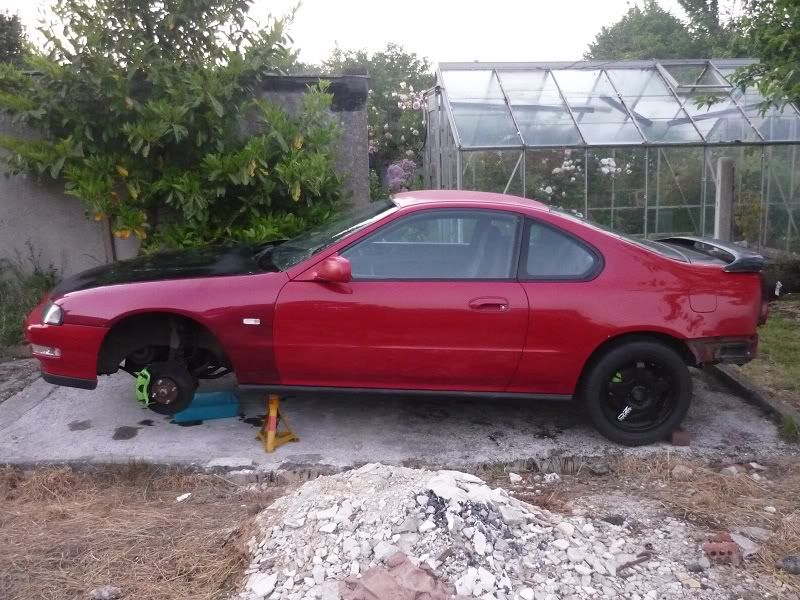
(LB) Bodywork Attention & Rear Bumper Concept
And for today's almost pointless exercise...
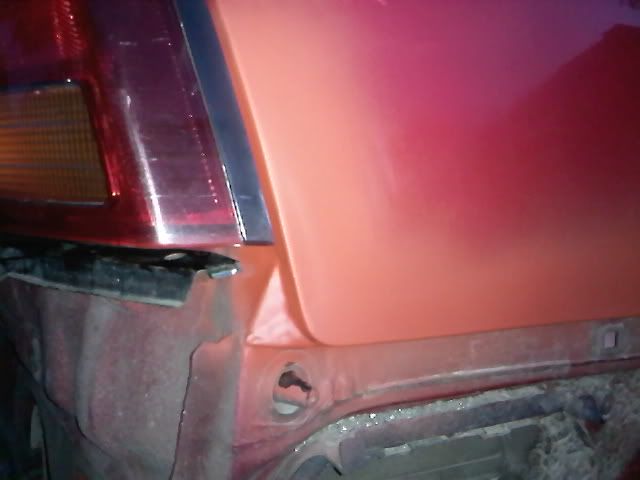
When I first got my lude, barr the subtle front end shunt it had had once upon a time... It's only other wound was this...
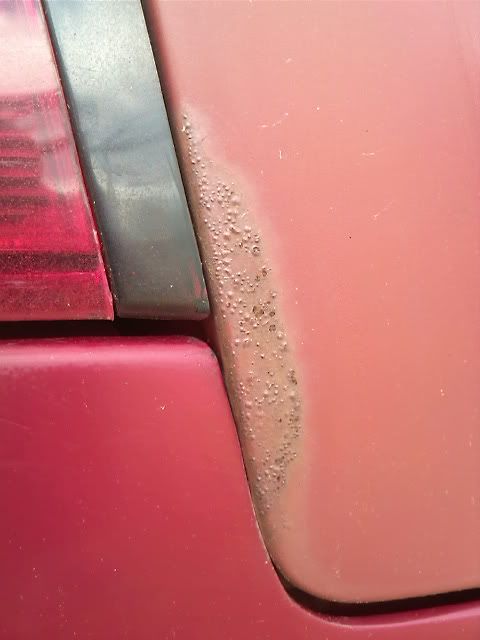
It had been caused by the rear bumper dislodging somehow and taking the paint off the metal work. I'd sanded it down and primed it once before, but being I hadn't sealed it with paint, it had started to bobble up again.
On the other side, where it had had a slight crumpling from when my girlfriend couldn't find the handbrake one time (#-o) and I'd had it repaired by Honda, the paint they'd literally slapped on had started to crack...
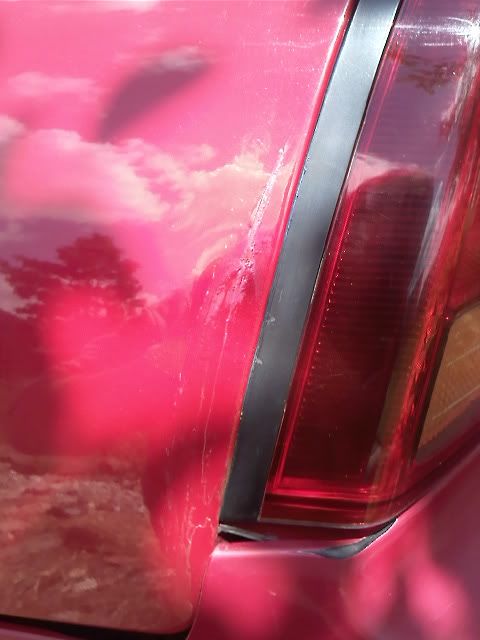
I had told them not to bother spraying it up as I didn't want to pay for it being the whole car is eventually going to get a spray job, but the guy put some paint on it to seal it anyway... I believe with a paint brush
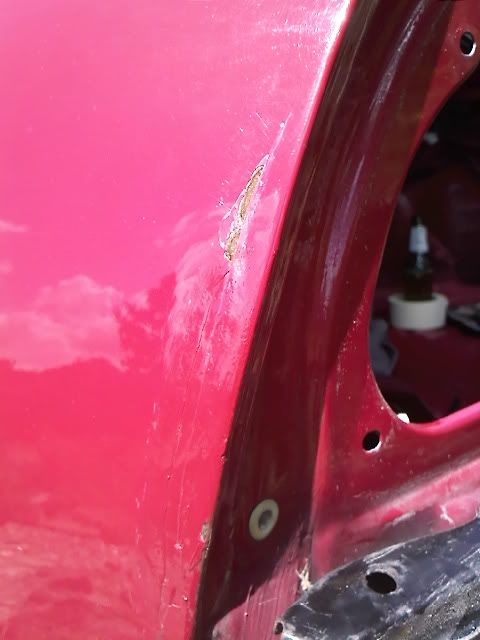
So I picked off the loose stuff to reveal some recently formed rust...
Treated it, then sanded it down... Along with the other side...

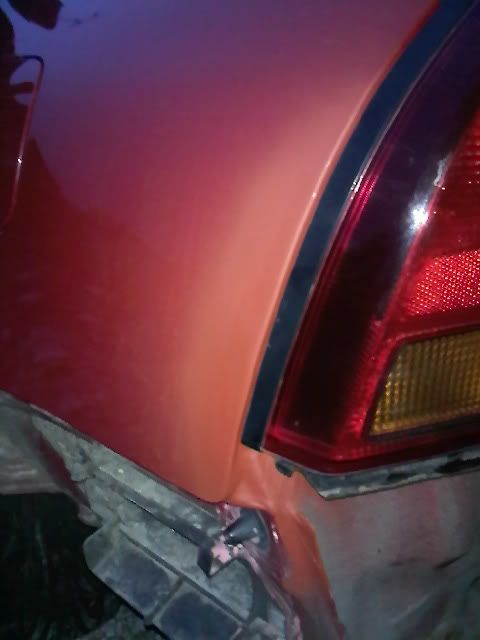
Then I primed them both ready to paint tomorrow...
(I forgot to take some pictures intially, hence the darkness )
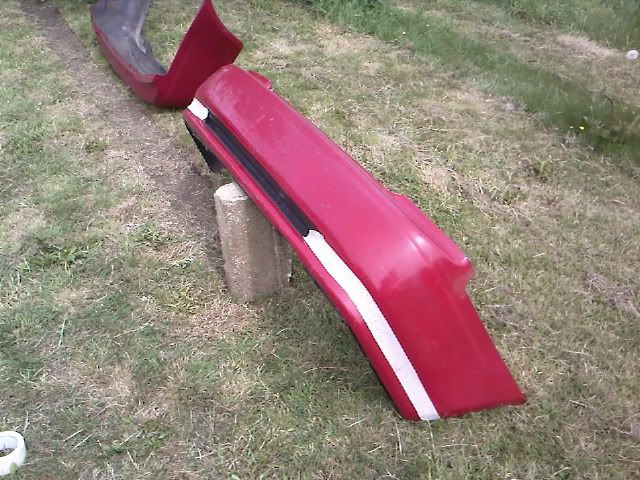
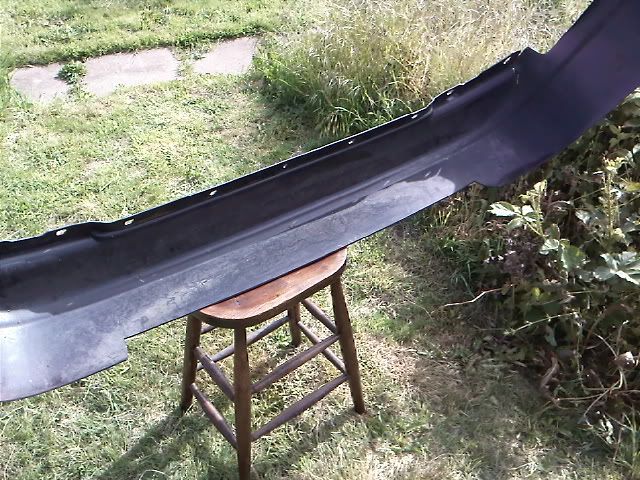
Then I decided to try something I've intended on trying for a while. I thought I'd take advantage of my cracked rear bumper from the "incident", and try a slight modification...
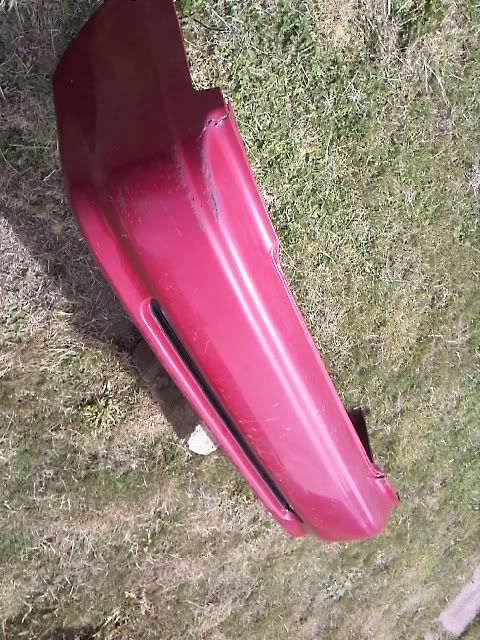
Ever since I read the february issue of Banzai I've been inspired by this...
So...
And...

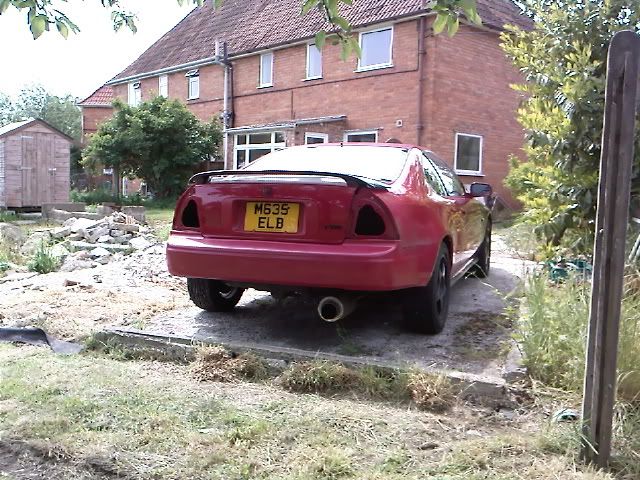
Looks odd ... So I thought I'd try it with my new lights ...

I'm not sure I like my new lights ... So I thought I'd put my originals back...

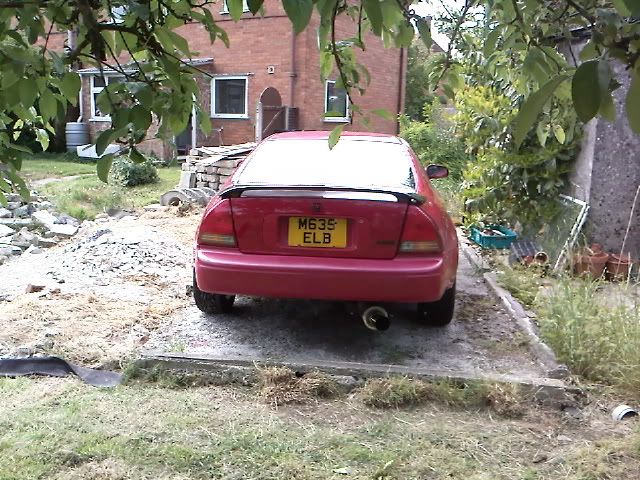
Looks better, but it just looks too plain... So...

Then...

And...
To...

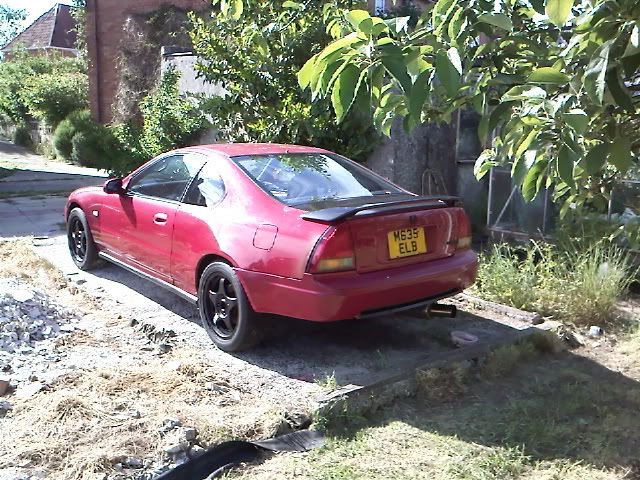

The pictures are bad I know. It still wasn't doing it for me, so I went all out and...

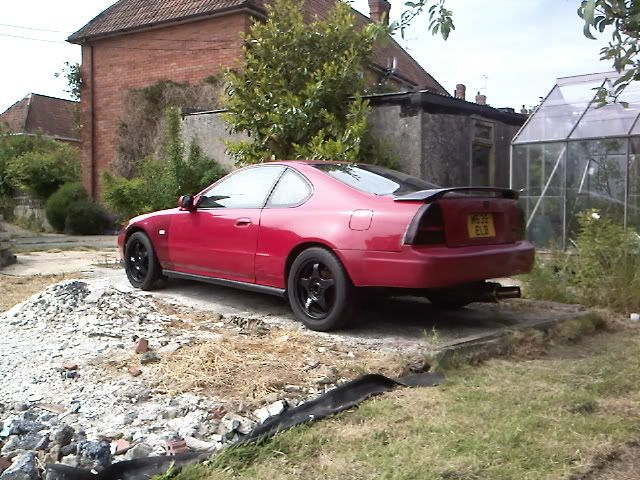
I think it's starting to look better, but that's nothing like what I intended it to look like and that's a whole lot of blending to do, and not having the correct set up it's just gonna have to wait! So once I've sprayed up the corners tomorrow, the oem bumper's going right back on!
... But at least I got to sit out in the sun all day
When I first got my lude, barr the subtle front end shunt it had had once upon a time... It's only other wound was this...
It had been caused by the rear bumper dislodging somehow and taking the paint off the metal work. I'd sanded it down and primed it once before, but being I hadn't sealed it with paint, it had started to bobble up again.
On the other side, where it had had a slight crumpling from when my girlfriend couldn't find the handbrake one time (#-o) and I'd had it repaired by Honda, the paint they'd literally slapped on had started to crack...
I had told them not to bother spraying it up as I didn't want to pay for it being the whole car is eventually going to get a spray job, but the guy put some paint on it to seal it anyway... I believe with a paint brush
So I picked off the loose stuff to reveal some recently formed rust...
Treated it, then sanded it down... Along with the other side...
Then I primed them both ready to paint tomorrow...
(I forgot to take some pictures intially, hence the darkness
Then I decided to try something I've intended on trying for a while. I thought I'd take advantage of my cracked rear bumper from the "incident", and try a slight modification...
Ever since I read the february issue of Banzai I've been inspired by this...
So...
And...
Looks odd
I'm not sure I like my new lights
Looks better, but it just looks too plain... So...
Then...
And...
To...
The pictures are bad I know. It still wasn't doing it for me, so I went all out and...
I think it's starting to look better, but that's nothing like what I intended it to look like and that's a whole lot of blending to do, and not having the correct set up it's just gonna have to wait! So once I've sprayed up the corners tomorrow, the oem bumper's going right back on!
... But at least I got to sit out in the sun all day
Last edited by NafemanNathan on Tue Feb 07, 2012 2:07 pm, edited 1 time in total.
-
NafemanNathan
- LotM Winner
- Posts: 20144
- Joined: Sun Aug 08, 2010 9:37 pm
- My Generation: 0G
- Location: Yeovil, Somerset
- Has thanked: 8 times
- Been thanked: 124 times
Re: PLEASE DO NOT POST IN THIS THREAD YET (Under Constructio
Matt wrote:That final version looks really good mate; like you say, would take a bit of smoothing in but I think it could look really good.
Like your way of working too, much the same as mine;
Idea>Action>Bodge>Result
Good darts.
Crazy_C wrote:That looks really cool man, like the look of it. Need some sick ass diffuser to go under there now
Floydie wrote:I reckon the back's tasty. If you can get the sides sorted out, you're on a winner!
-
NafemanNathan
- LotM Winner
- Posts: 20144
- Joined: Sun Aug 08, 2010 9:37 pm
- My Generation: 0G
- Location: Yeovil, Somerset
- Has thanked: 8 times
- Been thanked: 124 times
Re: PLEASE DO NOT POST IN THIS THREAD YET (Under Constructio
Sides are on their way ... Right Rob?!
I enjoyed doing it and I want it to be a little different to the norm, though that plastic is tough ****! I've already been thinking along a rear diffuser idea. I've seen the odd one pop up on ebay before now, which I could incorporate into my existing OEM bumper. That would obviously replace the lower centre portion, but like I said, the whole thing's going to have to wait sadly. No biggy though... I'll just carry on with the engine mods until then
Speaking of which, the girlfriends just buggered off to the cinema, so I'm now going to go bugger off outside
-
NafemanNathan
- LotM Winner
- Posts: 20144
- Joined: Sun Aug 08, 2010 9:37 pm
- My Generation: 0G
- Location: Yeovil, Somerset
- Has thanked: 8 times
- Been thanked: 124 times
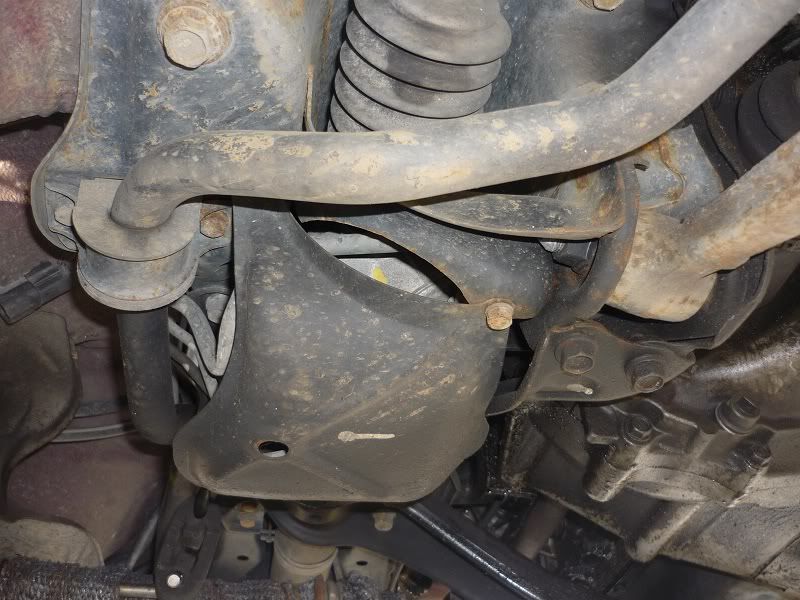
(LB) PAS Removal
As requested, a brief update of yesterday's work...
Well I decided the other day whilst moving the lude into her resting spot that the PAS has to go! The pump had started making a a squealing noise and the steering started juddering nearing full lock just before I stopped driving her and it had just gotten worse. So rather than replace the pump, it obviously helped persuade me to just do away with the lot
Anyway, I started removing it yesterday. I've been taking pictures of the progress, but being I haven't finished the whole job yet, I haven't uploaded them yet either.
But as it stands... the pump, belt, cast bracket, reservoir and a whole variety of pipes and other smaller brackets have been removed. This was once I'd drained the fluid by undoing the four pipes to the steering rack itself. All that was a doddle. ... The pipes behind the engine block however are a different story... They're a complete b*t*h to get at! There are a number of clip-in and 10mm bolted brackets behind there, and had I had the hands the size of a baby and arms of Mr Fantastic then it might not be so bad, but as it stands they are yet to be removed.
... I would have finished removing them tonight though... Had I not locked my one and only key inside the car when packing up last night ](*,)
So Part 2 is going to have to wait lol
Last edited by NafemanNathan on Tue Feb 07, 2012 2:07 pm, edited 1 time in total.
-
NafemanNathan
- LotM Winner
- Posts: 20144
- Joined: Sun Aug 08, 2010 9:37 pm
- My Generation: 0G
- Location: Yeovil, Somerset
- Has thanked: 8 times
- Been thanked: 124 times
Re: PLEASE DO NOT POST IN THIS THREAD YET (Under Constructio
Part 2. (I'll word this in "How-to" format )
So, a brief recap... With pictures...
Firstly I jacked the car up. Removing the wheels firstly helped with ease of getting in and out from under the car, plus also aloud a bit more light under there. But I mainly did this as she's going to be parked up for a while and I didn't want the tyres drying out...
Once under the car I started by removing the three 10mm bolts to remove the protective cover...
Once removed, that revealed the four pipes to contend with...
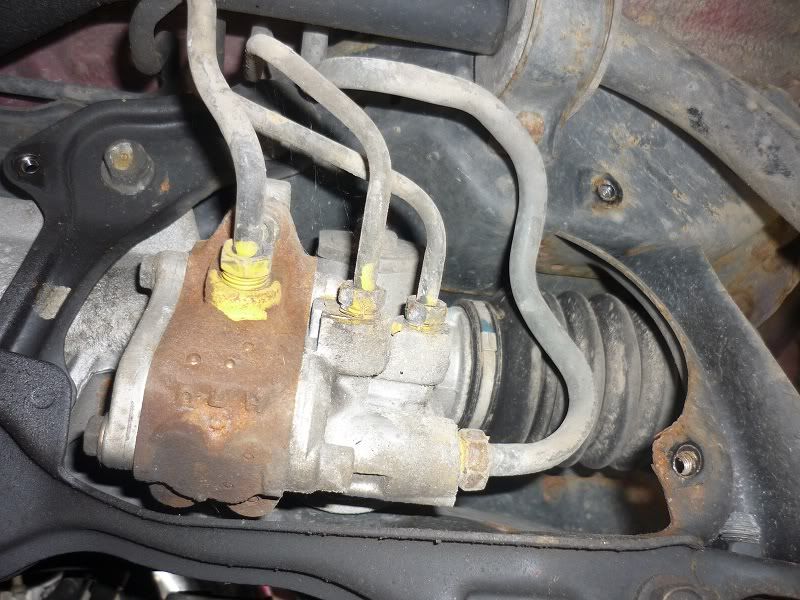
I carefully loosened and pulled the four pipes from the block and allow the fluid to drain... Into a suitable contain... I chose a deep tray (The cat's old litter tray) to allow for splutter as I then turned the wheels from full lock to full lock to force as much of the fluid out as possible...
The less fluid in the steering rack, the less resistance there will be. You'll never get it all out, but the remaining dreads will act as a lubricant, so this is fine.
Whilst the fluid is draining I took the opportunity to stand again and start removing the components from the engine bay. I started with the pump itself and then removed all the connecting pipework as I went. This made things easier and means I also don't have to describe every pipe to be removed to you
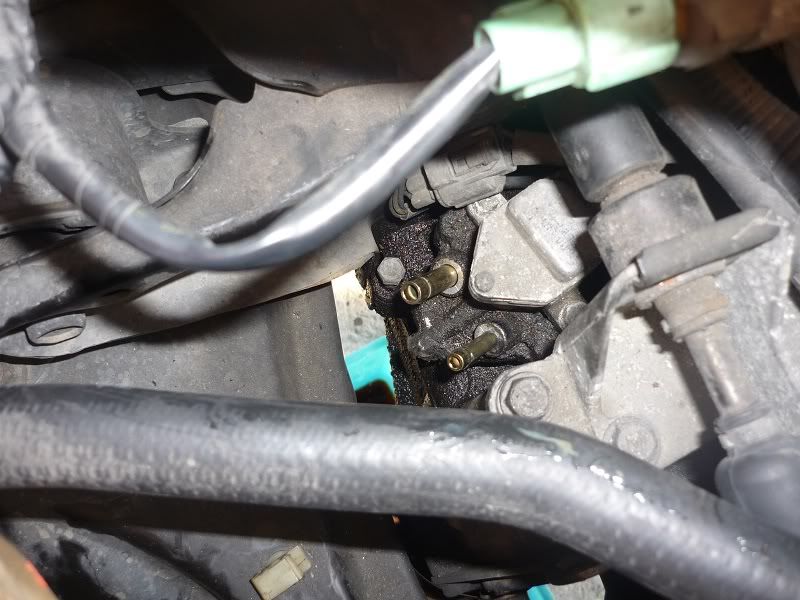
When doing this be careful as there will still be fluid in some of the pipes. It was also a lot easier to cut some of the pipes as well. Put it this way, once you've moved it, you'll realise you'll never want to put it back again, so you may as well make it as easy as possible to remove by cutting through When I came to removing the pipework from behind the block this is where things got awkward. It's very tight behind there and there are a few plastic clips and 10mm-bolted-down-brackets to remove which are a real pain! I persisted and eventually got them I found it easier to remove my induction kit as well.
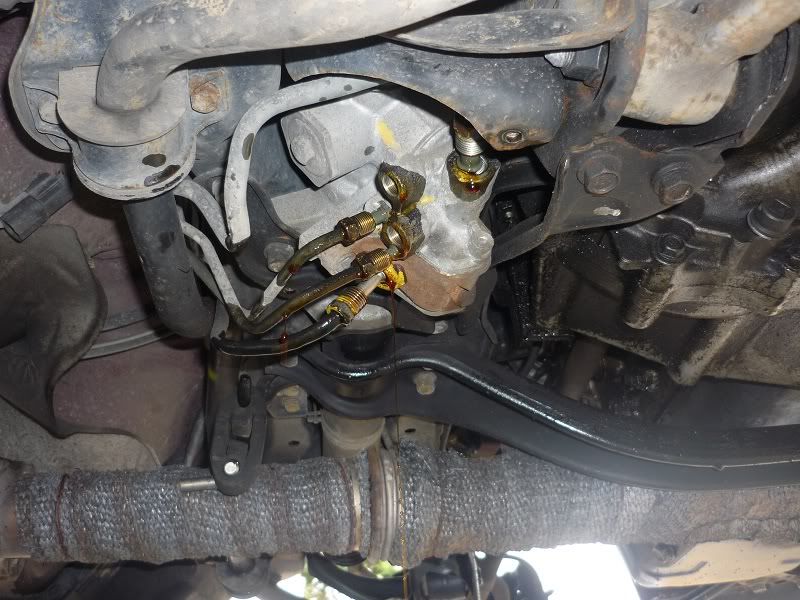
For the last bit of pipework (to the steering rack) I needed to remove these from underneath the car again. I needed to keep the ends of these bits, so made sure the ends weren't damaged...
Once removed, all I had remaining of the PAS was this...
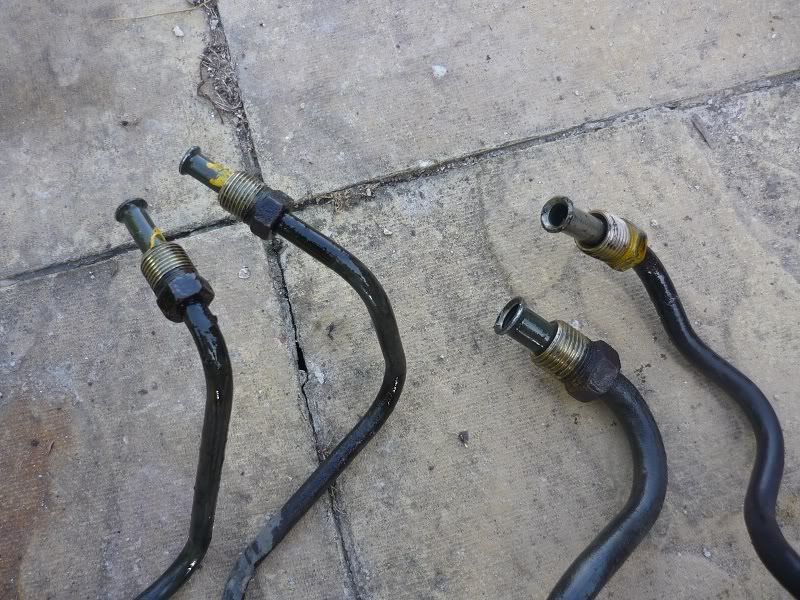
I then cut off the ends of the pipes like this...
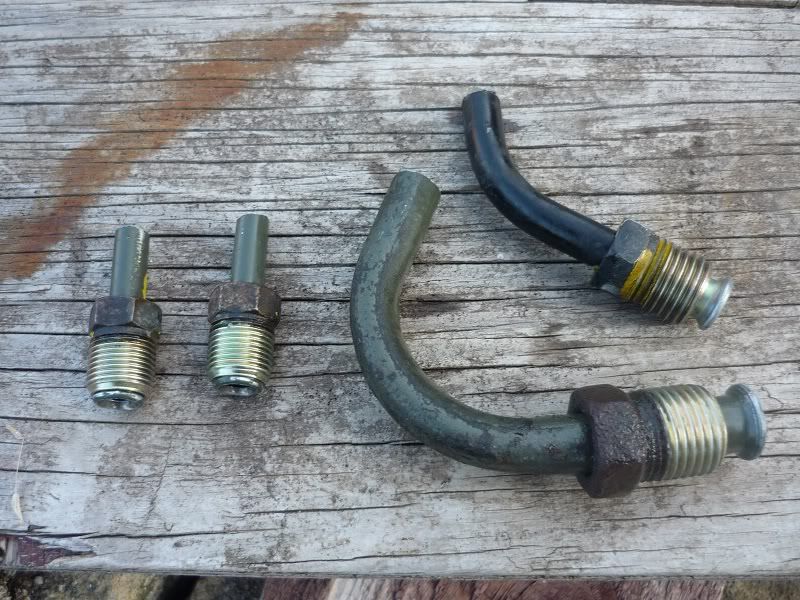
Filed down the sawed-off ends and de-bur them. Making sure they were clean with no sworf.
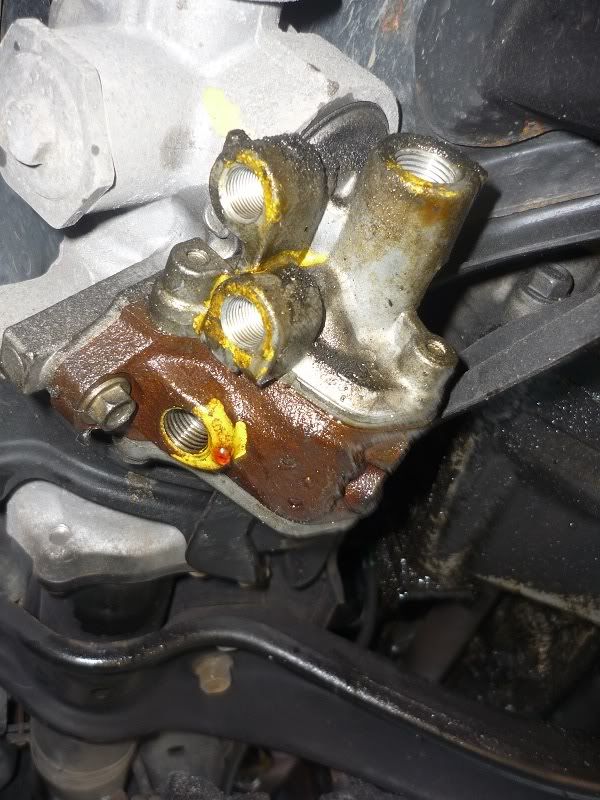
These then needed to be re-connected to the steering rack like so...
I made sure the two larger pipes are roughly pointing towards one-another.
Then by salvaging some appropriate rubber pipe from everything that had been removed, I found two lengths and cut to size. I made sure these were of a reasonably tight fit and cut off any dried/cracked ends and connect up the pipe work in this sequence...
I salvaged some clamps as well.
Then I refit my freshly cleaned protective sheild...
Now I was done under the car
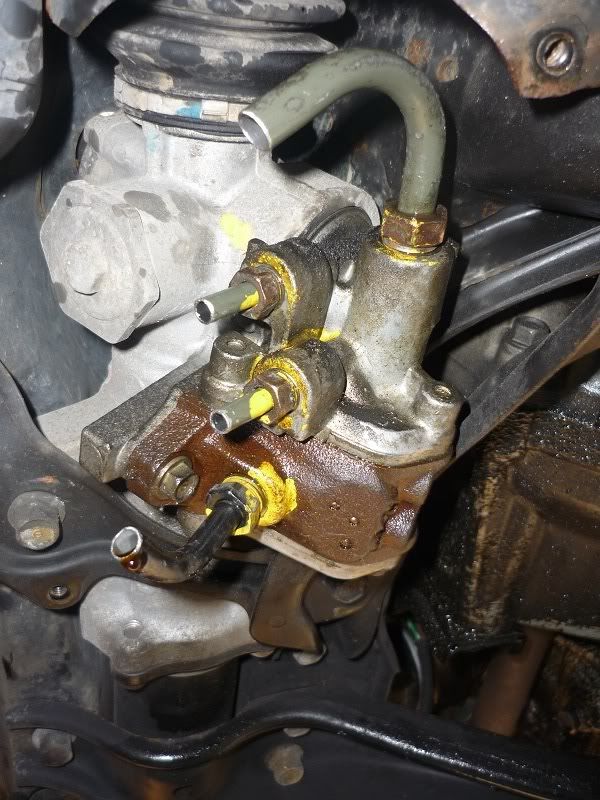
This just leaves one more connection to make...
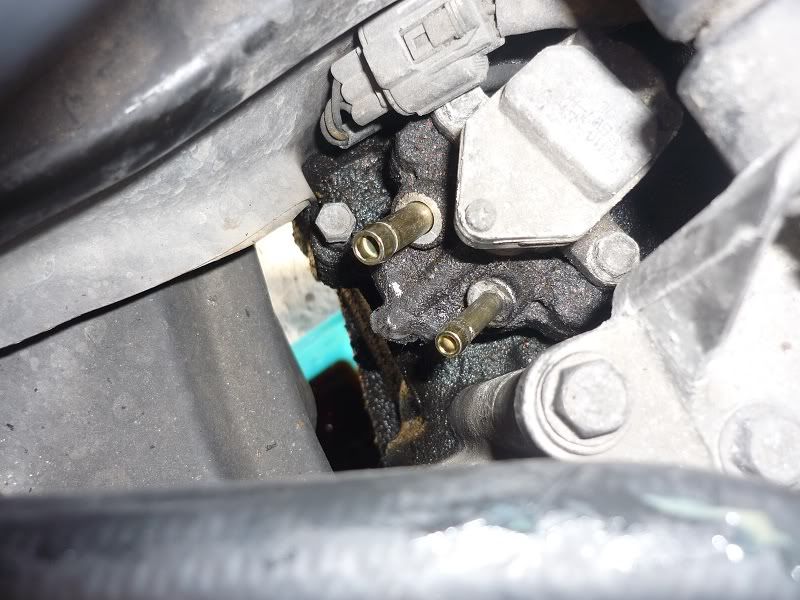
These two pipes found under the throttle body...
I've not yet connected them. It's only a short connection to make. A length about 10cm long should do it, but one OD is 8mm, where as the other is 6mm and I have no such pipe to salvage. But I shall connect these up before anything else is done.
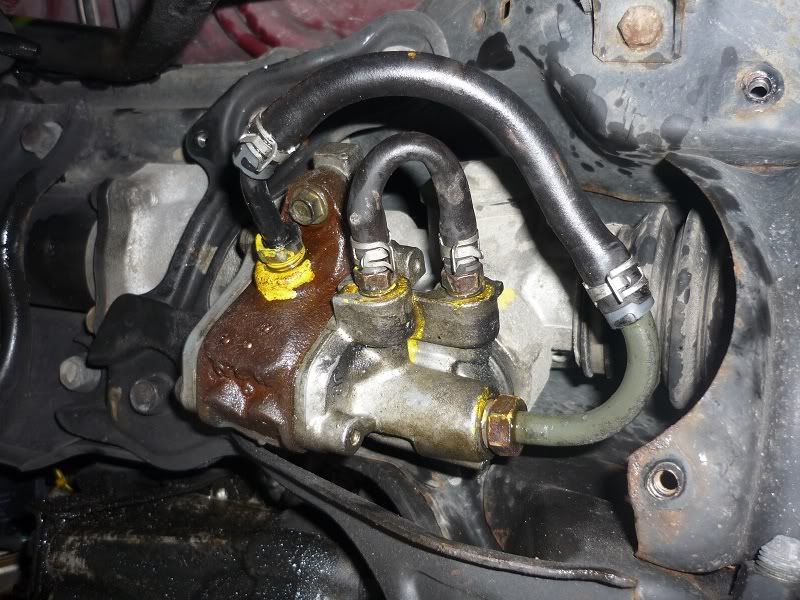
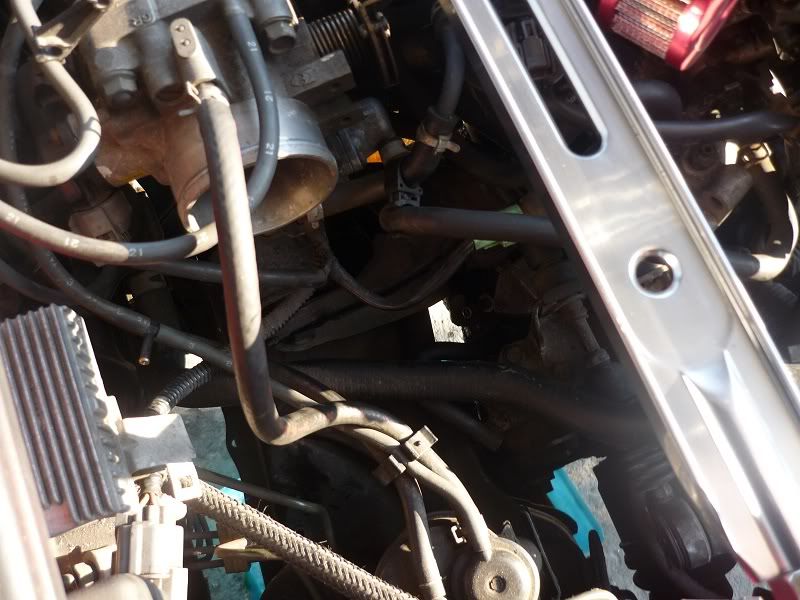
En Voila!... Power Assisted Steering removed
And look how much gumph has been removed ...

And look how much clearer she is now to! (remember I've already removed my aircon) ...
...
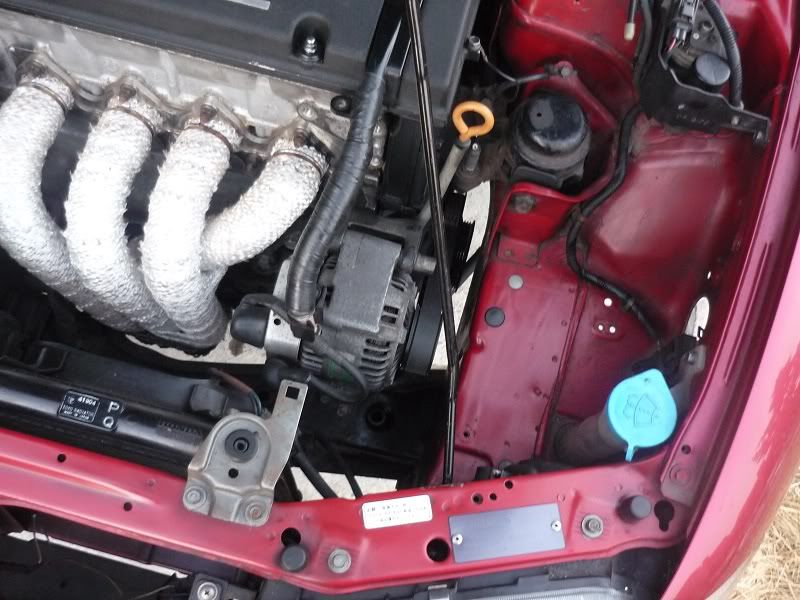
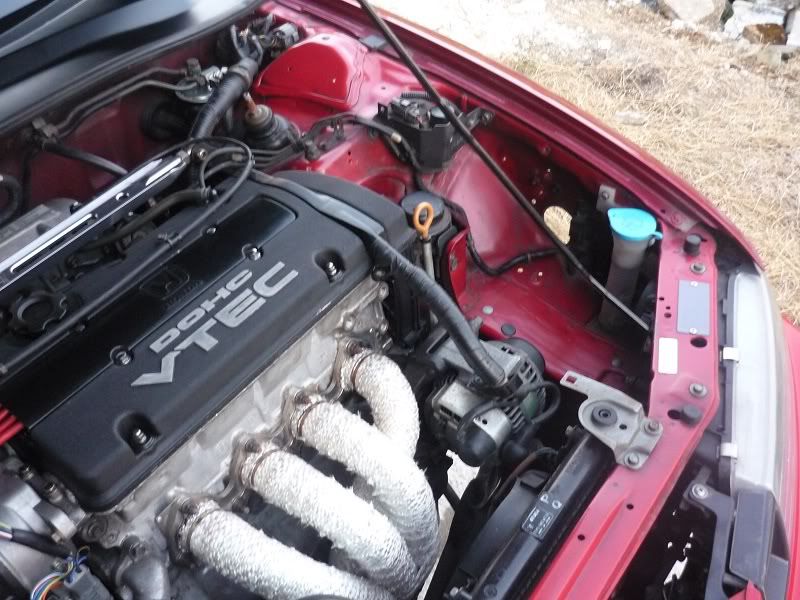
Excuse how grubby she is though
So, a brief recap... With pictures...
Firstly I jacked the car up. Removing the wheels firstly helped with ease of getting in and out from under the car, plus also aloud a bit more light under there. But I mainly did this as she's going to be parked up for a while and I didn't want the tyres drying out...
Once under the car I started by removing the three 10mm bolts to remove the protective cover...
Once removed, that revealed the four pipes to contend with...
I carefully loosened and pulled the four pipes from the block and allow the fluid to drain... Into a suitable contain... I chose a deep tray (The cat's old litter tray) to allow for splutter as I then turned the wheels from full lock to full lock to force as much of the fluid out as possible...
The less fluid in the steering rack, the less resistance there will be. You'll never get it all out, but the remaining dreads will act as a lubricant, so this is fine.
Whilst the fluid is draining I took the opportunity to stand again and start removing the components from the engine bay. I started with the pump itself and then removed all the connecting pipework as I went. This made things easier and means I also don't have to describe every pipe to be removed to you
When doing this be careful as there will still be fluid in some of the pipes. It was also a lot easier to cut some of the pipes as well. Put it this way, once you've moved it, you'll realise you'll never want to put it back again, so you may as well make it as easy as possible to remove by cutting through
For the last bit of pipework (to the steering rack) I needed to remove these from underneath the car again. I needed to keep the ends of these bits, so made sure the ends weren't damaged...
Once removed, all I had remaining of the PAS was this...
I then cut off the ends of the pipes like this...
Filed down the sawed-off ends and de-bur them. Making sure they were clean with no sworf.
These then needed to be re-connected to the steering rack like so...
I made sure the two larger pipes are roughly pointing towards one-another.
Then by salvaging some appropriate rubber pipe from everything that had been removed, I found two lengths and cut to size. I made sure these were of a reasonably tight fit and cut off any dried/cracked ends and connect up the pipe work in this sequence...
I salvaged some clamps as well.
Then I refit my freshly cleaned protective sheild...
Now I was done under the car
This just leaves one more connection to make...
These two pipes found under the throttle body...
I've not yet connected them. It's only a short connection to make. A length about 10cm long should do it, but one OD is 8mm, where as the other is 6mm and I have no such pipe to salvage. But I shall connect these up before anything else is done.
En Voila!... Power Assisted Steering removed
And look how much gumph has been removed
And look how much clearer she is now to! (remember I've already removed my aircon)
Excuse how grubby she is though
-
NafemanNathan
- LotM Winner
- Posts: 20144
- Joined: Sun Aug 08, 2010 9:37 pm
- My Generation: 0G
- Location: Yeovil, Somerset
- Has thanked: 8 times
- Been thanked: 124 times
Re: PLEASE DO NOT POST IN THIS THREAD YET (Under Constructio
nucleustylz lude wrote:Wow mate - you have been busy.
Cheers for getting stuck in before me, very helpful pics and descriptions too.
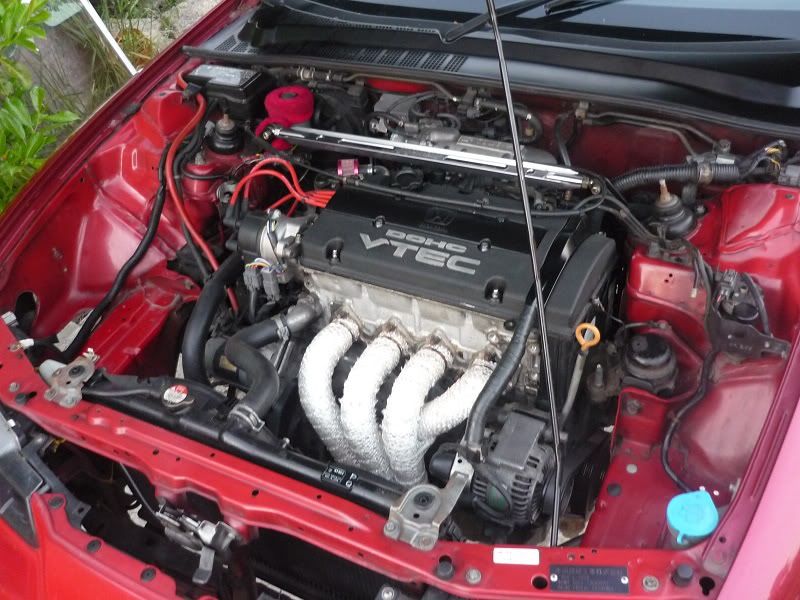
And damn! how good does the engine bay look now - less is definitely more. Get the P28 installed one day and you can say goodbye to that EGR stuff above where the PAS reservoir was.
Do I also spy a cable going to a relay down near the passenger headlight? Nothing to do with the Aircon though?
Next thing you know, you'll be moving the fuse box to your glove box and wire tucking the bay!
I'm still trawling through 1000+ pages on Honda-tech's wire tuck/shaved bay thread. Loads of inspiration in there. Some beyond what is necessary and practical but you got to appreciate the finished article.
Oh and before I go - that dipstick is asking for some shiny new red silicone hose to replace the old worn orange crap.
I have a random meter of the stuff at home for potential vacuum routing for my SC build. I think I could spare a few cm's if you can be arsed to measure yours.
Oh and did you get in the car and try the feel of it afterwards? Thinking she is still up on stilts at the mo though? And I guess not being able to get off your drive somewhat defeats the point of seeing it's real gain!
Cheers,
Rob
-
NafemanNathan
- LotM Winner
- Posts: 20144
- Joined: Sun Aug 08, 2010 9:37 pm
- My Generation: 0G
- Location: Yeovil, Somerset
- Has thanked: 8 times
- Been thanked: 124 times
Re: PLEASE DO NOT POST IN THIS THREAD YET (Under Constructio
Cheers Rob
Yeah the EGR valve is going just as soon as I can get my mate to mod that spare inlet manifold I have... along with the whole list of other breathing mods... Hence why my air filter isn't back in the pictures
I am tempted to do a whole wire tuck, so links would be useful dude I have so many holes left from where I've removed things that I need to properly cap them all. They just welcome in all the crap off the roads! Fingers crossed I might be able to get a few welding lessons from Wurzel, so eventually the engine bay's going to look as flush as you like!
And yep, don't worry about that pesky cable I'm yet to remove the refridgerator unit from behind the dash as well
And my dip stick cleans up alright actually. It's just still grubby from when my mechanic replace the cam belts lol. Though I had never thought to replace it actually so you may be on to something Though I'm not actually going for a red black silver scheme ... so watch this emptier space
And yeah, you're right... This is how she currently lies...

Fortunately the Polo hasn't got PAS either (as standard ) as boy did I feel the difference when I first started driving her! But I've already started getting used to it, so hopefully I won't feel much of a difference when I start driving the lude again
Yeah the EGR valve is going just as soon as I can get my mate to mod that spare inlet manifold I have... along with the whole list of other breathing mods... Hence why my air filter isn't back in the pictures
I am tempted to do a whole wire tuck, so links would be useful dude
And yep, don't worry about that pesky cable
And my dip stick cleans up alright actually. It's just still grubby from when my mechanic replace the cam belts lol. Though I had never thought to replace it actually so you may be on to something
And yeah, you're right... This is how she currently lies...
Fortunately the Polo hasn't got PAS either (as standard