
Lude-Dude wrote:used to work in a loom factory, and that how they do it.
board and nails
or walking up and down a long bench, I hated that job
Congratulations to vtecmec for winning May/June's Lude Of The Month, with his DIY Turbo BB1 build.
>>> Click Here For Profile <<<

>>> Click Here For Profile <<<
Nathan's Road-Legal/Track BB4
-
NafemanNathan

- LotM Winner
- Posts: 20144
- Joined: Sun Aug 08, 2010 9:37 pm
- My Generation: 0G
- Location: Yeovil, Somerset
- Has thanked: 8 times
- Been thanked: 124 times
Re: PLEASE DO NOT POST IN THIS THREAD YET (Under Constructio

-
NafemanNathan
- LotM Winner
- Posts: 20144
- Joined: Sun Aug 08, 2010 9:37 pm
- My Generation: 0G
- Location: Yeovil, Somerset
- Has thanked: 8 times
- Been thanked: 124 times
Re: PLEASE DO NOT POST IN THIS THREAD YET (Under Constructio
Good to know that's the way to do it  Hopefully I'll make a proper start on it tonight.
-
NafemanNathan
- LotM Winner
- Posts: 20144
- Joined: Sun Aug 08, 2010 9:37 pm
- My Generation: 0G
- Location: Yeovil, Somerset
- Has thanked: 8 times
- Been thanked: 124 times
(PUK) Custom Internal Harness
... And finish it to 
So from this...
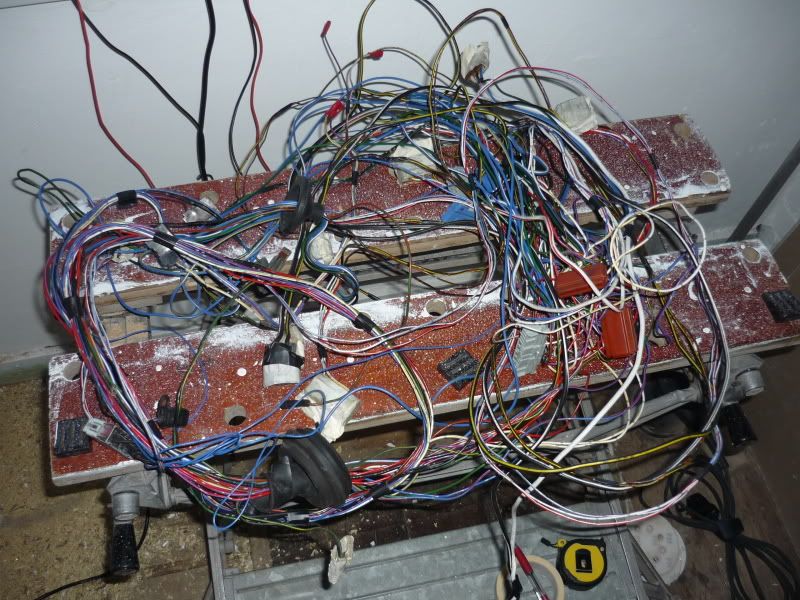
To this...

... In just 4 hours
Still looks a tad hectic in the last picture, but I can assure you, it makes perfect sense
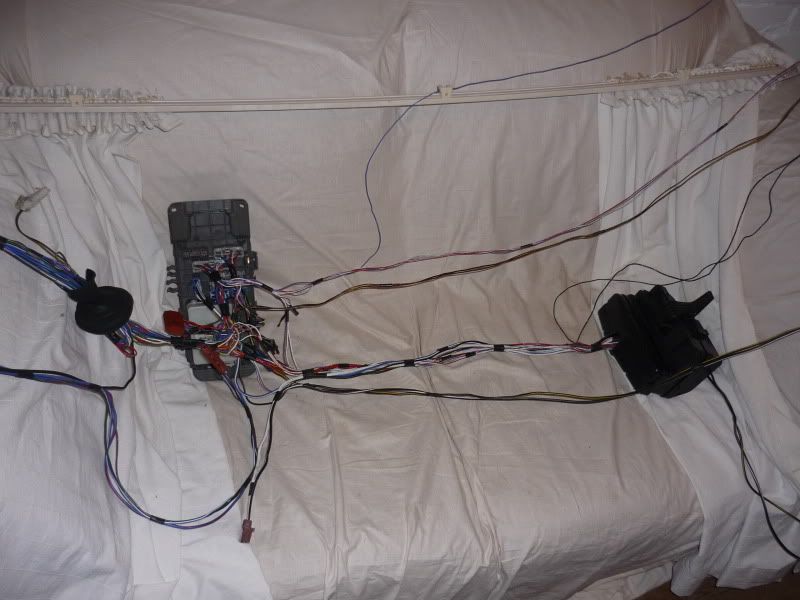
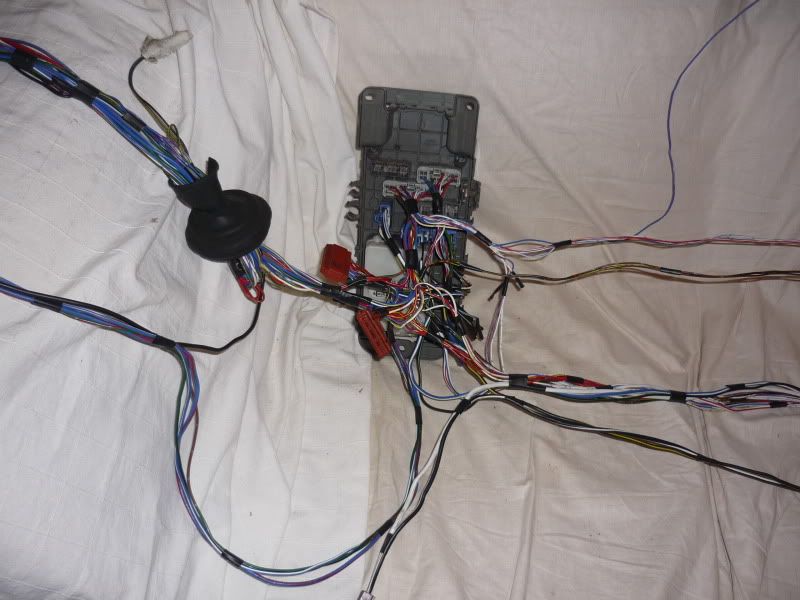
And just a few stragglers left as I'm undecided on where I'll be fitting the components to connect them yet. But other than that, it's ready to fit! And there's just enough length between the two fuseboxes to allow me to locate the original Engine bay fusebox between the two foot wells.
So from this...
To this...
... In just 4 hours
Still looks a tad hectic in the last picture, but I can assure you, it makes perfect sense
And just a few stragglers left as I'm undecided on where I'll be fitting the components to connect them yet. But other than that, it's ready to fit!
-
NafemanNathan
- LotM Winner
- Posts: 20144
- Joined: Sun Aug 08, 2010 9:37 pm
- My Generation: 0G
- Location: Yeovil, Somerset
- Has thanked: 8 times
- Been thanked: 124 times
-
NafemanNathan
- LotM Winner
- Posts: 20144
- Joined: Sun Aug 08, 2010 9:37 pm
- My Generation: 0G
- Location: Yeovil, Somerset
- Has thanked: 8 times
- Been thanked: 124 times
Re: PLEASE DO NOT POST IN THIS THREAD YET (Under Constructio
You are aware my lude has been sat for well over a year now right?
-
NafemanNathan
- LotM Winner
- Posts: 20144
- Joined: Sun Aug 08, 2010 9:37 pm
- My Generation: 0G
- Location: Yeovil, Somerset
- Has thanked: 8 times
- Been thanked: 124 times
Re: PLEASE DO NOT POST IN THIS THREAD YET (Under Constructio
Nucleustylz lude wrote:Just say Yes Nathan, by the time you get round to it he won't have a lude, we'll all be whizzing around in flying cars!
Good work bud, I'm in two minds whether to go the whole hog with mine? :-k
You're scaring me to be honest! Fair play! =D>
Have you seen the boards/paper reels that people use in the states to do there looms, the likes of chase bays etc physically draw the lengths of the wires and routing on a large piece / pieces of paper stuck together to be able to reproduce them again.
:cough:
While you're there, do a diagram for me!
-
NafemanNathan
- LotM Winner
- Posts: 20144
- Joined: Sun Aug 08, 2010 9:37 pm
- My Generation: 0G
- Location: Yeovil, Somerset
- Has thanked: 8 times
- Been thanked: 124 times
Re: PLEASE DO NOT POST IN THIS THREAD YET (Under Constructio
The cheek!!!Nucleustylz lude wrote:Just say Yes Nathan, by the time you get round to it he won't have a lude, we'll all be whizzing around in flying cars!
I was hoping to be able to lay/re-route the engine bay side this weekend and actually connect the whole thing up (Though not to start). But I've either had too much on or it's been raining
It's honestly not that complex... Just time consuming. Though having done it once, I don't envisage it would take me that long to do again (Though I'm not sure I should advertise that
-
NafemanNathan
- LotM Winner
- Posts: 20144
- Joined: Sun Aug 08, 2010 9:37 pm
- My Generation: 0G
- Location: Yeovil, Somerset
- Has thanked: 8 times
- Been thanked: 124 times
Re: PLEASE DO NOT POST IN THIS THREAD YET (Under Constructio
Mart609 wrote:got me thinking now
Nucleustylz lude wrote:Nayfe!! wrote:Especially once I have my garage together and don't have to keep putting everything away each time I have to pack up for the night.'
This is so true - give or take finding the time to work on the cars between things and weather, even with my garage because I need access to things, The setup to start and tidy and put things away at the end is such a PITA. Be nice to just stop what your doing one day, come back the next and just carry on. [smilie=hate-bravo2.gif]
Keep us updated with progress bud.
-
NafemanNathan
- LotM Winner
- Posts: 20144
- Joined: Sun Aug 08, 2010 9:37 pm
- My Generation: 0G
- Location: Yeovil, Somerset
- Has thanked: 8 times
- Been thanked: 124 times
Re: PLEASE DO NOT POST IN THIS THREAD YET (Under Constructio
Here here!Nucleustylzie ludey-wudey wrote:This is so true - give or take finding the time to work on the cars between things and weather, even with my garage because I need access to things, The setup to start and tidy and put things away at the end is such a PITA. Be nice to just stop what your doing one day, come back the next and just carry on. [smilie=hate-bravo2.gif]
The engine side of the loom is proving more difficult than I thought, (though I've not properly analysed my options yet), but I was hoping to remove the EGR valve, the IACV, the IABs, a purge control and possibly another connector from the loom, but it seems a couple of them sprout back off to other connectors. (ie, the EGR loops back to the TPS) so I'm unsure at the moment of whether the actual EGR valve plug completes part of the continuity or not, and therefore if I remove it, will I have to splice that one wire back into the loom or can I just chop it offNucleustylzie ludey-wudey wrote:Keep us updated with progress bud.
like I said, it'll take more reading, but I was hoping it would be quite straight forward and I could finally stop using my brain!
Oh and I had my Hondata S300 arrive today
-
NafemanNathan
- LotM Winner
- Posts: 20144
- Joined: Sun Aug 08, 2010 9:37 pm
- My Generation: 0G
- Location: Yeovil, Somerset
- Has thanked: 8 times
- Been thanked: 124 times
(PUK) Custom Engine Harness
Crap picture, but the simplified Engine harness is practically complete! (EGR removed, IABs removed, IACV removed, EVAP purge removed, Injector relay removed, P/S oil switch removed). Just need to splice in the new injector plugs.

The big bunch of loopiness may well remain, as with the varying lengths it makes it difficult to fold them back on themselves, which is never ideal anyway. But either way this section will be inside the cab and I can hide/protect it, so not a huge issue. Otherwise I may vary the reach of the end plugs, which may take up some of the slack (Probably will do this ).
Then this just leaves me to measure up the various harnesses to work out how much conduit and shrink-tube I need and which diameters and then it's ready to cover... And then install!!!
The big bunch of loopiness may well remain, as with the varying lengths it makes it difficult to fold them back on themselves, which is never ideal anyway. But either way this section will be inside the cab and I can hide/protect it, so not a huge issue. Otherwise I may vary the reach of the end plugs, which may take up some of the slack (Probably will do this
Then this just leaves me to measure up the various harnesses to work out how much conduit and shrink-tube I need and which diameters and then it's ready to cover... And then install!!!