
Congratulations to vtecmec for winning May/June's Lude Of The Month, with his DIY Turbo BB1 build.
>>> Click Here For Profile <<<

>>> Click Here For Profile <<<
Mario's ride

-
K30DPC
- LotM Winner
- Posts: 1106
- Joined: Fri Aug 09, 2013 7:45 am
- My Generation: 4G
- Location: GB/Poland
- Has thanked: 17 times
- Been thanked: 17 times
Re: Mario's ride
Thanks guys for all good words.
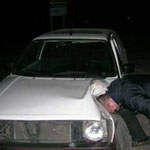
Today FedEx guy wake me up with this


Another step forward
I wanna buy flywheel and clutch and will be ready to put bottom end into one piece.I wanna flywheel to be balanced with crank before it all go in
Today FedEx guy wake me up with this
Another step forward
I wanna buy flywheel and clutch and will be ready to put bottom end into one piece.I wanna flywheel to be balanced with crank before it all go in
Last edited by K30DPC on Mon Apr 28, 2014 2:28 pm, edited 2 times in total.
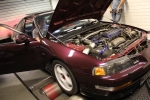
my BB1 UKDM
-
NafemanNathan

- LotM Winner
- Posts: 20144
- Joined: Sun Aug 08, 2010 9:37 pm
- My Generation: 0G
- Location: Yeovil, Somerset
- Has thanked: 8 times
- Been thanked: 124 times

-
K30DPC
- LotM Winner
- Posts: 1106
- Joined: Fri Aug 09, 2013 7:45 am
- My Generation: 4G
- Location: GB/Poland
- Has thanked: 17 times
- Been thanked: 17 times
Re: Mario's ride
Yes buddy. They were very well packed. I have used the lens we were talking about and just few hours before Mimms I put it on a car. Headlights are great now. Wurly told me they look like OEM ones 

my BB1 UKDM
-
K30DPC
- LotM Winner
- Posts: 1106
- Joined: Fri Aug 09, 2013 7:45 am
- My Generation: 4G
- Location: GB/Poland
- Has thanked: 17 times
- Been thanked: 17 times
retro headlights
As we all know 4gen headlights aren't perfect. Maybe they were 18-22 years ago but now they need further upgrades. It is not a metter of light bulbs as even better ones doesn't make a lot of progres. HIDs can not be installed into standard headlights so IMHO the only right way is retrofit. There is a lot of kits available. I can't say much about them as I didn't use them. My way is defo not for lazy mans.
Project was started long time ago. But because I hate this kind of work where you have to care about all details and any mistake make you starting from begining it has to grown up in me. Happilly it's almost finished, and I think in 2 weeks time on Japfest I will be able to show final product. I think headlights itself are done. The only thing is some extra wirings.
I have used 3 inch bixenon lens from '07 audi A4 with D2S bulbs. This are the only one 3inch's I found they will fit. But I'm not saying there arent any more 4 gen headlights are quite low and also not very deep, so you can't put anything into them.
From begining.
I bought some postlift headlights. And it was my first mistake. I wanted to have them black. There was no problem with internal shrouds, but you can't make lenses so easy.

It need to be open. So I heated up my owen to 80 celsius degree, and I put my headlight into for about 20mins. There are many different suggestions about the temp and time, But this way looks for me safe, as 80degree can't melt down your headlights, and time didn't really matters for me. After this I just pulled lens of the housing using fabric gloves.

Next to separate lens with shroud. Undo them two screws

and easily remove shroud from lens

Going forward we also need to remove reflector. So on the back of housing we have to undo three bolts. I found scissors helpful with two of them and the third one can be sorted with 8mm spanner

Bolts will remain in housing and reflector should fall on the desk

At this point I cleaned all glue from housing using some petrol. I did the same with lenses but then they turned wery foggy and I had to replace them with new/other, so DON"T TRY THIS
It wasn't finish of dissasembling. I wanted two metal strips attached to the reflector. Four more screws later

I get what I wanted

This was the easy part.
Now going forward I needed some plate to hold new projector on place. I knew it won't be easy to set projector in place and leave enough room for any adjustment needed. So for start with messing up my plate had to be made from something soft enough for easy fabrication. I went to use 4mm perspex. Stiff enough and soft enough, sounds like win win. So my first experimentatory plate was like this


Next step cost me some coinage. I put shrouds on,

then I realized that the projector have to be moved up, so I made some adjustments, and then again and again and again and when finally I was happy with it I put headlights back on car (without shrouds or lenses)

and of to the diagnostic station for proper alighment. Then another go with shroud and more adjustments, and diagnostic station again. Then I marked all bolts and screws possitions and changed my red perspex for some 4mm ally sheet. I made two of them

Which worked well with new projectors. On first pic comparison between new and old


plastic black spacers was replaced with ally ones as well

And since this I started to hate this what have to be done next.
IMHO this is the moment when sh!t job begins.
We going back to our shrouds. They look like this

and we need to change it. First easy pease.... sanding

Then using 3mm black perspex I blocked the oval hole and made round one at the same time


After a bit of this

and more sanding it start to look like it's going in good way

But still it was far away from what I wanted. So I glued in some shrouds which I get with other set of projectors. They needed some triming but at the end of the day I fitted them succesfully. Then more bumper filler and sanding and again, and again

and again - this is what I hate, Everytime you are thinking its done, you clean it, ask somebody for inspection and they show you a lot more to fill up or sand down. But after few hours I ended with this

It still not perfect and I know it's inperfection points but most of the people won't see them. So I decided it's good enough for painting. I used thrusted brand paint which I also found easy to paint with

First 3 coats of primer

And shortly after mat black

Last step was assembling it back into one piece. Well two pieces I cleaned everything from any dust and trying to not touch lenses, shrouds, projectors, reflectors, or anything I could leave my finger prints on inside the headlamp, I put it back together. I used this glue and it work perfect. I did small test before I used this for headlights. I left it to dry. It looks and work exactly the same as original glue so I believe it is something very similiar to this what Japanese used.

After all again some sanding. This time I used 800,1000,1200,1500,2000,2500 grid wet and dry sandpaper and after some of this

Headlights looks like new. You can easily notice that beautiful rainbow on them. I try to do more pics on the other day so you can see them inside. Whatever I did today it wasn't work. So final product my ludefellows


Project was started long time ago. But because I hate this kind of work where you have to care about all details and any mistake make you starting from begining it has to grown up in me. Happilly it's almost finished, and I think in 2 weeks time on Japfest I will be able to show final product. I think headlights itself are done. The only thing is some extra wirings.
I have used 3 inch bixenon lens from '07 audi A4 with D2S bulbs. This are the only one 3inch's I found they will fit. But I'm not saying there arent any more
From begining.
I bought some postlift headlights. And it was my first mistake. I wanted to have them black. There was no problem with internal shrouds, but you can't make lenses so easy.
It need to be open. So I heated up my owen to 80 celsius degree, and I put my headlight into for about 20mins. There are many different suggestions about the temp and time, But this way looks for me safe, as 80degree can't melt down your headlights, and time didn't really matters for me. After this I just pulled lens of the housing using fabric gloves.
Next to separate lens with shroud. Undo them two screws
and easily remove shroud from lens
Going forward we also need to remove reflector. So on the back of housing we have to undo three bolts. I found scissors helpful with two of them and the third one can be sorted with 8mm spanner
Bolts will remain in housing and reflector should fall on the desk
At this point I cleaned all glue from housing using some petrol. I did the same with lenses but then they turned wery foggy and I had to replace them with new/other, so DON"T TRY THIS
It wasn't finish of dissasembling. I wanted two metal strips attached to the reflector. Four more screws later
I get what I wanted
This was the easy part.
Now going forward I needed some plate to hold new projector on place. I knew it won't be easy to set projector in place and leave enough room for any adjustment needed. So for start with messing up my plate had to be made from something soft enough for easy fabrication. I went to use 4mm perspex. Stiff enough and soft enough, sounds like win win. So my first experimentatory plate was like this
Next step cost me some coinage. I put shrouds on,
then I realized that the projector have to be moved up, so I made some adjustments, and then again and again and again and when finally I was happy with it I put headlights back on car (without shrouds or lenses)
and of to the diagnostic station for proper alighment. Then another go with shroud and more adjustments, and diagnostic station again. Then I marked all bolts and screws possitions and changed my red perspex for some 4mm ally sheet. I made two of them
Which worked well with new projectors. On first pic comparison between new and old
plastic black spacers was replaced with ally ones as well
And since this I started to hate this what have to be done next.
IMHO this is the moment when sh!t job begins.
We going back to our shrouds. They look like this
and we need to change it. First easy pease.... sanding
Then using 3mm black perspex I blocked the oval hole and made round one at the same time
After a bit of this
and more sanding it start to look like it's going in good way
But still it was far away from what I wanted. So I glued in some shrouds which I get with other set of projectors. They needed some triming but at the end of the day I fitted them succesfully. Then more bumper filler and sanding and again, and again
and again - this is what I hate, Everytime you are thinking its done, you clean it, ask somebody for inspection and they show you a lot more to fill up or sand down. But after few hours I ended with this
It still not perfect and I know it's inperfection points but most of the people won't see them. So I decided it's good enough for painting. I used thrusted brand paint which I also found easy to paint with
First 3 coats of primer
And shortly after mat black
Last step was assembling it back into one piece. Well two pieces
After all again some sanding. This time I used 800,1000,1200,1500,2000,2500 grid wet and dry sandpaper and after some of this
Headlights looks like new. You can easily notice that beautiful rainbow on them. I try to do more pics on the other day so you can see them inside. Whatever I did today it wasn't work. So final product my ludefellows
my BB1 UKDM