
..and yes, it is the drivers side track rod end. The MOT guy told me to grab it with a monkey wrench and just undo it, I'm now guessing that's not the case
Congratulations to vtecmec for winning May/June's Lude Of The Month, with his DIY Turbo BB1 build.
>>> Click Here For Profile <<<

>>> Click Here For Profile <<<
MOT failure :(
-
bb1boy

- Posts: 4459
- Joined: Mon Jan 30, 2012 11:57 am
- My Generation: 4G
- XBOX GamerTag: adam fantastic
Thanks for that mate, the handbrake doesn't sound as bad as I thought then, the discs and pads are new, brake force is being registered on both sides from the foot pedal and the wheels spin freely when pedal released released, so not sticky piston or slider, it must be the pivot thing.
..and yes, it is the drivers side track rod end. The MOT guy told me to grab it with a monkey wrench and just undo it, I'm now guessing that's not the case
..and yes, it is the drivers side track rod end. The MOT guy told me to grab it with a monkey wrench and just undo it, I'm now guessing that's not the case

-
wurlycorner

- Ye are glad to be dead, RIGHT?
- Posts: 21499
- Joined: Sat May 19, 2012 3:33 pm
- My Generation: 4G
- Location: Chelmsford, Essex
- Has thanked: 2491 times
- Been thanked: 307 times
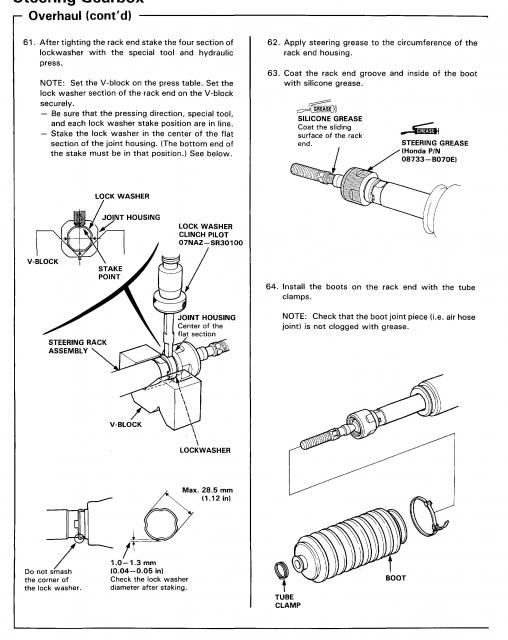
The outer end track rod undoes fairly simply, but the inner end is screwed into the end of the rack and tab washered over.
The manual helpfully shows assembly of it like this;

Rear caliper could still be stuck pads/slider pin, the handbrake puts less force onto the pads than the foot brake so do still check that out as well.
The manual helpfully shows assembly of it like this;
Rear caliper could still be stuck pads/slider pin, the handbrake puts less force onto the pads than the foot brake so do still check that out as well.
--
Iain.
Iain.
Super Secret 1G (not really super secret!)
-
wurlycorner
- Ye are glad to be dead, RIGHT?
- Posts: 21499
- Joined: Sat May 19, 2012 3:33 pm
- My Generation: 4G
- Location: Chelmsford, Essex
- Has thanked: 2491 times
- Been thanked: 307 times
Noooo! You DON'T have to take the rack out or use hydraulic tools.
Sorry didn't mean to scare you that much - that's why I said "The manual helpfully shows assembly of it like this" and followed up with It's because the manual only covers it as part of overhauling the rack (as far as I can see, anyway).
You can change them with the rack still on the car - I've done both ends.
EDIT:
Yep, just checked back in my old posts and it is the drivers side that's a sod, I'm afraid
Here's where I did the passenger side gaitor. That one's fine because you can get up from underneath it (can see all of it) but the drivers side is recessed inside the chassis so you can only reach in from outside, if I remember rightly.
Sorry didn't mean to scare you that much - that's why I said "The manual helpfully shows assembly of it like this" and followed up with
You can change them with the rack still on the car - I've done both ends.
EDIT:
Yep, just checked back in my old posts and it is the drivers side that's a sod, I'm afraid
Here's where I did the passenger side gaitor. That one's fine because you can get up from underneath it (can see all of it) but the drivers side is recessed inside the chassis so you can only reach in from outside, if I remember rightly.
--
Iain.
Iain.
Super Secret 1G (not really super secret!)
-
bb1boy
- Posts: 4459
- Joined: Mon Jan 30, 2012 11:57 am
- My Generation: 4G
- XBOX GamerTag: adam fantastic
Ok, heart attack avoided, but when you say you can only reach in from the outside, what do you mean? I was under the car this morning and the MOT guy showed me what to undo - looked like I should be able to just reach up, grab hold of it and unscrew it.. but now I'm learning about folding washers etc - I dunno, I'm so p!ssed off he failed it instead of giving me a list of advisories that I don't even want to think about it for a day or twowurlycorner wrote:...the drivers side is recessed inside the chassis so you can only reach in from outside, if I remember rightly.
-
wurlycorner
- Ye are glad to be dead, RIGHT?
- Posts: 21499
- Joined: Sat May 19, 2012 3:33 pm
- My Generation: 4G
- Location: Chelmsford, Essex
- Has thanked: 2491 times
- Been thanked: 307 times
You can get at the outer end of the inner track rod end easy enough, but not the inner end of the track rod end.
This pic is from the passenger side (the easy side), I don't have one from the drivers side.

You can see the outer end of the inner track rod on the left. The inner end of the innfer track rod is inside the gaitor.
If you're replacing the inner track rod end (which you'll have to if he says it's got excessive wear/play in it) then you need to undo both ends of it.
Detailed instructions to replace;
- Using 2 spanners, slacken off the lock nut on the outer end of the inner track rod end (this is the bit you can see)
- Using 1 spanner, undo the outer end of the inner track rod end. COUNT THE NUMBER OF TURNS EXACTLY to make sure you can put the new one without screwing up wheel alignment.
- Clean inside the chassis around the end of the rack where the gaitor is, to avoid any crap getting knocked into the rack when you've removed the gaitor (I forgot to do this and regretted it - would have saved rack cleaning aggro later)
- Reach in and remove the drain tube from the gaitor on the inner track rod end
- Remove the gaitor from the inner track rod end (cut it off if needs be)
- Reach in and prise open the tab washer from the inner end of the inner track rod (try and prise it open at least - if you can't, then move to the next step and hope you can force it off then) This is easier if you have the steering wheel turned so that it's extended out fully towards you (car turning left if you're doing the drivers side)
- Reach in with spanner and undo the inner end of the track rod from the rack. Don't be tempted to whack hard on the spanner to get it to undo, or you could bend the end of the rack.
- Unscrew and remove the inner end of the track rod from the rack (no need to count any turns)
- Remove and replace the tab washer
- Fit the new track rod end and do up tightly (you won't be able to torque it unless you have a crows foot torque wrench so just do it 'tight')
- Somehow you now need to knock the tab washer flat onto the ends of the inner track rod. This is a PITA. I think I managed to get the tabs knocked in on 3 of the 4 sides eventually. The 4th side was never going to happen...
- Slide the gaitor back over the inner track rod (I'd suggest fitting a new one after all this hassle rather than re-using). Swear and curse and lose skin on your hands trying to refit it onto the end of the rack, then fit the tie to secure it in place.
- Refit the drain tube into the gaitor (this can be a bit of a pain too as there's never any slack in the tube to pull on)
- Locate the gaitor properly on the outer end of the inner track rod, don't fit the securing tie yet
- Make sure you have the lock nut on the outer end of the inner track rod, would fully up the thread
- Fit the outer end of the inner track rod into the inner end of the outer track rod and do it up the same number of turns that you removed the last one (be careful to make sure you know when the thread actually engages so you get the start of the count right). This will be much tighter than the one you undid, don't worry that's right - it's because the ball joint in the new track rod isn't worn! If the gaitor starts to twist up while you do this (that's why you don't fit the out tie before this step) stop and untwist the gaitor before it tears, making sure you don't lose track of how far in you've wound the thread.
- When you have the right number of turns, make sure the outer track rod end is level (not twisted over more one way than the other) and using 2 spanners, tighten the lock nut, making sure that you don't undo/do-up the inner track rod at the same time
- Make sure the gaitor isn't twisted or collapsed etc, if it is gently re-arrange to get it back into shape then fit the securing tie to the outer end of the gaitor.
Done!
That's very detailed instructions making it sound more complicated than it is. It's a fairly straight forward job tbh, only made fiddly on the drivers side because of poor access.
You might find undoing the lock nut is difficult too, they have a habit of seizing over time, so wire brush the threads clean first and soak in WD40 overnight.
--
Iain.
Iain.
Super Secret 1G (not really super secret!)
-
bb1boy
- Posts: 4459
- Joined: Mon Jan 30, 2012 11:57 am
- My Generation: 4G
- XBOX GamerTag: adam fantastic
Thanks @wurlycorner, that doesn't actually sound too bad.. quick question though, once I have slackened off the lock nut on the track rod end, do I need to seperate the ball joint from the hub assembly to remove the track rod end completely or can I just split it in the middle by unscrewing the threaded piece? Is this job doable on axle stands or is this a 'take my car to the garage and put it on ramps' scenario?
Also do you (or anyone else) know if the bushes on the rear upper anti-roll bar drop links are replaceable or do I need to replace the entire drop links? They only wobbled a fraction and you can see the play in the top rubber bushes.
Also do you (or anyone else) know if the bushes on the rear upper anti-roll bar drop links are replaceable or do I need to replace the entire drop links? They only wobbled a fraction and you can see the play in the top rubber bushes.
-
VT3C RUNN3R
- Posts: 141
- Joined: Fri May 04, 2012 9:09 am
- My Generation: 4G
- XBOX GamerTag: SiR Vtec Junkie
- Location: Huntingdon, Cambs
Re: MOT failure :(
Hello mate, you just need to break loose the castle nut on the ball joint, the ball joint should be a bit stiff to try and get out....enter hammer, give it a whack and it should all break free then. for getting the lock nut off you want to turn it in the direction to actually tighten it on the steering rack to seperate it from the track rod end then you should be able to unsrew the track rod end off. just remember to mark the thread though if you need to take the lock nut off other wise you will need your tracking done again. Ive just done this last weekend to change my gaitors (it is a pain to try and get the little tubes on the nipples on the gaitors on the driver side, I think thats what wurly would be referring to be a PITA)
for your drop links I would just replace the links, I paid 30 for both.
hope that helps
mike
for your drop links I would just replace the links, I paid 30 for both.
hope that helps
mike
