
Congratulations to vtecmec for winning May/June's Lude Of The Month, with his DIY Turbo BB1 build.
>>> Click Here For Profile <<<

>>> Click Here For Profile <<<
Vtecmec's 4th Gen
-
h10ndr
- Posts: 821
- Joined: Mon Sep 13, 2010 7:07 pm
- My Generation: 4G
- Location: West Yorkshire
- Has thanked: 1 time
- Been thanked: 10 times
- Contact:
Are you going for a partial respray - or the whole thing...?
Tim
2004 S2000 GT Berlina Black
SOLD 1992 JDM-BB1UKSPEC-B545P-H22A7-U2Q7-P72 NEPTUNE RTP
RIP 1995 UKDM-BB1-Pacific Blue Pearl
http://www.s2000-parts.com
Profile
2004 S2000 GT Berlina Black
SOLD 1992 JDM-BB1UKSPEC-B545P-H22A7-U2Q7-P72 NEPTUNE RTP
RIP 1995 UKDM-BB1-Pacific Blue Pearl
http://www.s2000-parts.com
Profile
-
DaveyBa8
- Supporter 2016
- Posts: 547
- Joined: Sun Apr 14, 2013 5:21 pm
- My Generation: 4G
- XBOX GamerTag: DaveyRocket172
- Location: Ireland, Donegal
- Been thanked: 1 time
Read the whole thread in a few nights, enjoyed it so much, never seen so much dedication, I know how you feel with the rust. I've gathered so many tips from your thread, I am looking for rust beaters and your methods are insanely good. Like yourself I do all my own work and have a bad problem with everything not being perfect. Epic work, wish you all the best with it. Your an inspiration to many many people reading this thread.
-
simoncider
- Posts: 183
- Joined: Sat Oct 20, 2012 4:01 pm
- My Generation: 5G
-
BlackShadow

- Posts: 180
- Joined: Thu Jun 21, 2012 12:25 am
- My Generation: 5G
- Location: Whitby. Not THAT Whitby, the other Whitby, the one in Durham. Not THAT Durham, the other Durham.
 @this thread.
I am absolutely astonished.
This is going to sound weird but I read through the whole thread and I was totally blown away throughout... but the part that really clinched it for me was when you picked up a new heat shield. I'll explain why: That part is under the car and never seen. You could have reinstalled it as is, or you could have said "stuff it" and left it off. You didn't though. You opted to replace an unseen part with brand new, whereas most people would chuck it in the bin and buy a wink mirror or tint their tail lights. That is a proper restoration right there. You have your priorities in order, and for that, I take my hat off to you.
1997 Prelude Base (wrecked)
1996 Prelude SR (sold)
1994 Subaru SVX LSi (Sold)
Current:
1999 Prelude Base (S-Spec build in progress)
1990 Nissan 300ZX (weee!)
2011 Ford CVPI (daily)
1957 Cadillac Coupe de Ville
1996 Prelude SR (sold)
1994 Subaru SVX LSi (Sold)
Current:
1999 Prelude Base (S-Spec build in progress)
1990 Nissan 300ZX (weee!)
2011 Ford CVPI (daily)
1957 Cadillac Coupe de Ville
-
h10ndr
- Posts: 821
- Joined: Mon Sep 13, 2010 7:07 pm
- My Generation: 4G
- Location: West Yorkshire
- Has thanked: 1 time
- Been thanked: 10 times
- Contact:
How did it go...the respray?Vtecmec wrote:The whole thing bar the roof.
Tim
2004 S2000 GT Berlina Black
SOLD 1992 JDM-BB1UKSPEC-B545P-H22A7-U2Q7-P72 NEPTUNE RTP
RIP 1995 UKDM-BB1-Pacific Blue Pearl
http://www.s2000-parts.com
Profile
2004 S2000 GT Berlina Black
SOLD 1992 JDM-BB1UKSPEC-B545P-H22A7-U2Q7-P72 NEPTUNE RTP
RIP 1995 UKDM-BB1-Pacific Blue Pearl
http://www.s2000-parts.com
Profile
-
Vtecmec

- LotM Winner
- Posts: 5508
- Joined: Fri Aug 06, 2010 5:43 pm
- My Generation: 4G
- XBOX GamerTag: vtecmec
- Location: East Midlands
- Has thanked: 154 times
- Been thanked: 443 times
Re: Vtecmec's 4th Gen
Sorry, not got round to it yet. 
I decided I didn't like the previous job on the rear o/s inner and outer arch, too much filler due to the fire all that time ago............
Any way, so I've ended up welding a new galvanised inner arch and one of those outer arches from cebul.
Currently prepping and priming.
I decided I didn't like the previous job on the rear o/s inner and outer arch, too much filler due to the fire all that time ago............
Any way, so I've ended up welding a new galvanised inner arch and one of those outer arches from cebul.
Currently prepping and priming.
-
h10ndr
- Posts: 821
- Joined: Mon Sep 13, 2010 7:07 pm
- My Generation: 4G
- Location: West Yorkshire
- Has thanked: 1 time
- Been thanked: 10 times
- Contact:
been busy then... 
Tim
2004 S2000 GT Berlina Black
SOLD 1992 JDM-BB1UKSPEC-B545P-H22A7-U2Q7-P72 NEPTUNE RTP
RIP 1995 UKDM-BB1-Pacific Blue Pearl
http://www.s2000-parts.com
Profile
2004 S2000 GT Berlina Black
SOLD 1992 JDM-BB1UKSPEC-B545P-H22A7-U2Q7-P72 NEPTUNE RTP
RIP 1995 UKDM-BB1-Pacific Blue Pearl
http://www.s2000-parts.com
Profile
-
Vtecmec
- LotM Winner
- Posts: 5508
- Joined: Fri Aug 06, 2010 5:43 pm
- My Generation: 4G
- XBOX GamerTag: vtecmec
- Location: East Midlands
- Has thanked: 154 times
- Been thanked: 443 times
Front end build, partially complete, house move.
OK, so it has been a while since I updated this, so here goes…..
Unfortunately not too many pictures due to time constraints and a mad rush due to a(nother) recent house move and a pretty nasty illness; should be settled for a while now though as I've bought this house rather than renting. Sadly no garage at the moment either, though I have space to build one and an existing garage is marked on the deeds , the concrete base already exists and my dad’s a bricklayer (handy).
So, let’s go back a while, not happy with the previous repair to the o/s rear quarter as it has been sat with just primer for about 4 years now, I decided to re-replace it, trying not to set the thing on fire this time though.
Handy that I have a pair of replacement panels lying around.

So I prepped it ready to fit, having to add a few bits on the returns to make it fit.

Then cut the old work off the car and fabricated a new inner arch.

And then a bit of welding.


Followed by some body filler.

Due to time constraints, I did not have the chance to finish it off totally, so I’ve gone with a weather proof primer (BH epoxy mastic) to protect it until I get the chance to finish off, unfortunately my gun was playing up big time so the finish is pretty crap, no real biggie though as it still needs a minor amount of work on the shape.
A few other things I’ve done, but no pics, is:
• to derust the bonnet stay and paint with epoxy primer.
• modify the eyebrows, cutting out the faux nostrils, and giving them a lick of paint.
• the rear number plate holder normally has two little tabs at the bottom, one of mine had snapped off (always been like that), so instead of getting a new one I snapped off the other one and smoothed and painted it, never liked them anyway.
So, the house move took ages to progress, 12 weeks with a no chain transaction (lazy solicitors), and then suddenly everything went through and I had 3 weeks till completion, oh dear, oh very dear. The car was still on stilts, un-bled brakes (and a broken brake line) no hydraulic clutch system, a fuel pipe issue, no front wings, front bumper, rear bumper, both doors and tailgate stripped down. This will be a challenge………
Then, as sods law dictates, I fell ill, contracting something that gave me conjunctivitis, tonsillitis, a swollen face, muscle pain and flu symptoms. Fantastic.
My face says it all as to how I felt, but at least only one eye was affected…..

Until the virus spread, but I didn’t let it get me down…..

After two weeks I was feeling better, not 100%, more like 70%, but relative to the 30% I was earlier, this was ok, I can do it.
So there I am 1 week from moving, lots to do on the car, a garage in such a mess there’s at least a full days clean up, all the paperwork to do that’s associated with a house move, the physical house move, construct one of those flat pack metal sheds for my tools and cleanup of the rental property.
So I took a week off work and set to the car.
I started at the front, derusting the front wings.

One of the wings I had a replacement for as it had had at least two previous repairs; looked ok from the outside.

But when reversed.

Glad I had a replacement.
Though this too needed a little work, as did the other side.
So I did some repairs and filled.

Then filler primed.

At the same time I worked on the bumper, which had 3 years worth of garage scuffs and a little sinkage where the badge holes had previously been filled.

And then some decent 2k primer.

I followed this with a flat and paint with phantom pearl, along with the eyebrows and rear plate recess and fitted them.
In the middle of all this I set about fitting the clutch slave cylinder that I had previously removed to fit to the old Accord when it popped, I’ll replace it later I said to myself at the time, should have done this earlier (doh), at least I had bought the part and shelved it in the garage.
I decided to adjust the mounting bracket for the clutch fluid pot as it has always looked a little messy, this now mounts onto the strut brace.

Fitted that and on with the slave cylinder, nice and easy, then put some fluid in the system and attempted to bleed. Unfortunately the pedal went straight to the floor and not much was happening. After messing around for a while I decided to remove the master and see what was up.
Would you just know it, the rod had only gone and seized in place, not a chance of rescue.

Lucky for me I had bought a spare cylinder as a spare part years ago, cool, just drag it off the shelf and off I go. Comparing the two then suddenly realised that it was completely different, seems this is for a Civic. jobby. Bloody eBay.
With the time pressures and no chance of getting a replacement in time I had to think fast, stripping the old one down and using the old push rod in the new housing to make something suitable.


Looks good to me, and once installed, indeed it was.
A few other issues before this point though, to make bleeding brakes and clutches easier and quicker I bought one of these.

Well, try and try as I might I could not get the bugger to do its job properly, even my apprentice had a go and got nowhere.

So in the end we binned the use of it and I went to the old method of a bottle and tube immersed in fluid, open the valve, pump the pedal a few times and close the valve. Nice and simple (the best ways always are) job done in 5 minutes.
Then onto the brakes, the rear offside steel brake pipe had sheared off at the union due to corrosion, this actually happened about 2 years ago and was something I always meant to sort out, should have done it sooner rather than later. Knowing this was coming I had procured a brake flaring tool that I was hoping would put a flare in a metal pipe, as most won’t.
This is what I bought.

And was it any good?
Hell yes, probably one of the best tools ever, flared the steel pipe without issue, so easy to use, I can now flare a pipe in under a minute, perfect every time. And of course it is small enough to use on the car. Every tool box should have one.
So I fitted a union and a new part section of pipe. Lovely, I was expecting this item to give me loads of problems, but it went rather smoothly.
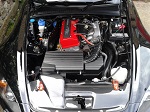
Now came the time to see if the car still actually runs, having not started it in 3 years I was a little apprehensive. So I filled some fuel cans and filled the tank with 20 litres, temporarily stole the battery off the daily, and set about the awakening of the beast.
Typically my neighbour was knocking around the immediate area at the time, he’s a good bloke and loves his VW’s, but you could clearly see he was watching, waiting to be able to offer advice (when it didn't start). So I put the key in, counted to 5 (in my head) for the fuel to prime, looked straight at him, gave a wink and turned the key. Broom, started first time, like it had only run yesterday. Oh, that was a surprise he said, yep I said, they do make good engines. He then went about his business. Sweet.
All good I thought, till I wandered round to the rear of the car, to discover a small fuel leak from the feed line, where it meets a crimped rubber section. Unbelievable, the only metal pipe underneath that I did not replace (as they are about £300). So with some head scratching, a bit of thought and some AN fittings and stainless fuel pipe I had to hand basically fabricated a new section of pipe.

And, it worked, yay.
Now onto the brakes, the good old bottle, tube and a bit of fluid method worked smashingly, all four corners done in an hour on my own, with no issues, I’d have been pretty screwed if there had been, 2 days to go….
So off to the new house to put together the yardmaster metal shed ready for the tools, blimey that took some doing on my own. Lots of self tapping screws, so many I lost count and blistered my hands with the screw driver action (oo-er). But 7 hours of graft later I had a home for my toys. Then back to the old place and another 5 hours of clean up and organising the garage contents.
Then the last day, fitted the interior, put the doors and boot lid back together, gave the car a wash and transported the tools over. Now for just the car….
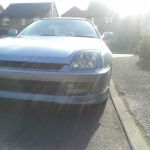
I double checked everything I could think of, aligned the rear wheel as straight as I could with my eye and off I went. Moving it felt good, far from complete and a bit twitchy but sitting in that low slung seating position with a nice smooth engine at the right foot has given me a lot to smile about.
And here it sits at the new place, waiting for me to find the time to finish it off, just after I've installed 40m of fencing, sorted out an 80sqm weed infested garden and a whole host of new jobs on the new place. Great, another project.


Unfortunately not too many pictures due to time constraints and a mad rush due to a(nother) recent house move and a pretty nasty illness; should be settled for a while now though as I've bought this house rather than renting. Sadly no garage at the moment either, though I have space to build one and an existing garage is marked on the deeds , the concrete base already exists and my dad’s a bricklayer (handy).
So, let’s go back a while, not happy with the previous repair to the o/s rear quarter as it has been sat with just primer for about 4 years now, I decided to re-replace it, trying not to set the thing on fire this time though.
Handy that I have a pair of replacement panels lying around.
So I prepped it ready to fit, having to add a few bits on the returns to make it fit.
Then cut the old work off the car and fabricated a new inner arch.
And then a bit of welding.
Followed by some body filler.
Due to time constraints, I did not have the chance to finish it off totally, so I’ve gone with a weather proof primer (BH epoxy mastic) to protect it until I get the chance to finish off, unfortunately my gun was playing up big time so the finish is pretty crap, no real biggie though as it still needs a minor amount of work on the shape.
A few other things I’ve done, but no pics, is:
• to derust the bonnet stay and paint with epoxy primer.
• modify the eyebrows, cutting out the faux nostrils, and giving them a lick of paint.
• the rear number plate holder normally has two little tabs at the bottom, one of mine had snapped off (always been like that), so instead of getting a new one I snapped off the other one and smoothed and painted it, never liked them anyway.
So, the house move took ages to progress, 12 weeks with a no chain transaction (lazy solicitors), and then suddenly everything went through and I had 3 weeks till completion, oh dear, oh very dear. The car was still on stilts, un-bled brakes (and a broken brake line) no hydraulic clutch system, a fuel pipe issue, no front wings, front bumper, rear bumper, both doors and tailgate stripped down. This will be a challenge………
Then, as sods law dictates, I fell ill, contracting something that gave me conjunctivitis, tonsillitis, a swollen face, muscle pain and flu symptoms. Fantastic.
My face says it all as to how I felt, but at least only one eye was affected…..
Until the virus spread, but I didn’t let it get me down…..
After two weeks I was feeling better, not 100%, more like 70%, but relative to the 30% I was earlier, this was ok, I can do it.
So there I am 1 week from moving, lots to do on the car, a garage in such a mess there’s at least a full days clean up, all the paperwork to do that’s associated with a house move, the physical house move, construct one of those flat pack metal sheds for my tools and cleanup of the rental property.
So I took a week off work and set to the car.
I started at the front, derusting the front wings.
One of the wings I had a replacement for as it had had at least two previous repairs; looked ok from the outside.
But when reversed.
Glad I had a replacement.
Though this too needed a little work, as did the other side.
So I did some repairs and filled.
Then filler primed.
At the same time I worked on the bumper, which had 3 years worth of garage scuffs and a little sinkage where the badge holes had previously been filled.
And then some decent 2k primer.
I followed this with a flat and paint with phantom pearl, along with the eyebrows and rear plate recess and fitted them.
In the middle of all this I set about fitting the clutch slave cylinder that I had previously removed to fit to the old Accord when it popped, I’ll replace it later I said to myself at the time, should have done this earlier (doh), at least I had bought the part and shelved it in the garage.
I decided to adjust the mounting bracket for the clutch fluid pot as it has always looked a little messy, this now mounts onto the strut brace.
Fitted that and on with the slave cylinder, nice and easy, then put some fluid in the system and attempted to bleed. Unfortunately the pedal went straight to the floor and not much was happening. After messing around for a while I decided to remove the master and see what was up.
Would you just know it, the rod had only gone and seized in place, not a chance of rescue.
Lucky for me I had bought a spare cylinder as a spare part years ago, cool, just drag it off the shelf and off I go. Comparing the two then suddenly realised that it was completely different, seems this is for a Civic. jobby. Bloody eBay.
With the time pressures and no chance of getting a replacement in time I had to think fast, stripping the old one down and using the old push rod in the new housing to make something suitable.
Looks good to me, and once installed, indeed it was.
A few other issues before this point though, to make bleeding brakes and clutches easier and quicker I bought one of these.
Well, try and try as I might I could not get the bugger to do its job properly, even my apprentice had a go and got nowhere.
So in the end we binned the use of it and I went to the old method of a bottle and tube immersed in fluid, open the valve, pump the pedal a few times and close the valve. Nice and simple (the best ways always are) job done in 5 minutes.
Then onto the brakes, the rear offside steel brake pipe had sheared off at the union due to corrosion, this actually happened about 2 years ago and was something I always meant to sort out, should have done it sooner rather than later. Knowing this was coming I had procured a brake flaring tool that I was hoping would put a flare in a metal pipe, as most won’t.
This is what I bought.
And was it any good?
Hell yes, probably one of the best tools ever, flared the steel pipe without issue, so easy to use, I can now flare a pipe in under a minute, perfect every time. And of course it is small enough to use on the car. Every tool box should have one.
So I fitted a union and a new part section of pipe. Lovely, I was expecting this item to give me loads of problems, but it went rather smoothly.
Now came the time to see if the car still actually runs, having not started it in 3 years I was a little apprehensive. So I filled some fuel cans and filled the tank with 20 litres, temporarily stole the battery off the daily, and set about the awakening of the beast.
Typically my neighbour was knocking around the immediate area at the time, he’s a good bloke and loves his VW’s, but you could clearly see he was watching, waiting to be able to offer advice (when it didn't start). So I put the key in, counted to 5 (in my head) for the fuel to prime, looked straight at him, gave a wink and turned the key. Broom, started first time, like it had only run yesterday. Oh, that was a surprise he said, yep I said, they do make good engines. He then went about his business. Sweet.
All good I thought, till I wandered round to the rear of the car, to discover a small fuel leak from the feed line, where it meets a crimped rubber section. Unbelievable, the only metal pipe underneath that I did not replace (as they are about £300). So with some head scratching, a bit of thought and some AN fittings and stainless fuel pipe I had to hand basically fabricated a new section of pipe.
And, it worked, yay.
Now onto the brakes, the good old bottle, tube and a bit of fluid method worked smashingly, all four corners done in an hour on my own, with no issues, I’d have been pretty screwed if there had been, 2 days to go….
So off to the new house to put together the yardmaster metal shed ready for the tools, blimey that took some doing on my own. Lots of self tapping screws, so many I lost count and blistered my hands with the screw driver action (oo-er). But 7 hours of graft later I had a home for my toys. Then back to the old place and another 5 hours of clean up and organising the garage contents.
Then the last day, fitted the interior, put the doors and boot lid back together, gave the car a wash and transported the tools over. Now for just the car….
I double checked everything I could think of, aligned the rear wheel as straight as I could with my eye and off I went. Moving it felt good, far from complete and a bit twitchy but sitting in that low slung seating position with a nice smooth engine at the right foot has given me a lot to smile about.
And here it sits at the new place, waiting for me to find the time to finish it off, just after I've installed 40m of fencing, sorted out an 80sqm weed infested garden and a whole host of new jobs on the new place. Great, another project.


-
wurlycorner

- Ye are glad to be dead, RIGHT?
- Posts: 21511
- Joined: Sat May 19, 2012 3:33 pm
- My Generation: 4G
- Location: Chelmsford, Essex
- Has thanked: 2507 times
- Been thanked: 317 times