More Parts!
Seats
I seem to have a thing about seats this last year, at one point I had 8 seats of assorted JDM goodness in the garage! Problems?
I sold the old Recaro SR3 confetti style ones to Mart609 which he was going to put in his Accord Wagon. Which still leaves me with 6 seats! I have the original Recaro SR3 from the Mitsubishi Evo 4, which I need to sell on. Plus I still have the rare red AAR bucket seats, which I am debating to part with soon to the right buyer with the right cash.

So what am I using for the lude?
I’ve bought these which some of you may recognise, Recaro Sportline Top Fuel Specials:


I’ve seen two other varieties of this seat, one in the states in red and black:
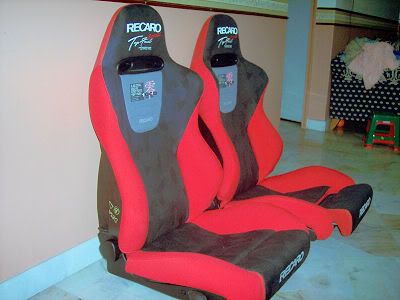
And another all black in Japan:

Mine are the only grey and black (with a hint of red) set I can find.
They need a little cleaning, which Dan (W1ggz) should be sorting out, along with my new track bucket seat for the drivers side. You won’t recognise it, it’s a Japan market only Recaro TS-G Limited Blue:


They sell various forms of TS-G & RS-G (similar but not as laid back) from Recaro’s main dealer ASM in Japan in various finishes, but this Limited model was the first testers from Recaro before ASM took over. Only 150 made in each colour, red and blue. So nearly one of the rarest items on my car.
Here is the best write up I can find from the best magazine in Japan:
http://www.jdm-option.com/eng/parts/05_11/recaro.html
Pretty cool!
This is the laid back version of the RS-G that Mugen use for their new seats and some of their concept cars:

Here is the seat dimensions against the RS-G.


I thought it would be a gamble as the AAR seats are beyond ‘snug’ for me and this was aimed at the smaller Japanese market. But it is perfect. The bottom bucket part is more generous than the likes of the high sided SPG’s and the shoulder strap holes and width of the shoulder area seem to fit me perfectly.
I’m not a big fan of the blue but they are in good condition. One day I may want to retrim it, in which case I’ll get it done like the Mugen Civic RR Advanced (concept car):
This is the extent of my problems:

Too many seats, tyres, gearboxes, etc, etc…
A final pic, as I am a pic whore of ASM in Japan and its extent of custom Recaros and the famous wall of seats!


Seat Rails
Both the Top Fuel Recaro’s and the TS-G will be fitted using the original Bride rails, which I nearly sold – Sorry Ste and Phil!

For the TS-G I have to add some side mounts, I picked up a pair of Recaro steel side mounts in the end, meant for XL seats:

These don’t line up 100% so I simply swapped the inside mount drivers to passengers so they came into the seat a little more and hey presto! I guess some SPG mounts would fit 100%, but they’re bought now and they were cheap (as always!).
Harnesses
More changes. Original plan and posts I was going to use a Willans 2” harness in red colour. But I still wanted something better and preferably in 3”. I really liked the new black Takata’s but didn’t want to compromise to the lower end of the line up. So I found an unused, second hand Takata MPH-341 harness. Oh, and a genuine one at that!
I’ve always thought the green was a bit off, but damn they are nice harnesses. So I found one for a good price:


Randomly in the box from the seller was some correct threaded Eye bolts and some even more random OEM Honda cotter pins – needed some of these too!
Keeping my eye out for another to join this one, but not desparate yet. Also wouldn’t mind a set of the harness pads. The authentic jap ones are like £120 though. The new European ones aren’t as nice but still about £70-80 a pair!
And to strap it into the car of course we can’t forget the Tram Road Motors harness bar from the 1st group buy. Sexy stuff Phil. I opted for mine to be in primer:

During my panting frenzy in the summer, this went white to go with a little colour theme here and there:


I used Plasticote, not the best to work with, but after enough coats it was up to my standards.
Brakes
Next change of plans is in the brake department. I originally had the Hi Spec 4 pots with 330mm-ish discs. Well as most have probably already seen, pete106 has got his hands on these for a deal of sorts (cough).
Reason being is I snapped up the 6 pot Ksports with 306mm discs from Nellers brother.


Loads of meat left on the discs and no calipers to refurb – I have no time and plenty of other stuff to fit! Plus the slightly smaller size disc gives more clearance for my wheels. Just need to sort the rusty bolts out at some point, but not urgent.


Test fitted to the car with the track wheels. Still need to remove the dust guards.
Sexy stuff! Should cope well, just trying to decide what to do with the rear now.
Wheels
Finally! Back to my Volk wheels. It feels like an age since I last posted the split down of these. I painstakingly started to sand the lips back to polish them, and well…gave up. It was taking an age to do and its too much work for the upkeep of UKs weather and winter salt on the roads. So I decided to powder coat the rims as well as the centres. Colour choice has seen much debate over the years and I settled on…drum role…
…
…
…
…
ALL WHITE!
Might not be everyone’s cup of tea, but I miss my white OZ wheels. Only other option was black, like when I bought them, but you would lose the detail of the wheel.
I used City Powder Coaters in Birmingham, following a recommendation from Mart609, they had a deal on for £20 a wheel standard colours. I had my new wheels for the Mazda 6 done for that price and he did the split rims in white for £30 a wheel. Even threw in the centre cap locking tool for free. Bargain!
Here’s when I got them back:

Here they are mocked up with the polished bolts and a centre cap.


Only PITA was the thickness of the powder coating to take out 99% of the blemishes has caused the centre cap wheel nut cover to not sit true. So I’ve been sat on evenings watching the telly, skimming thin layers down with a razor gasket scraper. Fun times!
Here’s what I’m talking about:

As for the magnesium baskets (back part of the wheels). I had these spray painted by a friend for free in black. Results:


Little Sienna liked this bit:

All pieced together:


Once I’ve got the wheel nut covers sitting true I just need to build them up (while not shearing any bolts!) and then some sealant to the joint to finish them. I’ve got a couple of Toyo T1-Rs to go on, just need to find two other tyres to add – Might try the Syron Street Race:
http://www.tyretraders.com/Syron.aspx
After using the Race 1’s on the front of my Mazda 6 and the rears of my missus’s 3 series Beemer, they are really good tyres.
I may have found some correct centre caps for them too! Fingers crossed I can get them.