
Congratulations to vtecmec for winning May/June's Lude Of The Month, with his DIY Turbo BB1 build.
>>> Click Here For Profile <<<

>>> Click Here For Profile <<<
aiming for 300+, JRSC, ongoing Story... ~
-
rob quilter

- Supporter 2014
- Posts: 5331
- Joined: Mon Aug 09, 2010 1:40 pm
- My Generation: 5G
- PSN GamerTag: robquilter
- Location: Derby
Nice work!
PERFORMANCE PARTS FOR JAPANESE CARS - http://WWW.TOKYOSQUAD.COM
FOLLOW US ON FACEBOOK - http://WWW.FACEBOOK.COM/TOKYOSQUAD
FOLLOW US ON FACEBOOK - http://WWW.FACEBOOK.COM/TOKYOSQUAD
-
wurlycorner

- Ye are glad to be dead, RIGHT?
- Posts: 21224
- Joined: Sat May 19, 2012 3:33 pm
- My Generation: 4G
- Location: Chelmsford, Essex
- Has thanked: 1968 times
- Been thanked: 240 times
-
RattyMcClelland

- Moderator
- Posts: 9195
- Joined: Wed Aug 04, 2010 10:02 pm
- My Generation: 5G
- PSN GamerTag: RattyMcClelland
- Location: Leicestershire
- Been thanked: 183 times
That's the way to do it.
I wish I had a milling machine. I did mine all by hand and drill bits. Took hours.
This mixed with the massive throttle body, merc racing supercharger inlet and the 9 psi pulley mine is making a constant 12psi of boost.
Plus now the supercharged is ported and plugged my intake air temps are exactly the same as the stock 6psi setup at 70degrees C.
Water and meth is reducing this by about 20degree C.
Mine isn't finished yet though.

-
woOtSalami

- Posts: 104
- Joined: Tue Feb 10, 2015 11:23 am
- My Generation: 5G
- Location: Germany, Stuttgart
Re: aiming for 300+, JRSC, ongoing Story... ~
Thanks guys! Iets see what the numbers will tell 
@RattyMcClelland
Can you post some pictures of the merc SC inlet?
@RattyMcClelland
Can you post some pictures of the merc SC inlet?
-
RattyMcClelland
- Moderator
- Posts: 9195
- Joined: Wed Aug 04, 2010 10:02 pm
- My Generation: 5G
- PSN GamerTag: RattyMcClelland
- Location: Leicestershire
- Been thanked: 183 times
-
woOtSalami
- Posts: 104
- Joined: Tue Feb 10, 2015 11:23 am
- My Generation: 5G
- Location: Germany, Stuttgart
Re: aiming for 300+, JRSC, ongoing Story... ~
Shame on me Ratty 
I will chekc out your thread and study it in the evening
I will chekc out your thread and study it in the evening
-
woOtSalami
- Posts: 104
- Joined: Tue Feb 10, 2015 11:23 am
- My Generation: 5G
- Location: Germany, Stuttgart
Last weekend marvelous progress part I - Saturday
Yep that was a long exhausting weekend for me but I achieved some marvelous progress
I prepared the whole Intake manifold for assembling which includes: finishing the manifold itself, blocking off the EGR, fitting the Injectors and fuel rail, craft all gaskets and sand the gasket surfaces.

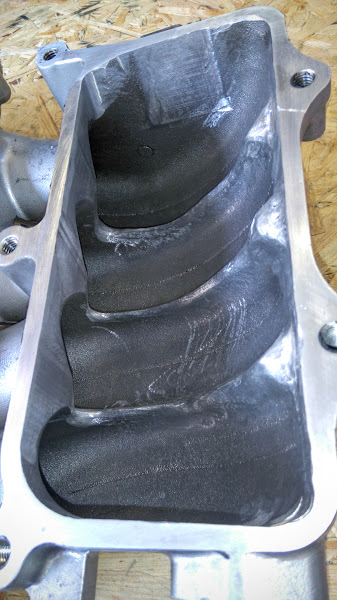


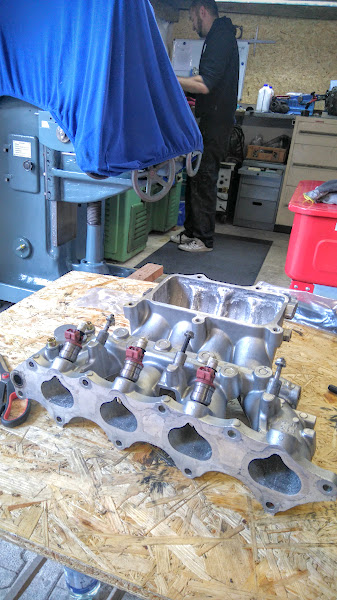


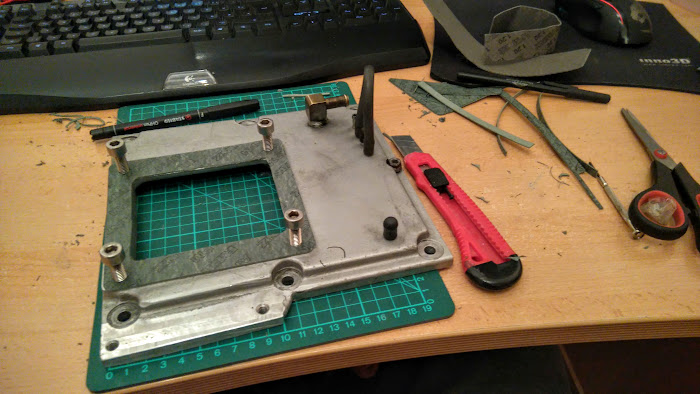

The worst part was fitting the Injectors... I am not using the usual ones like ID or RC Injectors, instead I go with some 560cc injectors from a Lancer Evo. But you have the same problem as with the RC ones... the diameter of the sealing shaft is to thick so I was thinking with a good friend what we can do and decided to mill them down by 0.9mm now the fit like a charm and it was the best solution after all. It just stole me some hours to complete all this.
All in All I am really happy with the result so far for a Saturday work.
I prepared the whole Intake manifold for assembling which includes: finishing the manifold itself, blocking off the EGR, fitting the Injectors and fuel rail, craft all gaskets and sand the gasket surfaces.
The worst part was fitting the Injectors... I am not using the usual ones like ID or RC Injectors, instead I go with some 560cc injectors from a Lancer Evo. But you have the same problem as with the RC ones... the diameter of the sealing shaft is to thick so I was thinking with a good friend what we can do and decided to mill them down by 0.9mm now the fit like a charm and it was the best solution after all. It just stole me some hours to complete all this.
All in All I am really happy with the result so far for a Saturday work.
-
nucleustylzlude

- Moderator
- Posts: 4010
- Joined: Wed Aug 11, 2010 11:46 pm
- My Generation: 4G
- Location: Bristol, UK!
- Been thanked: 3 times
- Contact:
Good work bud. Reducing the diameter of the seals I found a pain to get a consistent diameter.
I'm confused why you have two ports on the fuel rail and the OEM FPR? The FPR does the return back to the tank. What's the other take off for?
The milling work looks really good, my version 2 from Pete on here (including the chargecooler) was all done by others as trying to just port out the 'S' tube bit was taking me ages! Fairplay Ratty for doing the lower manifold yourself!

-
woOtSalami
- Posts: 104
- Joined: Tue Feb 10, 2015 11:23 am
- My Generation: 5G
- Location: Germany, Stuttgart
Re: aiming for 300+, JRSC, ongoing Story... ~
Actually the seals where the part when I wanted to give up... To find a solution which will flawlessly works was not so easy but it worked out finenucleustylzlude wrote:Good work bud. Reducing the diameter of the seals I found a pain to get a consistent diameter.
I'm confused why you have two ports on the fuel rail and the OEM FPR? The FPR does the return back to the tank. What's the other take off for?
The milling work looks really good, my version 2 from Pete on here (including the chargecooler) was all done by others as trying to just port out the 'S' tube bit was taking me ages! Fairplay Ratty for doing the lower manifold yourself!
The second hose is for "Dual feed" I run from the fuel filter two lines to the rail and like you said over the FPR back to the tank. I will use this for testing if I have any advantages.
Do you have a chargecooler with laminova cores or what kind of?
-
woOtSalami
- Posts: 104
- Joined: Tue Feb 10, 2015 11:23 am
- My Generation: 5G
- Location: Germany, Stuttgart
Weekend Progress Part II
Ok in the last weeks I was reeeeaaally busy and had no time to write or do any posts here.
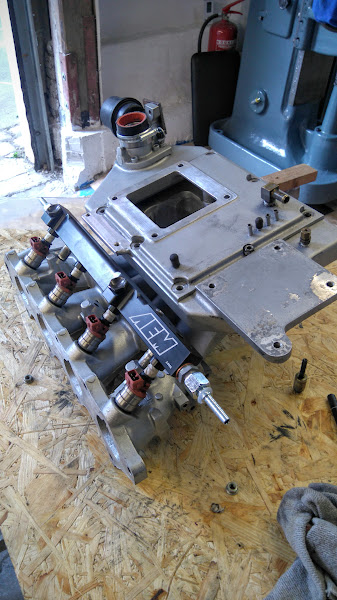
After the prep of the IM and Injectors I only had to fit everything in the car and this happened on a Sunday with a lot of headache...
First thing was to remove the old Fuel Filter and relocate it to a better place. I used some common fittings which are really easy to use and tighten a hose onto.
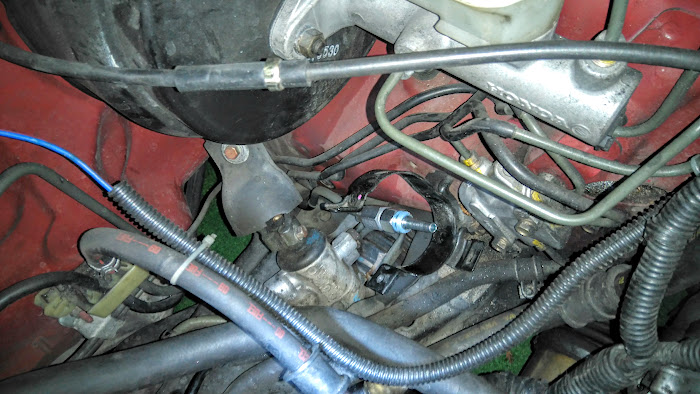
Next was to prep the Injectors on the rail and also the FPR. As you can see I use to fittings left and right for Dual feed.

Fitting the lower IM back again on the car was a pain... With the external oil cooler and the sandwich plate you have a really limited space and need really small chinese woman hands

Next step was to fit the first part of the JRSC, the big plate of jobby together with the Jackshaft assembly. Up to this moment I didnt know what kind of problems will throw some rocks in my way...


Next was to fit the rest of the stuff...


THEN IT HAPPENED! :/ It was not possible to mount the TB because the by-pass valve is to fat. I mean lol why should it not fit? I saw many of JRSC with skunk2 pro tb... Then I found the reason... Look for youself


After solving the problems I made the final touches and only needed to wait for monday to buy a new battery


While doing all this they were a few things which I was thinking about...
-Why do I need a IACV when I have no port for this on the Skunk2 TB
-FITV is only useful on really cold days
-Removing the whole Vacuum things should not harm anything.
-The car needs defo a re-tune but until then I should be able to drive it as long as the AFR is fine?!
-What do you think so far
After the prep of the IM and Injectors I only had to fit everything in the car and this happened on a Sunday with a lot of headache...
First thing was to remove the old Fuel Filter and relocate it to a better place. I used some common fittings which are really easy to use and tighten a hose onto.
Next was to prep the Injectors on the rail and also the FPR. As you can see I use to fittings left and right for Dual feed.
Fitting the lower IM back again on the car was a pain... With the external oil cooler and the sandwich plate you have a really limited space and need really small chinese woman hands
Next step was to fit the first part of the JRSC, the big plate of jobby together with the Jackshaft assembly. Up to this moment I didnt know what kind of problems will throw some rocks in my way...
Next was to fit the rest of the stuff...
THEN IT HAPPENED! :/ It was not possible to mount the TB because the by-pass valve is to fat. I mean lol why should it not fit? I saw many of JRSC with skunk2 pro tb... Then I found the reason... Look for youself
After solving the problems I made the final touches and only needed to wait for monday to buy a new battery
While doing all this they were a few things which I was thinking about...
-Why do I need a IACV when I have no port for this on the Skunk2 TB
-FITV is only useful on really cold days
-Removing the whole Vacuum things should not harm anything.
-The car needs defo a re-tune but until then I should be able to drive it as long as the AFR is fine?!
-What do you think so far
Last edited by woOtSalami on Mon Jun 13, 2016 11:16 pm, edited 2 times in total.