
And now, angry ticks fire out of my nipplesLewisH wrote:I meant... "I just choose kto jobby mine in the layby outside my house"
Congratulations to vtecmec for winning May/June's Lude Of The Month, with his DIY Turbo BB1 build.
>>> Click Here For Profile <<<

>>> Click Here For Profile <<<
JDM 98Spec Integra Type-R: Update P12 (5th June)
-
Dino
- Posts: 1692
- Joined: Wed Jul 20, 2011 1:30 pm
- My Generation: 4G
- Location: Monmouth
- Has thanked: 1 time
- Been thanked: 8 times
Winter work
Alleluja.....its been a while, so here is bit of an update. 
At the end of September I took the Teg off the road for winter to garage her and protect her from Winters harshness
In that time I planned to do lots of jobs on the car to get her ready to be back on the road for April.
First Job of the year was to fit the air intake duct I received earlier.
So I took the bumper and cut out the section required to fit the duct
Before:

After:

The next step was to fit the duct and this was mounted by sealing in place:

I'd bought a length of 4" diameter flexi pipe to mate up to the back of the Duct intake and the other end of the pipe was retro-fitted to the bottom section of the airbox.
Quick picture of it retro-fitted:

Next job was to fit the Mesiter-R Coilovers. These had been sat in the box from new since May 2013.
So I went about fitting them. No real problems as all the bolts had been greased up and everything fitted nicely:

I picked up a spare sump and had some baffle plates fitted ready for when I do the Flywheel swap on the car:

Talking of which, I had one of many deliveries come:
Fidanza 8lb Flywheel

Hawk HP+ Front Brake pads & Hawk HPS Rear Pads

Bremtec Grooved Front Discs

HEL Braided Brake Lines (In Black)

x4 Kumho Ku36 Semi-slick tyres in 215/45 16"


These seem to have had pretty good reviews and Im really surprised at their wet road capability/rating. I decided to get them as an alternative to Hankook RS2's that are no longer available as an EU tyre.
Next up was to paint my scabby rocker cover:

So first we gave it a little bit of paint stripper love

Then removed all the excess paint and degreased it:

Gave it a coat of Bilts Hamber Etch primer

Then gave it a few coats of UHT Wrinkle paint and here we have it:

Next job was to fit the brakes, pads and brake lines and refreshed the system with Motul RBF 600 including the clutch fluid...(Sorry No pics for this one )
)
Next job was to change the Flywheel. There was no need to change the clutch as this had been done approx. 20k miles before.

Engine out:


Box stripped off an old flywheel:

New flywheel fitted:

So while the engine was out...time to give it a degrease: Please note, it aint Mr Muscle in the bottles
Before:

After:

Replaced all the Belts on the Air Con, Power Steering a Alternator while the engine was out and sorted a slight oil leak.
While the engine was out, I noticed the Rad stays and bottom sill area were starting to look a little rusty.

These needed a little treatment, so I wire brushed the area, applied Bilts Hamber De-oxy gel

Once cleaned up the De-oxy gel I applied Bilts Hamber UB Sealant to prevent any rust coming back

While that was drying, the front lenses were yellowing. These were in need of a little TLC with some Meguiars Plastex..The pictures don't really do it them much justice, but they have cleaned up nicely.
Before:

After:

So today, I managed to a few other bits done:
Fitted the Energy Suspension shifter linkage bushes:


Fitted the Energy suspension Engine mount inserts (Rear Mount & Side Torque mounts)

Plus I managed to get the engine back in today with most of the plumbing sorted. Just need to finish it off tomorrow so more updates coming very soon:
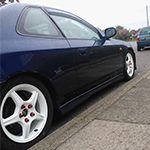
Pic of the car as of today:

At the end of September I took the Teg off the road for winter to garage her and protect her from Winters harshness
In that time I planned to do lots of jobs on the car to get her ready to be back on the road for April.
First Job of the year was to fit the air intake duct I received earlier.
So I took the bumper and cut out the section required to fit the duct
Before:

After:

The next step was to fit the duct and this was mounted by sealing in place:

I'd bought a length of 4" diameter flexi pipe to mate up to the back of the Duct intake and the other end of the pipe was retro-fitted to the bottom section of the airbox.
Quick picture of it retro-fitted:

Next job was to fit the Mesiter-R Coilovers. These had been sat in the box from new since May 2013.
So I went about fitting them. No real problems as all the bolts had been greased up and everything fitted nicely:

I picked up a spare sump and had some baffle plates fitted ready for when I do the Flywheel swap on the car:

Talking of which, I had one of many deliveries come:
Fidanza 8lb Flywheel

Hawk HP+ Front Brake pads & Hawk HPS Rear Pads

Bremtec Grooved Front Discs

HEL Braided Brake Lines (In Black)

x4 Kumho Ku36 Semi-slick tyres in 215/45 16"


These seem to have had pretty good reviews and Im really surprised at their wet road capability/rating. I decided to get them as an alternative to Hankook RS2's that are no longer available as an EU tyre.
Next up was to paint my scabby rocker cover:

So first we gave it a little bit of paint stripper love

Then removed all the excess paint and degreased it:

Gave it a coat of Bilts Hamber Etch primer

Then gave it a few coats of UHT Wrinkle paint and here we have it:

Next job was to fit the brakes, pads and brake lines and refreshed the system with Motul RBF 600 including the clutch fluid...(Sorry No pics for this one
Next job was to change the Flywheel. There was no need to change the clutch as this had been done approx. 20k miles before.

Engine out:


Box stripped off an old flywheel:

New flywheel fitted:

So while the engine was out...time to give it a degrease: Please note, it aint Mr Muscle in the bottles
Before:

After:

Replaced all the Belts on the Air Con, Power Steering a Alternator while the engine was out and sorted a slight oil leak.
While the engine was out, I noticed the Rad stays and bottom sill area were starting to look a little rusty.

These needed a little treatment, so I wire brushed the area, applied Bilts Hamber De-oxy gel

Once cleaned up the De-oxy gel I applied Bilts Hamber UB Sealant to prevent any rust coming back

While that was drying, the front lenses were yellowing. These were in need of a little TLC with some Meguiars Plastex..The pictures don't really do it them much justice, but they have cleaned up nicely.
Before:

After:

So today, I managed to a few other bits done:
Fitted the Energy Suspension shifter linkage bushes:


Fitted the Energy suspension Engine mount inserts (Rear Mount & Side Torque mounts)

Plus I managed to get the engine back in today with most of the plumbing sorted. Just need to finish it off tomorrow so more updates coming very soon:
Pic of the car as of today:
Last edited by Dino on Sat Mar 22, 2014 11:17 pm, edited 1 time in total.


-
wurlycorner

- Ye are glad to be dead, RIGHT?
- Posts: 21511
- Joined: Sat May 19, 2012 3:33 pm
- My Generation: 4G
- Location: Chelmsford, Essex
- Has thanked: 2507 times
- Been thanked: 317 times
-
rob quilter

- Supporter 2014
- Posts: 5331
- Joined: Mon Aug 09, 2010 1:40 pm
- My Generation: 5G
- PSN GamerTag: robquilter
- Location: Derby
Holy crap, that's some progress!

PERFORMANCE PARTS FOR JAPANESE CARS - http://WWW.TOKYOSQUAD.COM
FOLLOW US ON FACEBOOK - http://WWW.FACEBOOK.COM/TOKYOSQUAD
FOLLOW US ON FACEBOOK - http://WWW.FACEBOOK.COM/TOKYOSQUAD