
No matey. I give up on it. I think it can be difference between JDM and UKDM cars. But till I get my H22A2 out of the bay and replace it with H22A I can't confirm this. Honda dealer told me that this is the only one seal they can get.Donald wrote:Did you ever figure out what was going on with 36172-P08-015?
Congratulations to vtecmec for winning May/June's Lude Of The Month, with his DIY Turbo BB1 build.
>>> Click Here For Profile <<<

>>> Click Here For Profile <<<
Mario's ride
-
K30DPC
- LotM Winner
- Posts: 1106
- Joined: Fri Aug 09, 2013 7:45 am
- My Generation: 4G
- Location: GB/Poland
- Has thanked: 17 times
- Been thanked: 17 times
Re: Mario's ride
my BB1 UKDM

-
K30DPC
- LotM Winner
- Posts: 1106
- Joined: Fri Aug 09, 2013 7:45 am
- My Generation: 4G
- Location: GB/Poland
- Has thanked: 17 times
- Been thanked: 17 times
Re: Mario's ride
I had to only fuel it and enjoy it. But as quick as weather comes better I spent all day on my car. I looked into rear calipers and I found out one piston had to be replaced. Likely I had spare one so I could do it stright away. Other side was fine so I only regreased it and put back on the car.
Some time ago I found one of fixings was lost and flexi brake pipe was touching to the driveshaft. Imediately I reinstall it but flexi pipe was slightly rubbed. I knew it's enough save to still use it, but it wont pass next MOT. Today I have changed all four for some brided with stainless steel mounts goodridge one. Also I had some stainless steel banjo bolts so I used them as well. I had some problems to undo connections between flexi and hard pipes but at the end of the day it was there for last 19 years. I don't think that anybody did replace them before.
I also checked fog lights as one didn't come up. It was loose connection so easy to fix - hard to find
Tomorrow I have to fit my front number plate and it will be ready for its MOT. It runs out on saturday and I'm going to book it tomorrow for ASAP. Wish me luck. I'm just wondering what they will find this year...
my BB1 UKDM
-
K30DPC
- LotM Winner
- Posts: 1106
- Joined: Fri Aug 09, 2013 7:45 am
- My Generation: 4G
- Location: GB/Poland
- Has thanked: 17 times
- Been thanked: 17 times
Re: Mario's ride
A bit late update as I've been busy.
She didn't pass an MOT. Same as last year she failed on emission. Good run and a lot of heat aplied to cat didn't help this time. So I came back home and had to order new catalitic converter. Two days later I had in my hands shiny box with 2.5 inch in and outlet with 200cells per square cm. I had this installed on friday and stright away I gave her a good run and put to MOT station. Result as expected. Mechanic was even laughing that I should apply for lower tax as emission was so low.
Going forward: advisory:
1. Both front tyres worn - really??
2. Exhaust noisy - what??
3. handbrake lever has quite a long travel - same as last year
Other then that no issues. So back on the road
Gayno start this and many of us liked his LED idea so I'll show you some of my diodes.
This two was made by myself. I made pcb's then solder in some white flux LEDs and voila
courtesy light

and maplight

For this purpose I've used LED strips. Same long for driver and passenger side so light intensity is the same

And here we have single 3mm diodes in exterior handles. After installation I covered everything with silicone.

I made door light as well using the same method as for interior lights, and glovebox light using small piece of LED strip (I think only 3 LEDswas used). Sorry no pics for now.
Also today I managed interior temp sensor for my computer. So one small step closer to finish and having it fully usable

This is how it looks at night. OLED display is almost the same colour as ori illumination

And last thing I wanna show you. I'm happy to present to you actual milage. So far so good

She didn't pass an MOT. Same as last year she failed on emission. Good run and a lot of heat aplied to cat
Going forward: advisory:
1. Both front tyres worn - really??
2. Exhaust noisy - what??
3. handbrake lever has quite a long travel - same as last year
Other then that no issues. So back on the road
Gayno start this and many of us liked his LED idea so I'll show you some of my diodes.
This two was made by myself. I made pcb's then solder in some white flux LEDs and voila
courtesy light
and maplight
For this purpose I've used LED strips. Same long for driver and passenger side so light intensity is the same
And here we have single 3mm diodes in exterior handles. After installation I covered everything with silicone.
I made door light as well using the same method as for interior lights, and glovebox light using small piece of LED strip (I think only 3 LEDswas used). Sorry no pics for now.
Also today I managed interior temp sensor for my computer. So one small step closer to finish and having it fully usable
This is how it looks at night. OLED display is almost the same colour as ori illumination
And last thing I wanna show you. I'm happy to present to you actual milage. So far so good
Last edited by K30DPC on Sat Mar 29, 2014 5:52 pm, edited 3 times in total.
my BB1 UKDM
-
honda-hardy
- Club Cartographer
- Posts: 6268
- Joined: Sat Jan 28, 2012 7:35 pm
- My Generation: 5G
- Location: chippenham
- Been thanked: 1 time

-
K30DPC
- LotM Winner
- Posts: 1106
- Joined: Fri Aug 09, 2013 7:45 am
- My Generation: 4G
- Location: GB/Poland
- Has thanked: 17 times
- Been thanked: 17 times
Re: Mario's ride
I have it from polish manufacturer. They sell it on polish auction web. Some more info you can find around page 7 in this gallery
Two days ago while I was going to work my EML comes on. When I come back home I pulled error code. 12 -EGR. I had issue with it last year as well but then good run with some VTEC was helping. This time I decided to deal with it like I should do at first time.
I pulled EGR valve off and I discovered a lot of carbon over there. This little fella help to deal with it. Available in halfrauds

I didn't use it as they suggested. I just spray it over the valve, then brush it and repeat, and repeat... to the moment when it looks like this

I sanded this a bit checked for operaion and it was ready to go back on it's place.
But sooner or later this issue would come back. So because I'm a bit lazy and didn't wanna do it again I made this

I've used 4mm thick aluminium sheet and cut this almost to EGR valve base size. Almost because piece which I had was not enough wide. Ideally it should be 5mm wider.
A it of gasket

And few minutes later it sits well on its place


I left EGR valve so ECU doesn't throw any faults. Channels are blocked with my little ali plate which is hardly noticable.
Another good day...
Two days ago while I was going to work my EML comes on. When I come back home I pulled error code. 12 -EGR. I had issue with it last year as well but then good run with some VTEC was helping. This time I decided to deal with it like I should do at first time.
I pulled EGR valve off and I discovered a lot of carbon over there. This little fella help to deal with it. Available in halfrauds
I didn't use it as they suggested. I just spray it over the valve, then brush it and repeat, and repeat... to the moment when it looks like this
I sanded this a bit checked for operaion and it was ready to go back on it's place.
But sooner or later this issue would come back. So because I'm a bit lazy and didn't wanna do it again I made this
I've used 4mm thick aluminium sheet and cut this almost to EGR valve base size. Almost because piece which I had was not enough wide. Ideally it should be 5mm wider.
A it of gasket
And few minutes later it sits well on its place
I left EGR valve so ECU doesn't throw any faults. Channels are blocked with my little ali plate which is hardly noticable.
Another good day...
my BB1 UKDM
-
ddoubledanny

- LotM Winner
- Posts: 1016
- Joined: Fri Jan 27, 2012 8:24 pm
- My Generation: 4G
- PSN GamerTag: Ddoubledanny
- Location: Kettering
-
K30DPC
- LotM Winner
- Posts: 1106
- Joined: Fri Aug 09, 2013 7:45 am
- My Generation: 4G
- Location: GB/Poland
- Has thanked: 17 times
- Been thanked: 17 times
Re: Mario's ride
Nothing was going on here for some time. The think is we're in the middle of process of buying new house so we're saving as much coins as possible. But I had some extra cash and I said to my missus I will spend them like I want it. So this are my new toys:
Skunk2 pro series cam gears

Hondata 4BAR MAP sensor

MAC boost by gear control solenoid

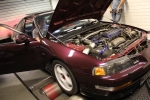
And this what took my day.
First of all I strip it to parts and sanded the case

I took it outside for lick of paint. Then I inspected the PCB. Somebody was here before me. They try to convert it to 5 speed manual. Poor ECU wasn't treat well. Now this will have to be fixed

I installed all brand new low ESR electrolytic capacitors. Why low ESR? Only because they keep their parameters a bit better then oridynary one. This ECU is quite old and it was siting not used for about 2 years so I don't trust ori cap's any longer.
Going to socketing. I did some preparation a while ago so some components were already installed. The last bit I left was them

Standard chip needs only socketing while hondata use goldpins. Because I wasn't sure which route I'll go my ECU was left like this

Now decision was made, shopping was done and I'm one of many happy owners of this white board.

It's a third generation of hondata S300. Full spec can be found on hondata web.
So after a bit of soldering I get this

and was ready to install white board on it's new place

I have also installed some other parts to control boost by shift solenoid. Sorry but no pic for this.
When ECU board was ready I went to check how is the ECU case. After few layers of black and clear laquer it turned quite nice. Paint job was already dry and ready for assembly. PCB's back in frame

Case closed

And a final touch

Just have to sort out damaged connection and it's ready for installation and tuning. As an extra I have installed in my smartphone app working with new hondata. I can not use it till ECU will be in my car but already have it
Skunk2 pro series cam gears
Hondata 4BAR MAP sensor
MAC boost by gear control solenoid
And this what took my day.
First of all I strip it to parts and sanded the case
I took it outside for lick of paint. Then I inspected the PCB. Somebody was here before me. They try to convert it to 5 speed manual. Poor ECU wasn't treat well. Now this will have to be fixed
I installed all brand new low ESR electrolytic capacitors. Why low ESR? Only because they keep their parameters a bit better then oridynary one. This ECU is quite old and it was siting not used for about 2 years so I don't trust ori cap's any longer.
Going to socketing. I did some preparation a while ago so some components were already installed. The last bit I left was them
Standard chip needs only socketing while hondata use goldpins. Because I wasn't sure which route I'll go my ECU was left like this
Now decision was made, shopping was done and I'm one of many happy owners of this white board.
It's a third generation of hondata S300. Full spec can be found on hondata web.
So after a bit of soldering I get this
and was ready to install white board on it's new place
I have also installed some other parts to control boost by shift solenoid. Sorry but no pic for this.
When ECU board was ready I went to check how is the ECU case. After few layers of black and clear laquer it turned quite nice. Paint job was already dry and ready for assembly. PCB's back in frame
Case closed
And a final touch
Just have to sort out damaged connection and it's ready for installation and tuning. As an extra I have installed in my smartphone app working with new hondata. I can not use it till ECU will be in my car but already have it
my BB1 UKDM
-
wurlycorner

- Ye are glad to be dead, RIGHT?
- Posts: 21511
- Joined: Sat May 19, 2012 3:33 pm
- My Generation: 4G
- Location: Chelmsford, Essex
- Has thanked: 2507 times
- Been thanked: 317 times
-
K30DPC
- LotM Winner
- Posts: 1106
- Joined: Fri Aug 09, 2013 7:45 am
- My Generation: 4G
- Location: GB/Poland
- Has thanked: 17 times
- Been thanked: 17 times
Re: Mario's ride
I wanted to move to the vilage but my missus doesn't drive and when I counted petrol money we decided to stay in town. We found 3 bedroom with nice garden and posibility of conversion storage rooms for double garage close to our jobs so when we will finally move prelude will be used only at weekends  For me it sounds like big win win win especially because our mortgage will be only £34 more then actual rent
my BB1 UKDM