Congratulations to vtecmec for winning May/June's Lude Of The Month, with his DIY Turbo BB1 build.

>>> Click Here For Profile <<<

Image

DIY Alloy refurb

Banter goes here, and doesn't have to be Lude related
S7EVE
Posts: 8
Joined: Mon Jul 28, 2014 6:43 pm
My Generation: 5G

DIY Alloy refurb

Post by S7EVE » Tue Aug 26, 2014 8:19 pm

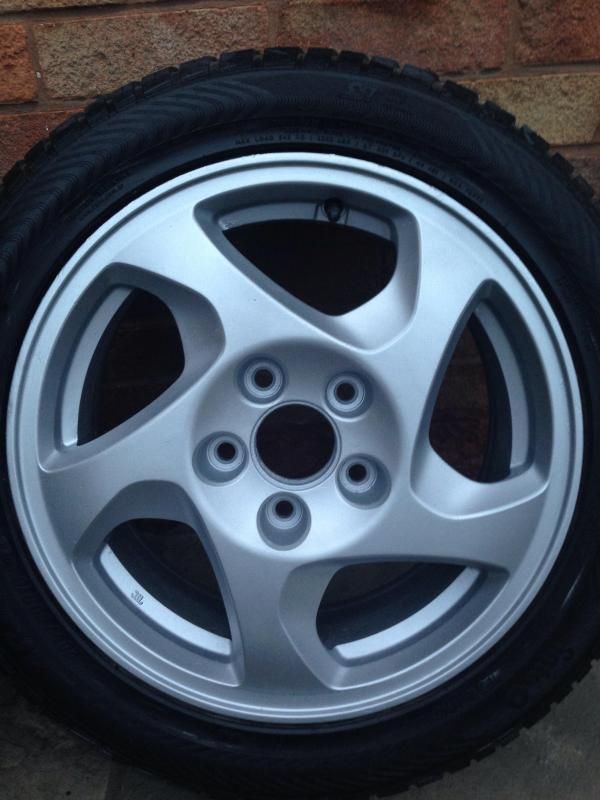
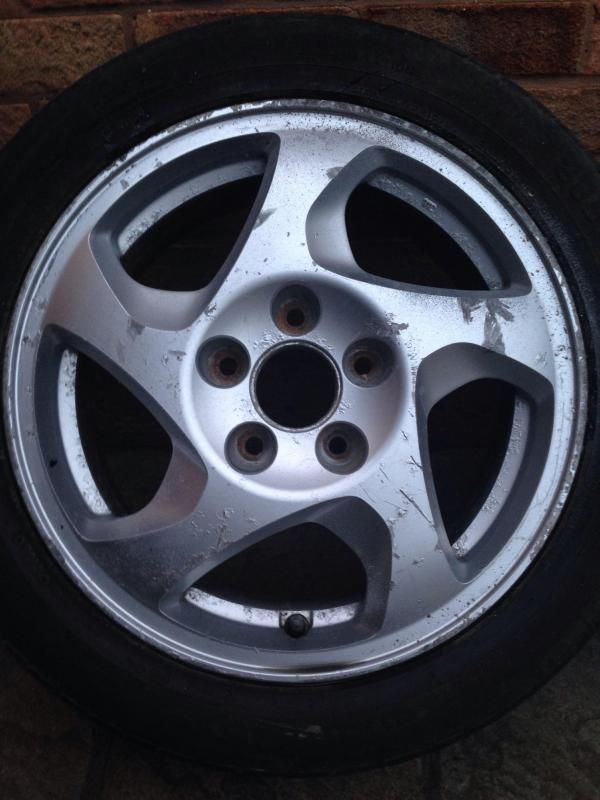
My wife doesn't seem to share my satisfaction following a lot of hours spent manually prepping my old standard 5th gen alloys for refurb. I know it's been done before but thought I would share my achievement with you all.

Old blistered, scratched, dinked standard alloys manually refurbed ready for refitting to the car. Before and after pics below. Hope you like. One wheel has probably taken 4 hours. 3 to go!

BEFORE
Image

FINISHED
Image

Centre caps also completed but not yet fitted.

:D

User avatar
rob quilter
Supporter 2014
Posts: 5331
Joined: Mon Aug 09, 2010 1:40 pm
My Generation: 5G
PSN GamerTag: robquilter
Location: Derby

Post by rob quilter » Tue Aug 26, 2014 8:27 pm

Nice work.

8-)
PERFORMANCE PARTS FOR JAPANESE CARS - http://WWW.TOKYOSQUAD.COM

FOLLOW US ON FACEBOOK - http://WWW.FACEBOOK.COM/TOKYOSQUAD

jsalas623
Posts: 52
Joined: Thu Aug 14, 2014 8:35 pm
My Generation: 5G
Location: US

Post by jsalas623 » Tue Aug 26, 2014 8:29 pm

Looks good! What was the process to do this? My clear coat on my rims is getting pretty bad so would prefer to remove this

User avatar
Ash.Z
Supporter 2014
Posts: 371
Joined: Thu Feb 02, 2012 9:51 pm
My Generation: 4G
Location: Exeter
Has thanked: 1 time
Been thanked: 2 times

Post by Ash.Z » Tue Aug 26, 2014 8:32 pm

Looks good bud.
Image
Hope for the best, prepare for the worst.

User avatar
mercutio
LotM Winner
Posts: 14958
Joined: Sun Aug 08, 2010 8:45 pm
My Generation: 5G
Location: Sunny Manchester
Has thanked: 1 time
Been thanked: 4 times
Contact:

Post by mercutio » Tue Aug 26, 2014 8:39 pm

very nice job 8-)
bristol_bb4 wrote:ahhh a 5th gen, i love 5th gens :D :lol:
Dino wrote:I loves the 5th gen really.... just dont quote me on it... ;)
4thgenphil wrote:Mines 4 1/4 unches mate, sorry

http://www.ludegeneration.co.uk/profile ... -t618.html

User avatar
Doggo
Court Jester
Posts: 2895
Joined: Wed Jan 09, 2013 11:26 pm
My Generation: 5G
PSN GamerTag: FfyreDog
Location: Glasgow

Post by Doggo » Tue Aug 26, 2014 8:47 pm

:shock:

How'dya do that? :shock:

mr_drc
Posts: 507
Joined: Tue Jun 24, 2014 11:19 pm
My Generation: 5G
Location: Desborough
Has thanked: 6 times
Been thanked: 16 times

Post by mr_drc » Tue Aug 26, 2014 9:11 pm

Nice work did you high build prime? The sanding by hand is a bitch ! I get mine soda blasted now much easier costs a £1 per inch :P
If it looks like jobby and smells like jobby it probably is jobby!

S7EVE
Posts: 8
Joined: Mon Jul 28, 2014 6:43 pm
My Generation: 5G

Post by S7EVE » Tue Aug 26, 2014 9:27 pm

Thanks for positive feedback chaps, hard graft but worth it seeing the results.
jsalas623 wrote:Looks good! What was the process to do this? My clear coat on my rims is getting pretty bad so would prefer to remove this
After several chemical cleans I sanded down with 150 sand paper by hand. Wet and dry sanded the wheel down to ensure it all felt smooth. 2 coats of primer, 4 coats of smooth hammerite. From my research I shouldn't need laquer, we'll see!

Will take a picture when their complete and back on car.

Cheers guys.
User avatar
Sailor
Supporter 2016
Posts: 3290
Joined: Tue Jul 17, 2012 7:36 pm
My Generation: 0G
Location: Hampshire
Has thanked: 62 times
Been thanked: 142 times
Contact:

Post by Sailor » Tue Aug 26, 2014 10:51 pm

Excellent.
International Pensioner of Mystery

User avatar
wurlycorner
Ye are glad to be dead, RIGHT?
Posts: 21496
Joined: Sat May 19, 2012 3:33 pm
My Generation: 4G
Location: Chelmsford, Essex
Has thanked: 2483 times
Been thanked: 307 times

Post by wurlycorner » Tue Aug 26, 2014 11:12 pm

Looks excellent, well done!

Post Reply

Return to “General Chat”