
Did you get rid of the unusual centre console then?newkid wrote:No ears burning here
Wish I'd kept my old interior.
Congratulations to vtecmec for winning May/June's Lude Of The Month, with his DIY Turbo BB1 build.
>>> Click Here For Profile <<<

>>> Click Here For Profile <<<
BsBB1
-
bennyboy

- Art Mechanic
- Posts: 2826
- Joined: Sat Aug 20, 2011 11:59 am
- My Generation: 4G
- PSN GamerTag: OCbennyboy
- Location: St Albans, Herts.
- Has thanked: 7 times
- Been thanked: 23 times
- Contact:
Re: BsBB1
-
bennyboy
- Art Mechanic
- Posts: 2826
- Joined: Sat Aug 20, 2011 11:59 am
- My Generation: 4G
- PSN GamerTag: OCbennyboy
- Location: St Albans, Herts.
- Has thanked: 7 times
- Been thanked: 23 times
- Contact:
Re: BsBB1
Further update on the interior.
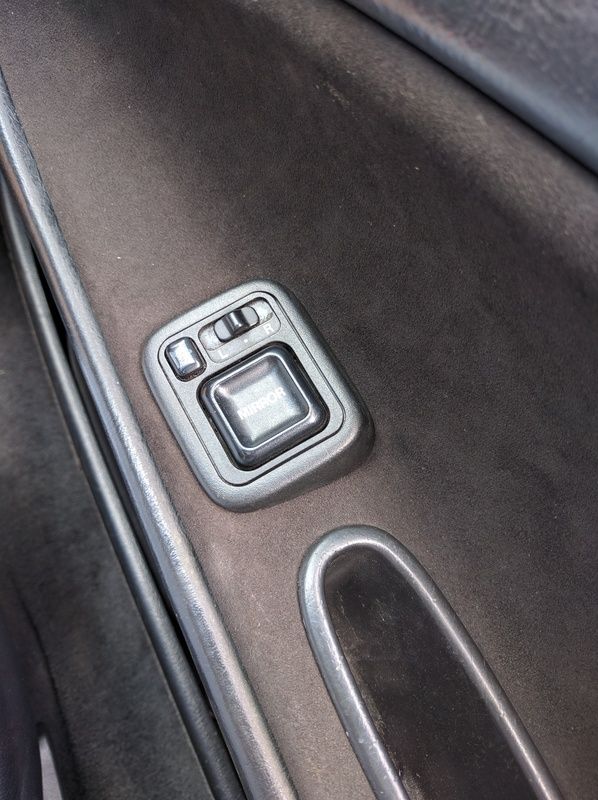
Had a couple of hours spare (for once) so swapped the front door card inserts over. As most of you will know I'm sure, it's a case of taking the door card off, then bending back the metal tabs that hold the insert in, a bit like a picture frame.
Simple yes? Well, yes and no.....spot the issue:
Yup. No hole for the mirror adjuster.
So, out with the Dremel, or should I say Woolies Workshop Dremel-esque mindrill.
Marked out:
After carefully cutting with the disc:
After cleaning up the edges with the sanding attachment, test fit:
All done:
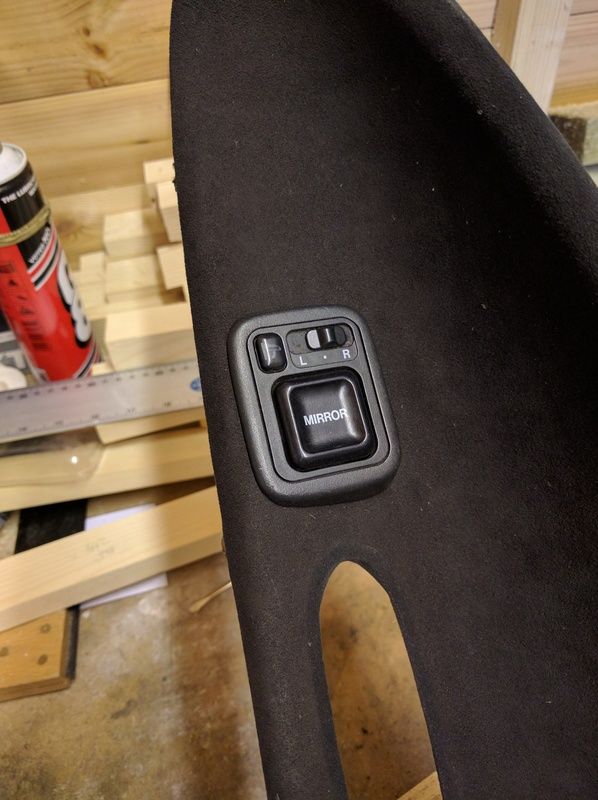
Back in the car.
Had a couple of hours spare (for once) so swapped the front door card inserts over. As most of you will know I'm sure, it's a case of taking the door card off, then bending back the metal tabs that hold the insert in, a bit like a picture frame.
Simple yes? Well, yes and no.....spot the issue:
Yup. No hole for the mirror adjuster.
So, out with the Dremel, or should I say Woolies Workshop Dremel-esque mindrill.
Marked out:
After carefully cutting with the disc:
After cleaning up the edges with the sanding attachment, test fit:
All done:
Back in the car.
-
bennyboy
- Art Mechanic
- Posts: 2826
- Joined: Sat Aug 20, 2011 11:59 am
- My Generation: 4G
- PSN GamerTag: OCbennyboy
- Location: St Albans, Herts.
- Has thanked: 7 times
- Been thanked: 23 times
- Contact:
Re: BsBB1
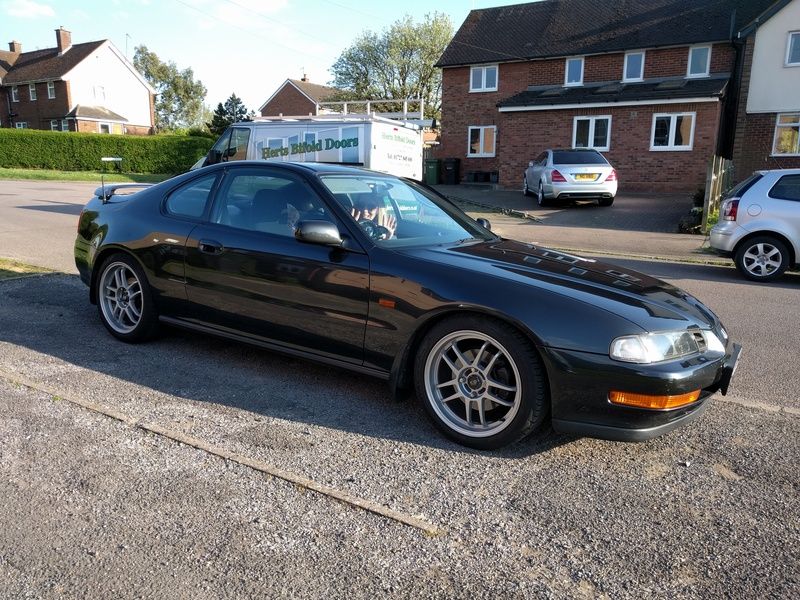
Oh and random pic because I just found it on my phone and it actually features a happy Mrs Bennyboy. And little man. 
-
wurlycorner

- Ye are glad to be dead, RIGHT?
- Posts: 21511
- Joined: Sat May 19, 2012 3:33 pm
- My Generation: 4G
- Location: Chelmsford, Essex
- Has thanked: 2507 times
- Been thanked: 317 times
-
bennyboy
- Art Mechanic
- Posts: 2826
- Joined: Sat Aug 20, 2011 11:59 am
- My Generation: 4G
- PSN GamerTag: OCbennyboy
- Location: St Albans, Herts.
- Has thanked: 7 times
- Been thanked: 23 times
- Contact:
Re: BsBB1
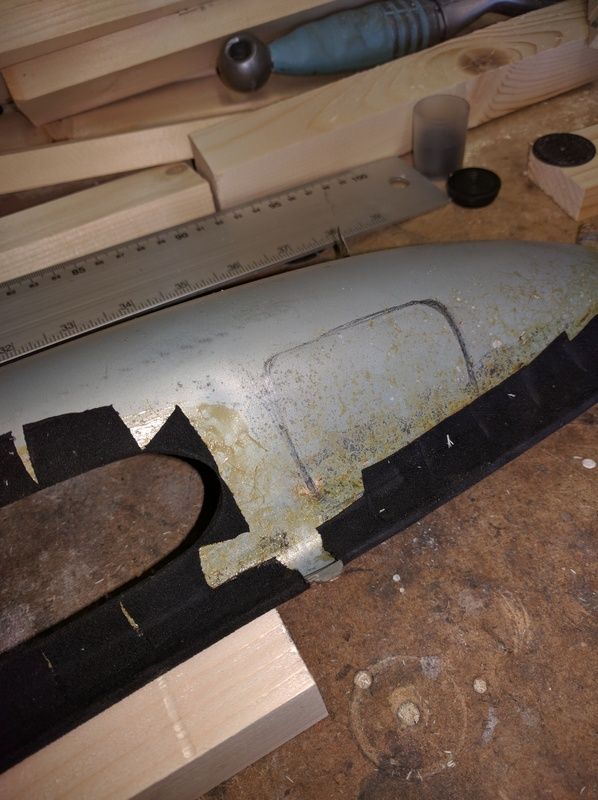
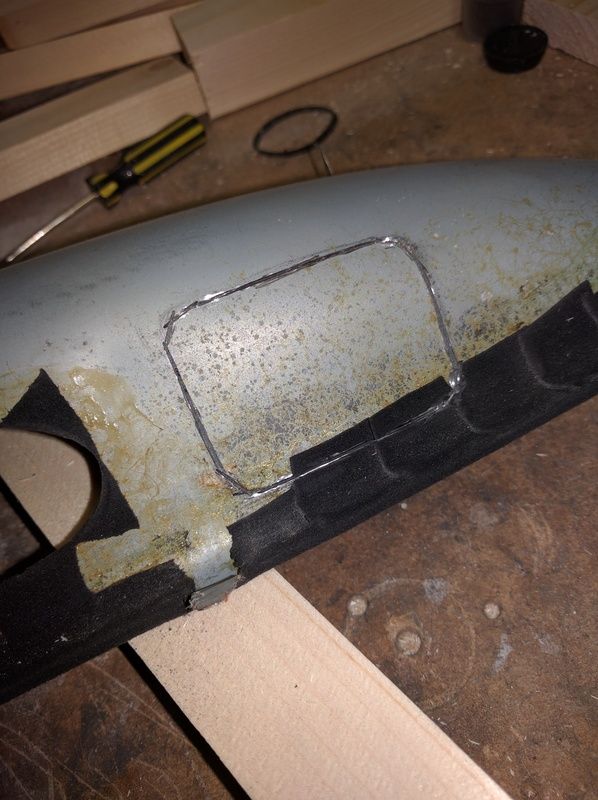
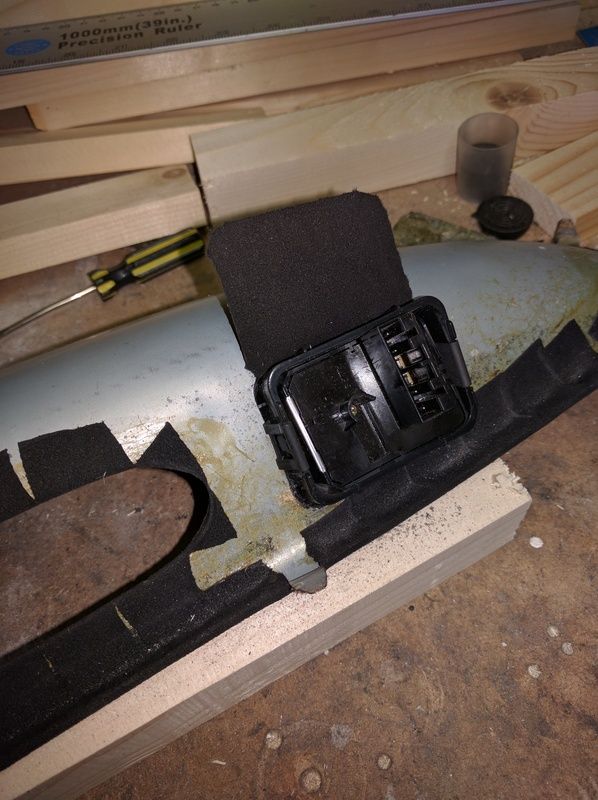
OK, so something that's been bugging me for a while is this:
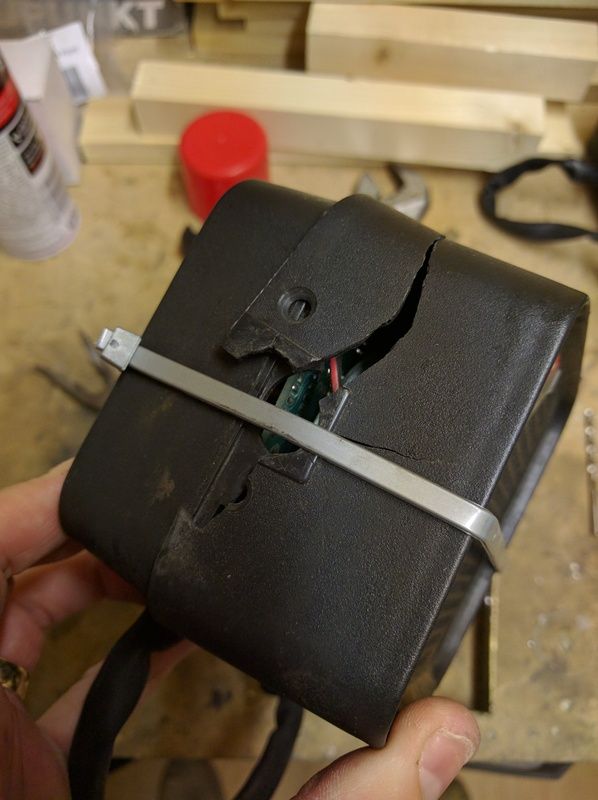
The original/factory fitted Hamilton & Palmer alarm siren case has been like this for years. On further inspection it seems it's mounted just high enough to get twatted by the bonnet when you close it!
So, after finding a replacement siren on the filthy bay:
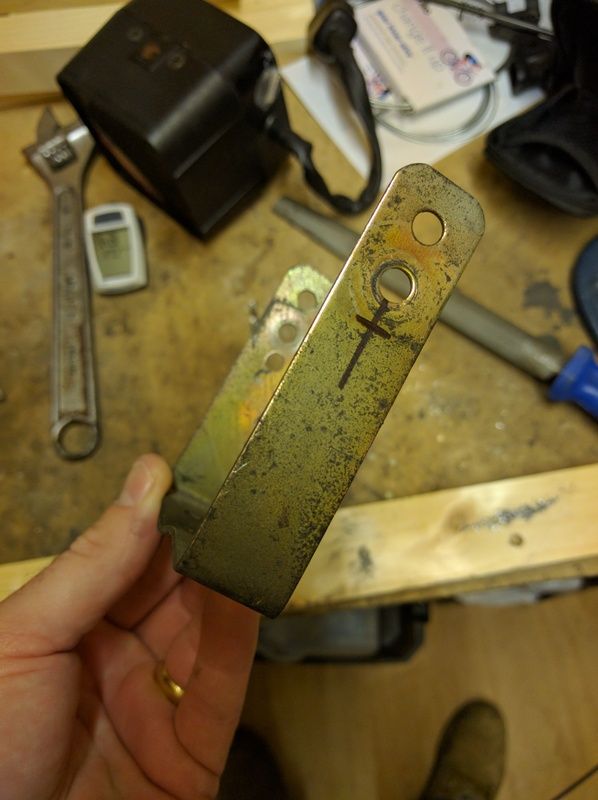
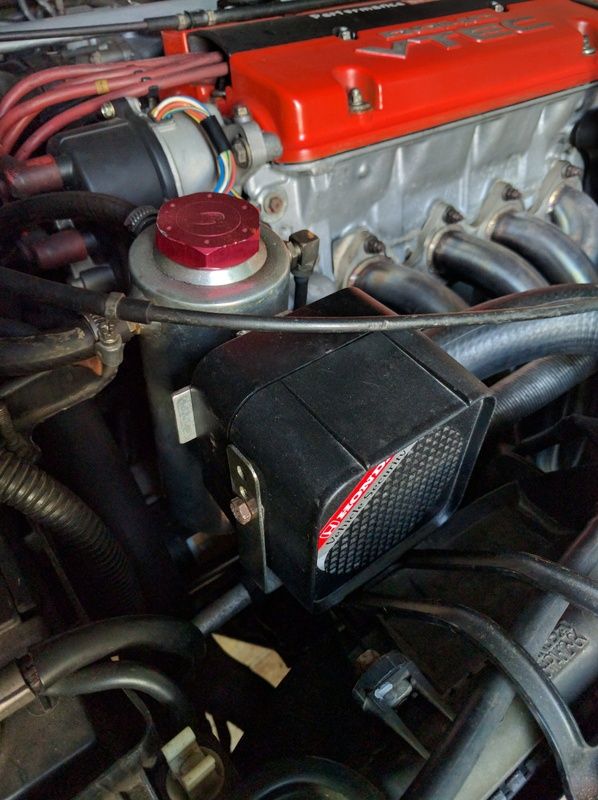
Took the bracket off and made a new set of holes, as low as possible. It will get trimmed down and sprayed when I have a bit more time but for now it's function>form.
Wrecked:
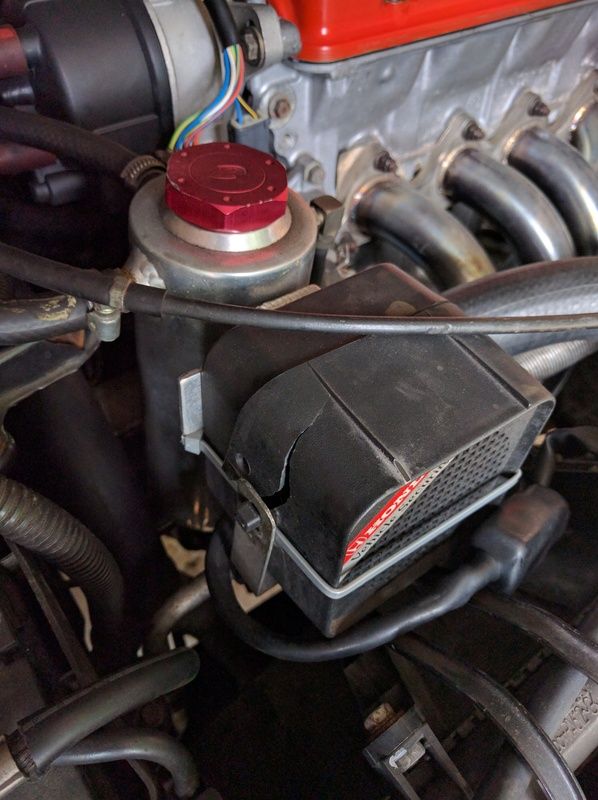
Small holes for holding the oil catch can. ( I had literally no other options in the engine bay as I have CC/AC etc.
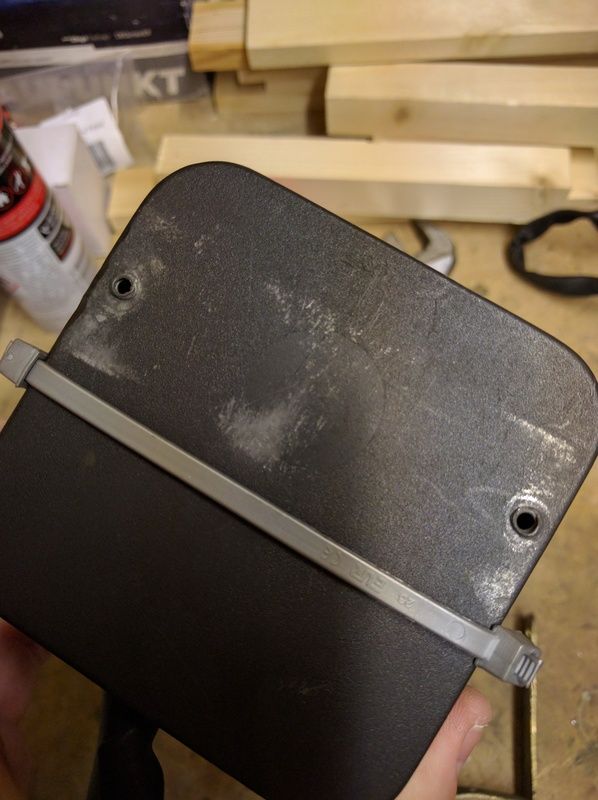
Replacement siren all bolted back up and working perfectly. Clears the bonnet when closing too. It's the little things eh...
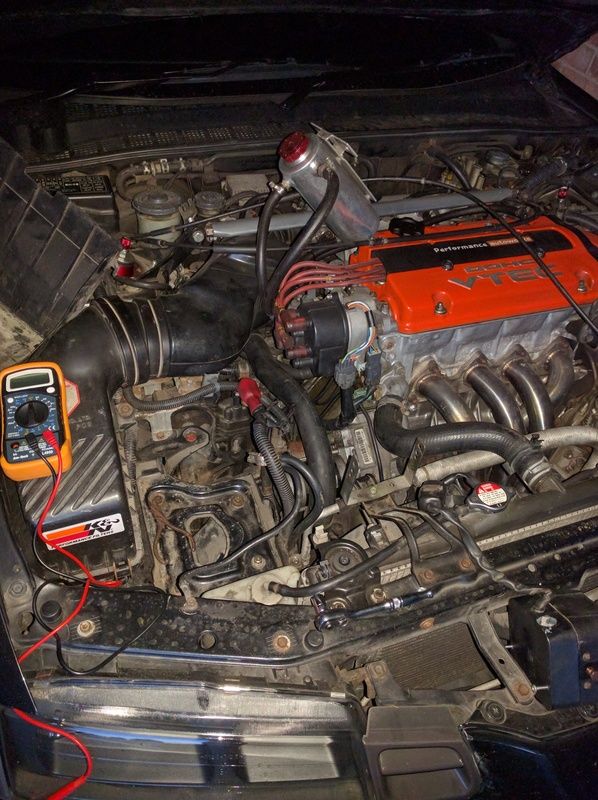
So, cut to this week and I notice that starting the lude is getting a little laboured/sluggish. Battery had a green light and was showing 12.24V, I suspected that it might not have the amps though, or that maybe the alternator was at fault, as I have never changed it or done anything to it in all the years of ownership.
Anyway, yesterday I get in and turn the key. Nothing. All lights ok, lights, windows etc. but not even a click when turned to start. Nicked the Mrs CRV battery and tried with that. Nothing again. So it pretty much had to be starter itself.
After a rummage through the Benny's World of Blood Parts, I found another starter I had bought from a breaker, years back.
I didn't take a mass of pics as I was against the clock/light, but suffice to say the easiet way to get at the starter is to take the battery and battery tray out, which is simple.
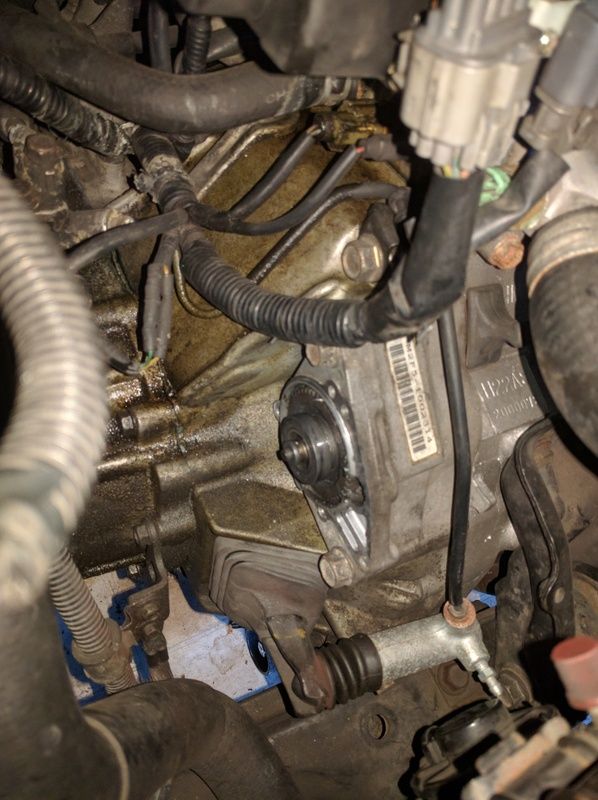
I did try one part of the starter at a time, so just motor first, but as suspected it was the solenoid:
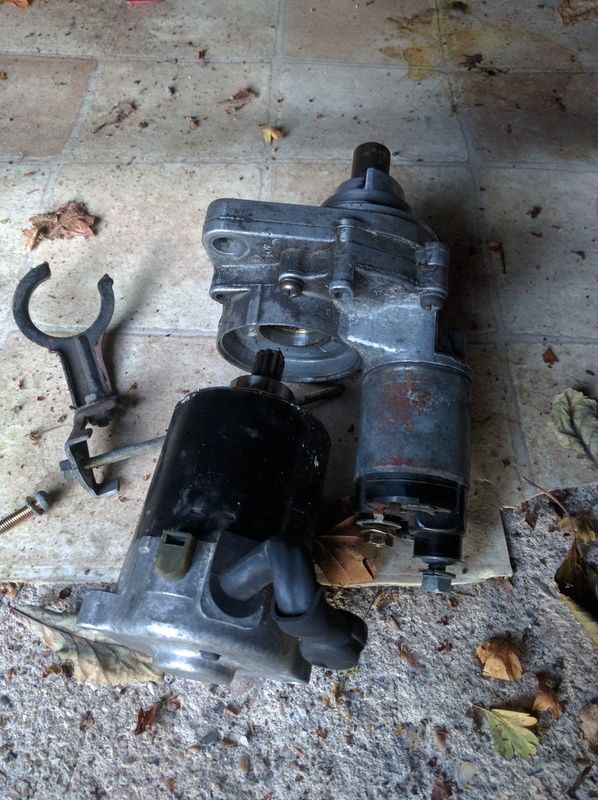

After mixing and matching a little (my motor and bearing was much better than the replacement one), I bolted everything back up and, bingo. Turns over nice and quick and starts on the button.
A quick check with the multi-meter across the battery showed 14.42V which means the alternator is doing it's job too.
Normal service has resumed.
The original/factory fitted Hamilton & Palmer alarm siren case has been like this for years. On further inspection it seems it's mounted just high enough to get twatted by the bonnet when you close it!
So, after finding a replacement siren on the filthy bay:
Took the bracket off and made a new set of holes, as low as possible. It will get trimmed down and sprayed when I have a bit more time but for now it's function>form.
Wrecked:
Small holes for holding the oil catch can. ( I had literally no other options in the engine bay as I have CC/AC etc.
Replacement siren all bolted back up and working perfectly. Clears the bonnet when closing too.
So, cut to this week and I notice that starting the lude is getting a little laboured/sluggish. Battery had a green light and was showing 12.24V, I suspected that it might not have the amps though, or that maybe the alternator was at fault, as I have never changed it or done anything to it in all the years of ownership.
Anyway, yesterday I get in and turn the key. Nothing. All lights ok, lights, windows etc. but not even a click when turned to start. Nicked the Mrs CRV battery and tried with that. Nothing again. So it pretty much had to be starter itself.
After a rummage through the Benny's World of Blood Parts, I found another starter I had bought from a breaker, years back.
I didn't take a mass of pics as I was against the clock/light, but suffice to say the easiet way to get at the starter is to take the battery and battery tray out, which is simple.
I did try one part of the starter at a time, so just motor first, but as suspected it was the solenoid:
After mixing and matching a little (my motor and bearing was much better than the replacement one), I bolted everything back up and, bingo. Turns over nice and quick and starts on the button.
A quick check with the multi-meter across the battery showed 14.42V which means the alternator is doing it's job too.
Normal service has resumed.
-
lewie fraser

- Posts: 348
- Joined: Fri May 10, 2013 6:50 pm
- My Generation: 4G
- Location: Blairgowrie Perthshire
-
vanzep

- Supporter 2016
- Posts: 7171
- Joined: Sun Jan 29, 2012 6:38 pm
- My Generation: 4G
- Location: Edinburgh
- Has thanked: 314 times
- Been thanked: 520 times
yep good work on the starter motor and always makes a difference getting some of the smaller jobs out of the way -
and its a helpful reminder to get my one changed as the BB1 always takes two or three cranks to get going in the morning...
and its a helpful reminder to get my one changed as the BB1 always takes two or three cranks to get going in the morning...
1996-2000 1993 EG9 Blue Civic 1.6 Vti - Traded in against the BB4
2000-2019 1994 2WS BB4 Milano Red JDM Prelude Si VTEC LSD
2015 on > 1991 4WS BB1 Phantom Pearl Grey JDM Prelude Si VTEC LSD
2021 ON > 1998 2WS BB6 White Pearl JDM Prelude Si VTEC
2000-2019 1994 2WS BB4 Milano Red JDM Prelude Si VTEC LSD
2015 on > 1991 4WS BB1 Phantom Pearl Grey JDM Prelude Si VTEC LSD
2021 ON > 1998 2WS BB6 White Pearl JDM Prelude Si VTEC
-
bennyboy
- Art Mechanic
- Posts: 2826
- Joined: Sat Aug 20, 2011 11:59 am
- My Generation: 4G
- PSN GamerTag: OCbennyboy
- Location: St Albans, Herts.
- Has thanked: 7 times
- Been thanked: 23 times
- Contact:
Re: BsBB1 Sexblocker gone, tunes updated..
Couple of little things I've been wanting to do for a while.
The speakers I put in some years ago are good, but I always wanted a little more punch from a bigger cone.
CBA with subs and all that, used to work in hifi 20 years ago so been there and done that. I still run my Blaupunkt Woodstock DAB54 head unit which was top of the line back when I got it and still goes for a fair price now.
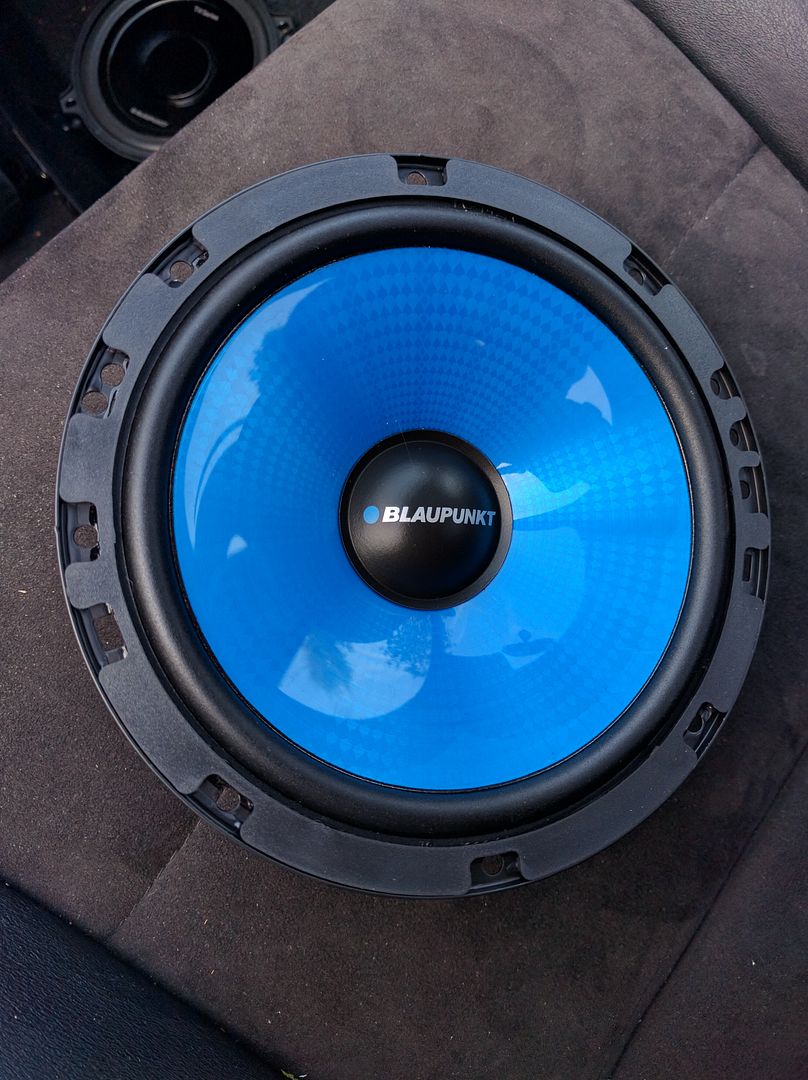
So, out with the old: Blaupunkt THc 542 components. 5 1/4"
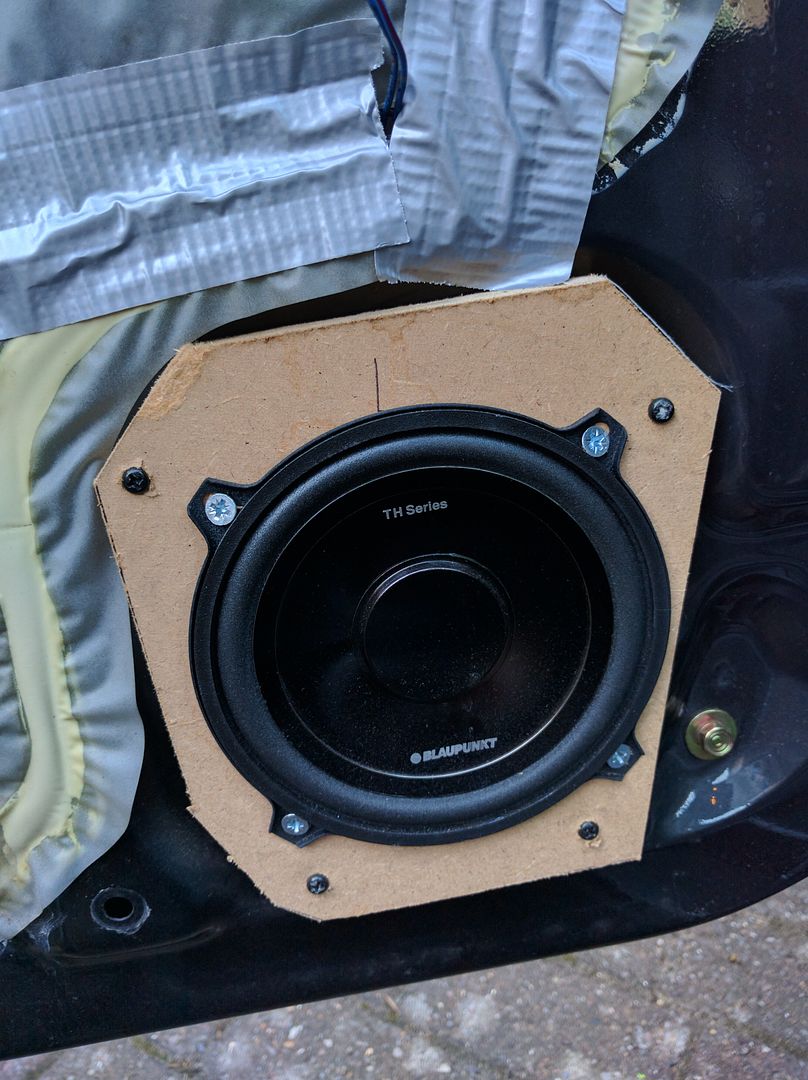
In with these, new old stock from Germany for a bargain price, Blaupunkt CX170 6 1/2" components.
I didn't get any shots of the tweeter installs but they fit perfectly inside the existing tweeter housings on the 4th gen. Will try to remember to get a pic.

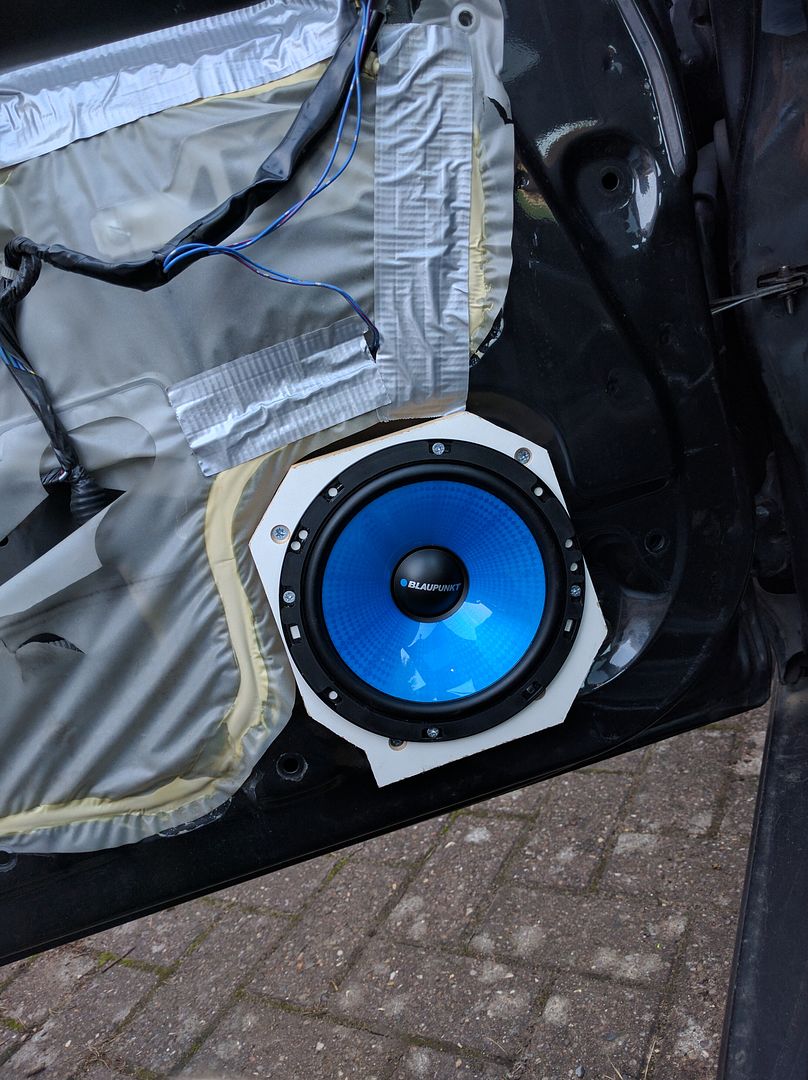
Had to make up some new mounts. They are not pretty right now, at some point I'll take them out and give them a coat of something just to help keep moisture out, but they are actually 20mm thick, 'water resistant' MDF, heavy and dense and sound wise, inert.
The odd shape is because I wanted to fill the available mounting area to give the speakers a really solid support, rather than just a thin circle for example. These go all the way to the raised areas on the door skin, so it's a really solid fixing from door to mount and mount to speaker.
And some suitable setup/testing kit.

Really nice sound to these, much as I'm used to with the Blaupunkt stuff, it's well balanced, but the extra size gives more punch down low and overall they give a nice tight sound.
Obviously once the door cards are back on, everything looks OEM. Almost a shame not to show those cones off , but I like it like this.
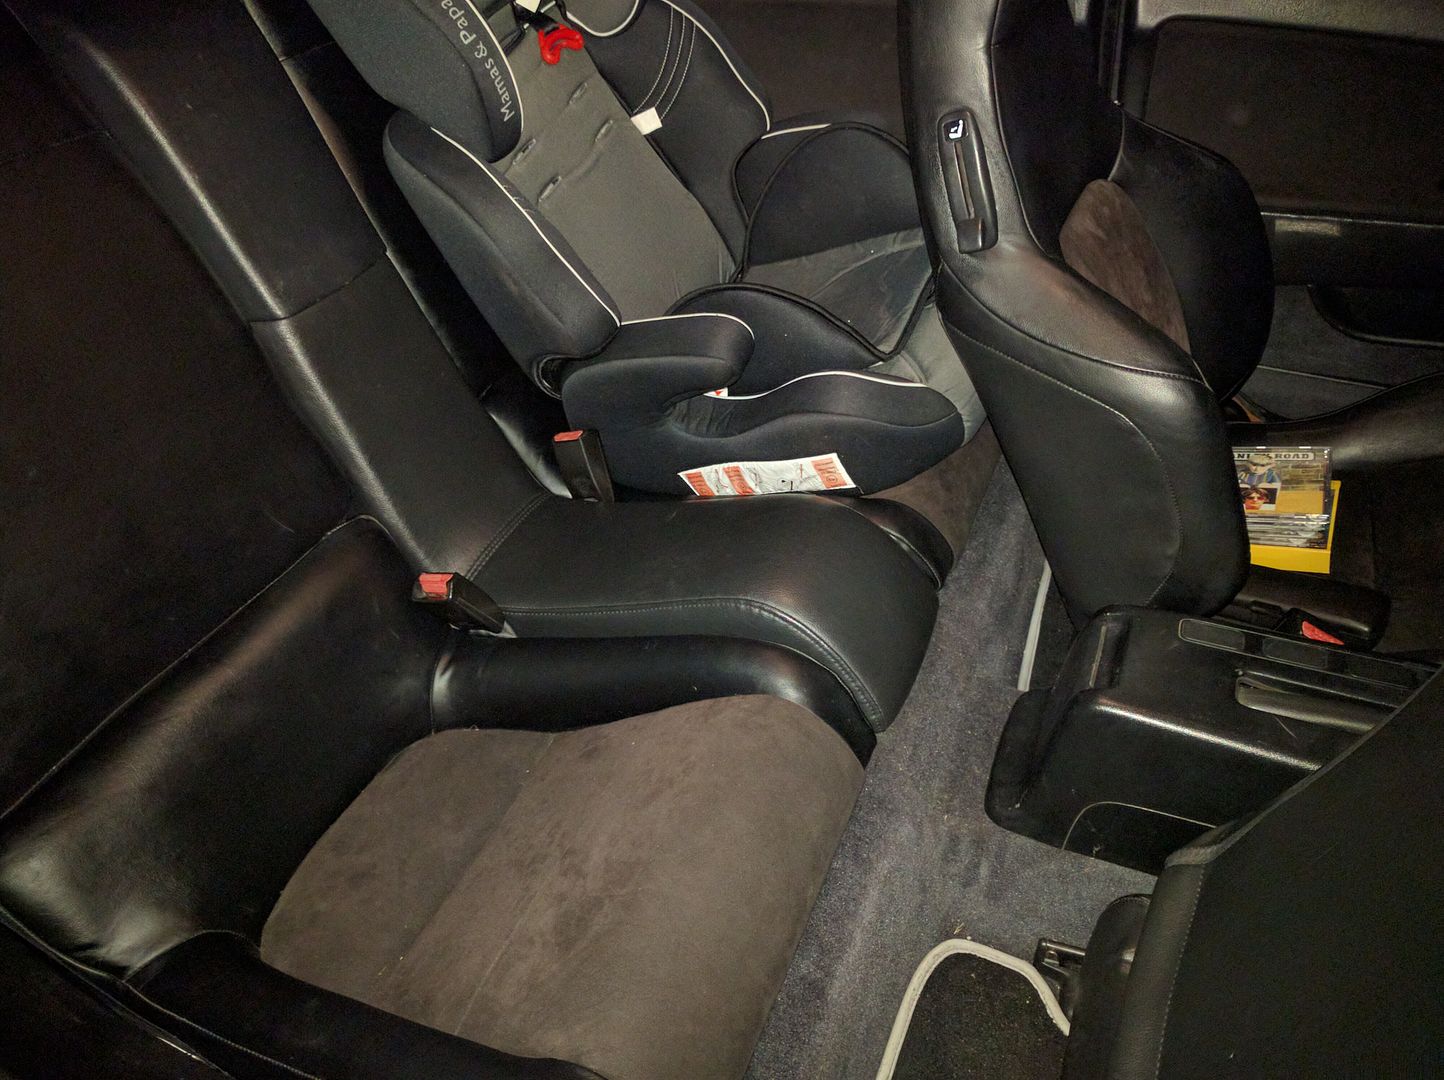
Other thing I've been toying with for a while was losing the sexblocker, not because I don't like it, I've always found it pretty useful, but these days I have my own NAS server and tend to stream a lot more music from that (unlimited data plan), with just a few discs in the car. Plus my son is getting that bit older and a bit more room for his stuff will help. It's easier to get to the seat belt for his child seat, too.
Also, as some of you know my car is my daily driver and I'm an artist for a living, so being able to put larger artwork behind the seats for delivery etc is great.
I'm keeping the sexblocker and this may not be for good, but it's the right setup for now.
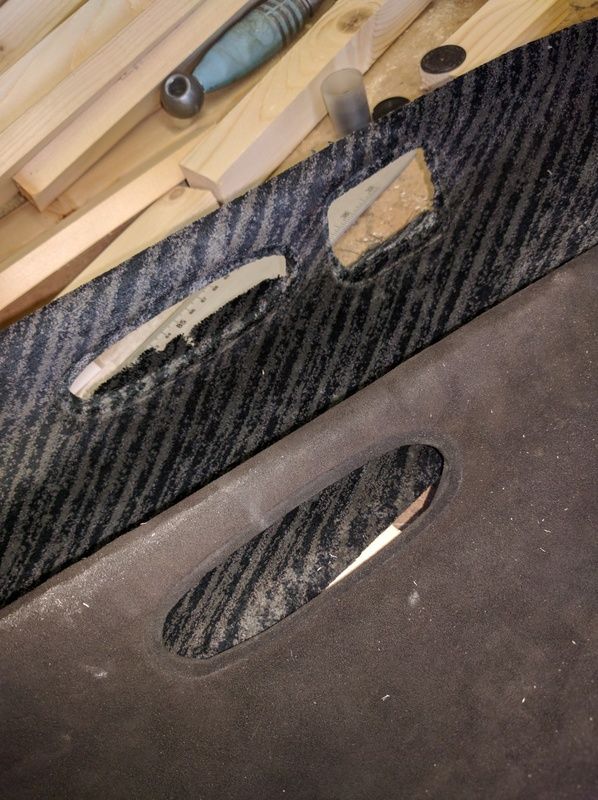
So anyway, didn't want to go facelift as I like the handbrake where it is, thankyouverymuch, so was looking out for the fairly rare transition rear console part, when @newkid put his up for sale.
A quick deal was done and it arrived a few days later. Thanks again mate, much appreciated.
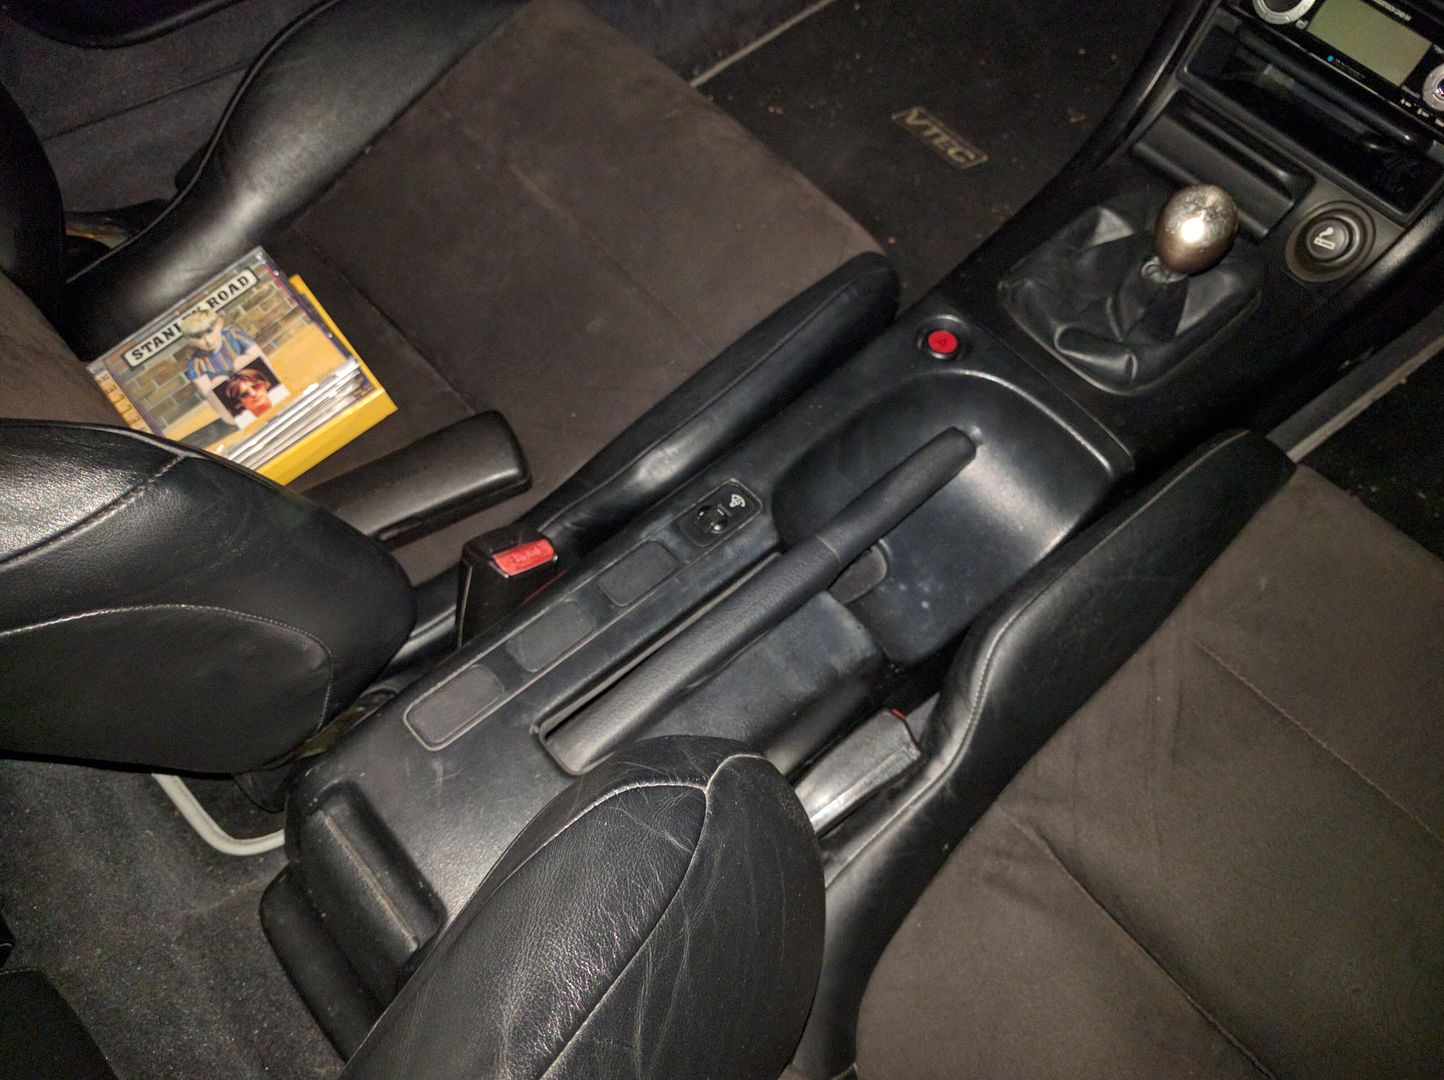
I had the centre 'leather' part left over from the interior I bought from @bb1boy. I say 'leather' as I'm pretty sure none of them are. I know there was a leather interior and a 'pleather' (leather look) one, but from what I can see all of them had this pleather type centre section.
Had to rummage through the fixings box as the centre part requires shorter mounting bolts than the sexblocker.
Don't worry about the apparent colour difference, they are both black to the naked eye, this was taken late at night, in the garage using the phone flash.. I'll be treating the whole interior again soon too as the first application has soaked in nicely, so will get better photos then.
The real plus here for me is that void between the console and the back seats. I could get a 3' square painting behind the seats before, if you know how, with this I reckon it'll be about 4' and a lot easier.
The speakers I put in some years ago are good, but I always wanted a little more punch from a bigger cone.
CBA with subs and all that, used to work in hifi 20 years ago so been there and done that. I still run my Blaupunkt Woodstock DAB54 head unit which was top of the line back when I got it and still goes for a fair price now.
So, out with the old: Blaupunkt THc 542 components. 5 1/4"
In with these, new old stock from Germany for a bargain price, Blaupunkt CX170 6 1/2" components.
I didn't get any shots of the tweeter installs but they fit perfectly inside the existing tweeter housings on the 4th gen. Will try to remember to get a pic.
Had to make up some new mounts. They are not pretty right now, at some point I'll take them out and give them a coat of something just to help keep moisture out, but they are actually 20mm thick, 'water resistant' MDF, heavy and dense and sound wise, inert.
The odd shape is because I wanted to fill the available mounting area to give the speakers a really solid support, rather than just a thin circle for example. These go all the way to the raised areas on the door skin, so it's a really solid fixing from door to mount and mount to speaker.
And some suitable setup/testing kit.
Really nice sound to these, much as I'm used to with the Blaupunkt stuff, it's well balanced, but the extra size gives more punch down low and overall they give a nice tight sound.
Obviously once the door cards are back on, everything looks OEM. Almost a shame not to show those cones off
Other thing I've been toying with for a while was losing the sexblocker, not because I don't like it, I've always found it pretty useful, but these days I have my own NAS server and tend to stream a lot more music from that (unlimited data plan), with just a few discs in the car. Plus my son is getting that bit older and a bit more room for his stuff will help. It's easier to get to the seat belt for his child seat, too.
Also, as some of you know my car is my daily driver and I'm an artist for a living, so being able to put larger artwork behind the seats for delivery etc is great.
I'm keeping the sexblocker and this may not be for good, but it's the right setup for now.
So anyway, didn't want to go facelift as I like the handbrake where it is, thankyouverymuch, so was looking out for the fairly rare transition rear console part, when @newkid put his up for sale.
A quick deal was done and it arrived a few days later. Thanks again mate, much appreciated.
I had the centre 'leather' part left over from the interior I bought from @bb1boy. I say 'leather' as I'm pretty sure none of them are. I know there was a leather interior and a 'pleather' (leather look) one, but from what I can see all of them had this pleather type centre section.
Had to rummage through the fixings box as the centre part requires shorter mounting bolts than the sexblocker.
Don't worry about the apparent colour difference, they are both black to the naked eye, this was taken late at night, in the garage using the phone flash..
The real plus here for me is that void between the console and the back seats. I could get a 3' square painting behind the seats before, if you know how, with this I reckon it'll be about 4' and a lot easier.

