Congratulations to vtecmec for winning May/June's Lude Of The Month, with his DIY Turbo BB1 build.

>>> Click Here For Profile <<<

Image

Supercharged Mugen Lude (03/06/14 Update!)

Tell us all about your Lude, you know you want to ...
User avatar
nucleustylzlude
Moderator
Posts: 4010
Joined: Wed Aug 11, 2010 11:46 pm
My Generation: 4G
Location: Bristol, UK!
Been thanked: 3 times
Contact:

Re: Supercharged Mugen Lude (03/06/14 Update!)

Post by nucleustylzlude » Tue Jun 03, 2014 2:43 pm

nellers2001 wrote:
nucleustylzlude wrote:
nellers2001 wrote:I had a nightmare with the aluminium japspeed rad for my 4th gen a couple years back. Emailed japspeed to tell them they don't fit and they basically said they didn't care as never had a complaint before...I found that very hard to believe but had already modified the mountings on the car with a grinder to make it fit!
Sounds about right, exactly what I need to do is get the grinder out. Heard many people say about the fitment issues but it's still well made and I can't deny the huge capacity of it.
The rad did seem well made. Might be worth sourcing a couple of spare O rings for the drain valve to. Mine starting weeping quitequickly as the rubber perished, maybe old stock? You may have fun with the drain as well as it was next to impossible to get the drain plug out with the rad in situ, and had to lift the rad out to get the bung out due to the sub frame and the extra thickness of the rad.
Good advice thanks, I'll check the drain plug. As for the fitment issue of the front crossmember, no problems:

Image

8)
Drax wrote:
nucleustylzlude wrote: Image
I love it 8-)
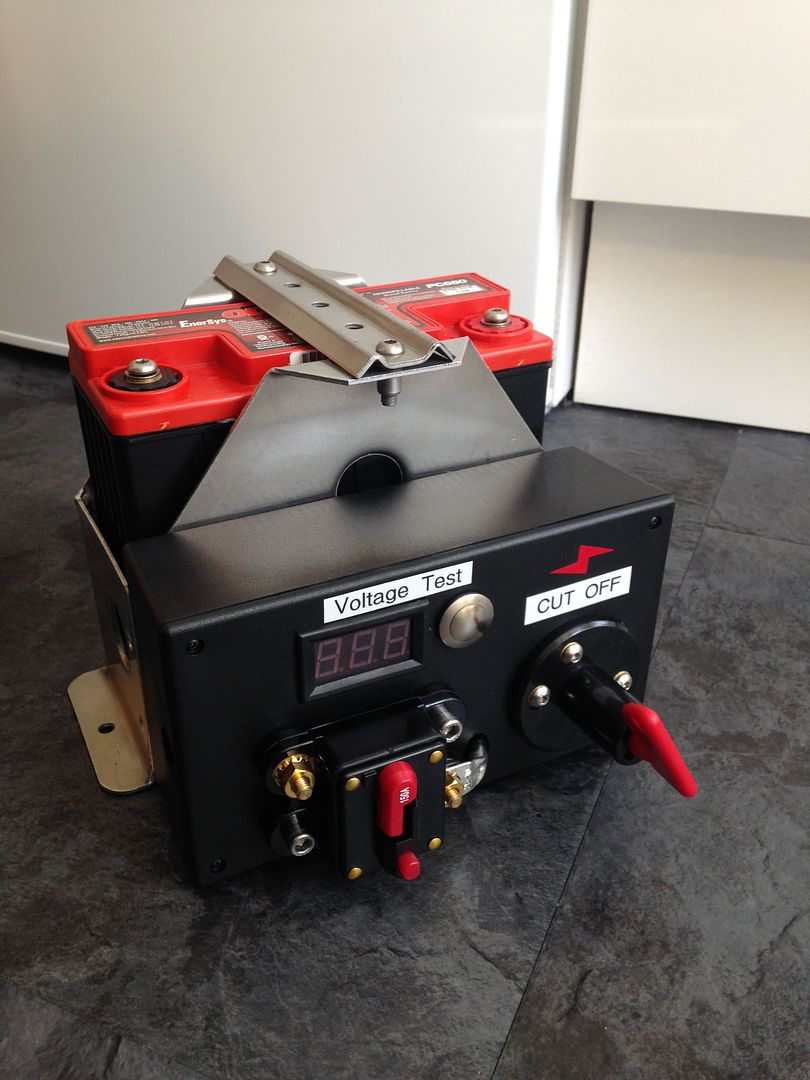
ive done similar but used the Nippon battery stabilier, plus cut cut off switch is in the dash.

btw, I may have missed this so apologies, I see your using the Simoniz Engine Enamel as the finish, what are you using for the main engine paint? as I need to stock some for mine too.
cheers
The main engine paint will be the same black Simoniz Engine Enamel as that is the initial purpose of this paint. I've just gone a bit mad everywhere else as its robust and a good finish. :D

I was debating on adding the cut-off at the dash but its not exactly in competition use. Always something I can add later down the line.

Vtecmec wrote:
nucleustylzlude wrote:Vtecmec: Alright, alright you'll get your mount soon.
I've got to drop the old box, fit the flywheel and clutch, then install the ATR box back in its place. I'll see how the jack holds the engine with just the rear and passenger mount, if it looks ok, I'll remove it for you.
:lol: If it helps, I've just had the box off (and back on) with only the rear and passenger mount and a suitably placed jack, and to be honest, gettting the box in an out is a million times easier with the front cross bar removed, it saves you having to twist and contort the gearbox up. If I ever remove the box again, that bar will be off first.
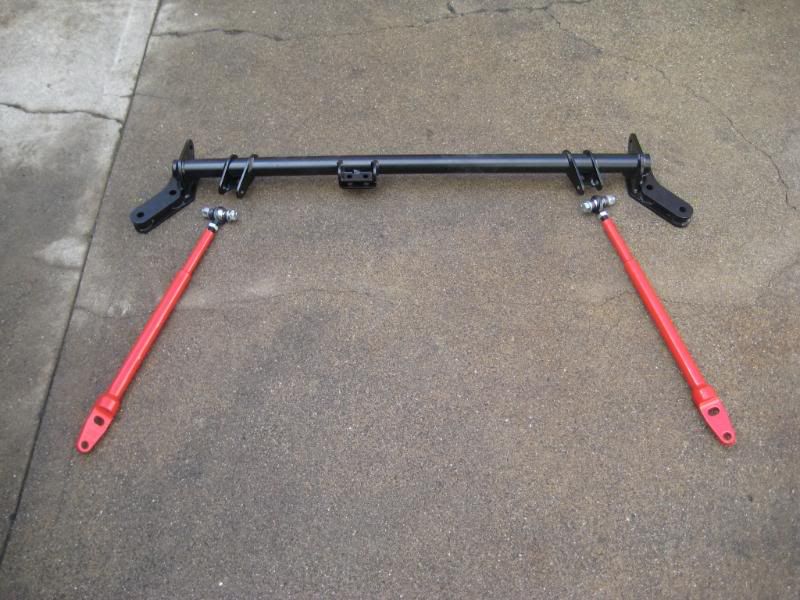
Even more great advice, sounds like a plan! So win, win for both of us!

User avatar
mart609
LotM Winner
Posts: 3354
Joined: Sun Aug 08, 2010 10:22 pm
My Generation: 4G
XBOX GamerTag: mart609
PSN GamerTag: mart609
Location: Dudley, West Mids
Has thanked: 9 times
Been thanked: 14 times
Contact:

Post by mart609 » Fri Jun 20, 2014 10:41 pm

great read again rob.
Steady progress being made, look forward to the next.

User avatar
Doggo
Court Jester
Posts: 2895
Joined: Wed Jan 09, 2013 11:26 pm
My Generation: 5G
PSN GamerTag: FfyreDog
Location: Glasgow

Post by Doggo » Fri Jun 20, 2014 11:48 pm

I don't really understand all this stuff you're bolting to your car but it all looks really cool 8-) . Except your knob sack. That's just horrible.

Nice work. I think.


TopPrelude
Posts: 157
Joined: Thu Jul 11, 2013 5:01 pm
My Generation: 4G
Has thanked: 2 times

Post by TopPrelude » Thu Jul 10, 2014 8:57 pm

nucleustylzlude wrote:
Plus, I also went a bit mad measuring up and buying replacement stainless steel nuts, bolts and washer:

Rob
Nice one Rob, looking sweet as.

Since you done all the hard work sizing up the nuts and bolts, any chance of sharing the measurements? Also where did you buy them from?

Cheers :D
Image

User avatar
Brozilla
Posts: 186
Joined: Mon Apr 20, 2015 9:46 am
My Generation: 5G
Has thanked: 25 times
Been thanked: 52 times

Post by Brozilla » Tue May 05, 2015 8:46 am

Damn, this has to be the most thorough subject on a car I have ever seen. Great job.

User avatar
nucleustylzlude
Moderator
Posts: 4010
Joined: Wed Aug 11, 2010 11:46 pm
My Generation: 4G
Location: Bristol, UK!
Been thanked: 3 times
Contact:

Re: Supercharged Mugen Lude (03/06/14 Update!)

Post by nucleustylzlude » Tue May 05, 2015 10:45 am

Thanks for the kind words, means a lot.

I've given the car and this build thread a little neglect recently with kids taking up my time. However, I do have some updates to add, so I'll get writing!

User avatar
MaccaIRL
Posts: 773
Joined: Mon Dec 01, 2014 9:04 pm
My Generation: 5G
XBOX GamerTag: MaccaIRL
Location: Belfast

Re: Supercharged Mugen Lude (03/06/14 Update!)

Post by MaccaIRL » Tue May 05, 2015 11:17 am

Looks well and itll deffo give a few people a surprise
Lude-behaviour!

User avatar
nucleustylzlude
Moderator
Posts: 4010
Joined: Wed Aug 11, 2010 11:46 pm
My Generation: 4G
Location: Bristol, UK!
Been thanked: 3 times
Contact:

Re: Supercharged Mugen Lude (03/06/14 Update!)

Post by nucleustylzlude » Tue May 05, 2015 2:00 pm

Yeah it'll surprise everyone on here when they see her on the road! :lol:

User avatar
NafemanNathan
LotM Winner
Posts: 20144
Joined: Sun Aug 08, 2010 9:37 pm
My Generation: 0G
Location: Yeovil, Somerset
Has thanked: 8 times
Been thanked: 122 times

Post by NafemanNathan » Tue May 05, 2015 2:04 pm

Just believe!

Image

Post Reply

Return to “Lude Profiles”