
Congratulations to vtecmec for winning May/June's Lude Of The Month, with his DIY Turbo BB1 build.
>>> Click Here For Profile <<<

>>> Click Here For Profile <<<
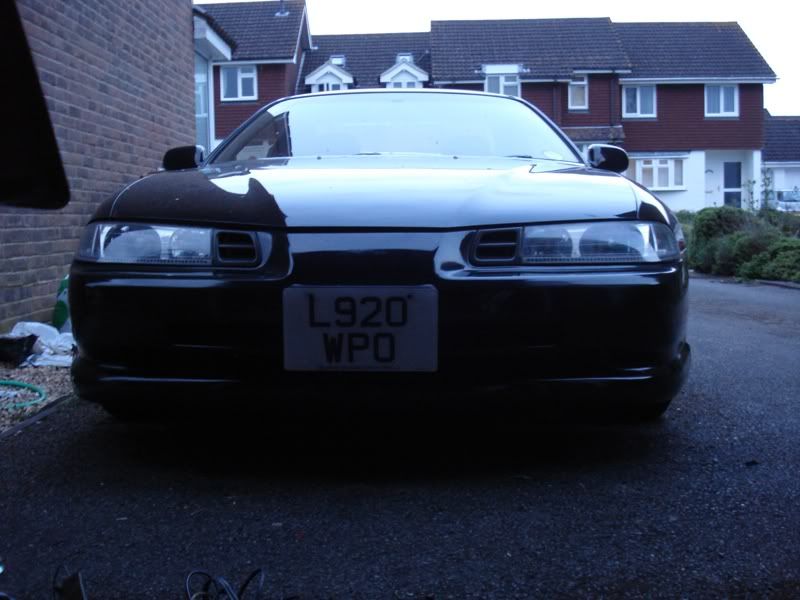
Matt Watts prelude rear end.

-
honda-hardy

- Club Cartographer
- Posts: 6268
- Joined: Sat Jan 28, 2012 7:35 pm
- My Generation: 5G
- Location: chippenham
- Been thanked: 1 time

"matt...
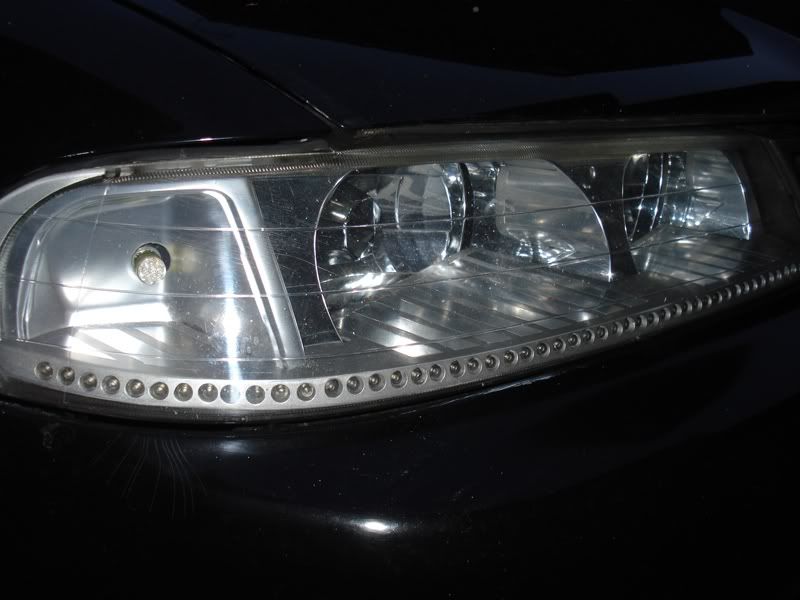
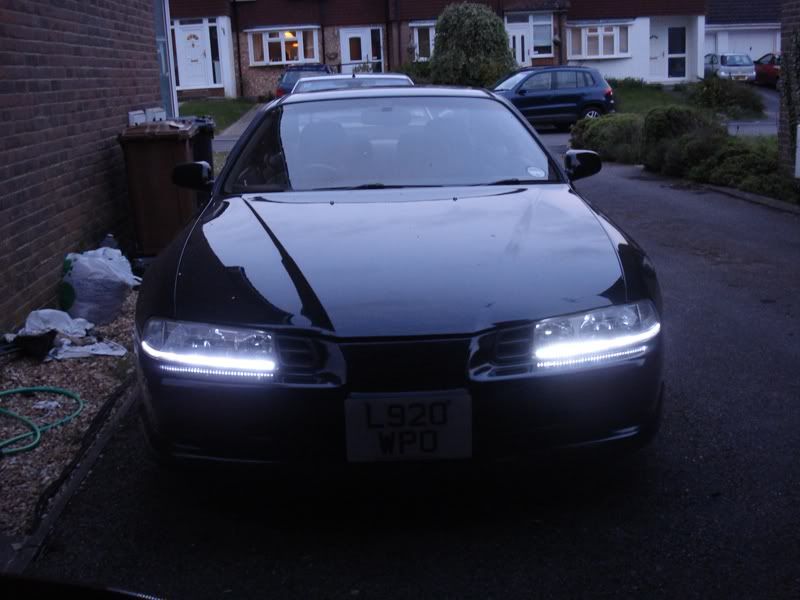
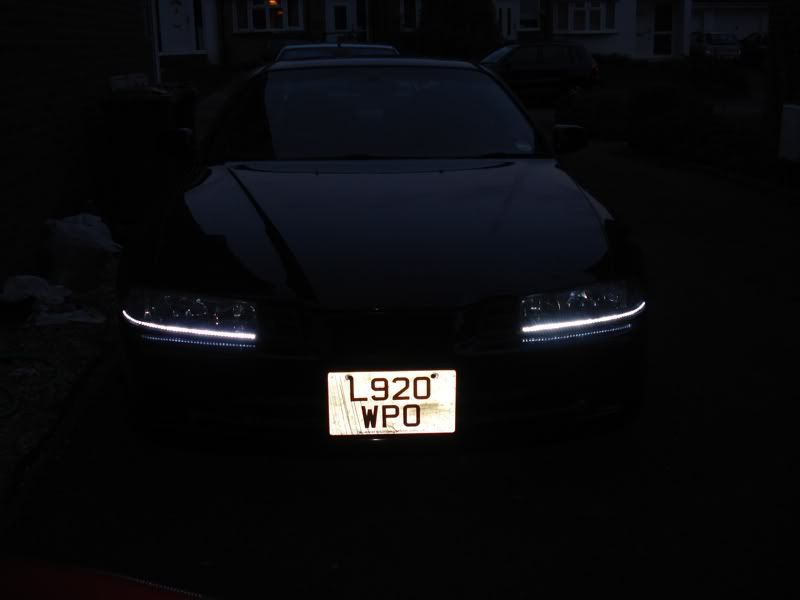
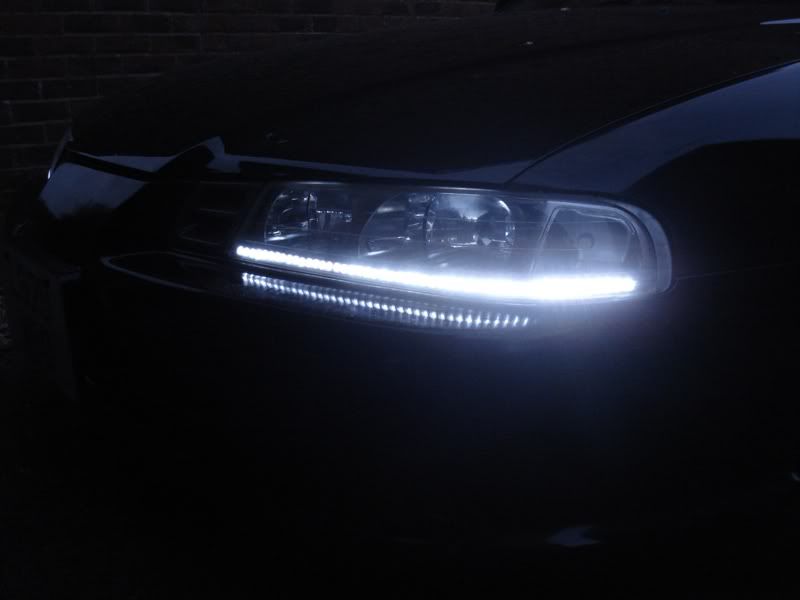
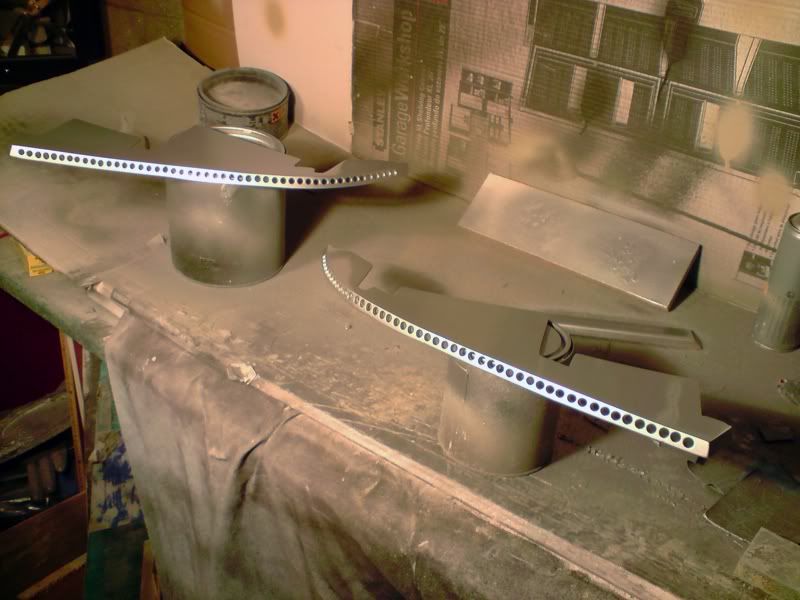
Its basically an inlay in a set of JDM lights, with some of those LED strip lights that are readily available on ebay. I stripped the lights apart then spent a while cutting a basic card template. I used this to make an approximate model of the part from MDF - due to the curves on the lens and the complex shape of the housing, this took a while. Luckily, once I had made one model the second for the other side was easier, as I could just turn it upside down and draw round it, then angle the jigsaw the other way.
Next I made a mould from the MDF parts, and once this had all cured properly, set about making the fibreglass parts. These still needed quite a bit of fettling to get them fitting right, and so that they could be inserted into the lens section once assembled.
Marking out and drilling out the holes for the LED's was tedious, especially as I dont have a drill press - 96 LED's; 2mm pilot hole, 6mm hole for the light, slight taper on the back to aid assembly, then a bevel on the front, plus sanding at each stage!!
I sprayed the inlays in aluminium enamel paint which will hopefully withstand the heat of the headlight bulbs, then carefully masked off some areas and added some chrome detail. Chrome paint is fookin ard to get perfect, and it takes days to cure fully, as I found out when I wiped some dust off one of them and left an imprint all along one edge.
I also had to modify the sidelight section by removing the reflector and smoothing out the slots these fit into.
Once the mods to the housing where complete, I cleaned as much of the sealant as possible off the lens and backing units and applied some rubber butyl seal before clamping it all back together.
All in all, bit of a mission, and I still need to polish up the lenses a bit and get the drivers side beams working a bit better - I hate electrics!"

-
mercutio

- LotM Winner
- Posts: 14958
- Joined: Sun Aug 08, 2010 8:45 pm
- My Generation: 5G
- Location: Sunny Manchester
- Has thanked: 1 time
- Been thanked: 4 times
- Contact:
he did a really good job there 
bristol_bb4 wrote:ahhh a 5th gen, i love 5th gens
Dino wrote:I loves the 5th gen really.... just dont quote me on it...
4thgenphil wrote:Mines 4 1/4 unches mate, sorry
http://www.ludegeneration.co.uk/profile ... -t618.html
-
kris_aka_edu

- Posts: 1106
- Joined: Fri Oct 12, 2012 4:25 pm
- My Generation: 4G
- XBOX GamerTag: chris aka edu
- Location: Biggleswade, Bedfordshire
Those lights look awesome! Not too keen on the rear lights. Maybe if they were a different style but the way the spoiler is intergrated in looks really good.
Honda Prelude 92' 2.2 JDm
http://www.ludegeneration.co.uk/profile ... t7514.html
http://www.ludegeneration.co.uk/site-fe ... t8014.html

http://www.ludegeneration.co.uk/profile ... t7514.html
http://www.ludegeneration.co.uk/site-fe ... t8014.html
-
FrontBackSide2Side
- Posts: 882
- Joined: Tue Dec 04, 2012 12:13 pm
- My Generation: 4G
Re: Matt Watts prelude rear end.
Matts a real nice guy and I love what he has done to his lude. I personally wouldn't do it to my car but the fact its all custom work, done at his house to the standard he's managed to achieve get my respect 
-
Crazy_C

- Posts: 1814
- Joined: Tue Aug 03, 2010 4:42 pm
- My Generation: 3G
- Location: The Asylum
- Contact:
Strange I came across this, as I just sent Matt a message on FB!! 
I've always loved his lude, as it was something different, but it just updated the old '90's look the original rear end had, and brought the whole thing into the '00's in my opinion.
I've always loved his lude, as it was something different, but it just updated the old '90's look the original rear end had, and brought the whole thing into the '00's in my opinion.
4thgenphil wrote:you're odd and that made me crap myself!
RattyMcClelland wrote:Dom with a fag in his mouth. A rare sight.
nitin_s1 wrote:I am Nitin, motha fucka!
mart609 wrote:It wasn't a good look standing around stratching my nuts every 5 minutes. Never again


-
wurlycorner

- Ye are glad to be dead, RIGHT?
- Posts: 21511
- Joined: Sat May 19, 2012 3:33 pm
- My Generation: 4G
- Location: Chelmsford, Essex
- Has thanked: 2507 times
- Been thanked: 317 times
-
bb1boy

- Posts: 4459
- Joined: Mon Jan 30, 2012 11:57 am
- My Generation: 4G
- XBOX GamerTag: adam fantastic
I really appreciate the amount of work that has gone into this 'Lude, I'm not a fan of the lights, front or rear - I think daytime running lights should stay with new cars, retro fitted ones never look quite right (although I think he has done the best possible job of making them look OEM)
..that lip spoiler gives me some good food for thought though.
Who here makes carbon fibre parts? I could do with talking to them.
..that lip spoiler gives me some good food for thought though.
Who here makes carbon fibre parts? I could do with talking to them.

-
NafemanNathan

- LotM Winner
- Posts: 20144
- Joined: Sun Aug 08, 2010 9:37 pm
- My Generation: 0G
- Location: Yeovil, Somerset
- Has thanked: 8 times
- Been thanked: 124 times
