
Congratulations to vtecmec for winning May/June's Lude Of The Month, with his DIY Turbo BB1 build.
>>> Click Here For Profile <<<

>>> Click Here For Profile <<<
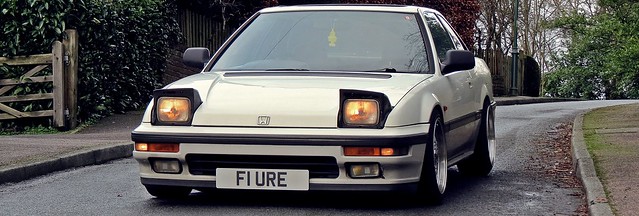
Fefelarue's 3rd gen Honda Prelude
Re: Fefelarue's 3rd gen Honda Prelude
Haha they're not, they're too small so we can't pull them up all the way!
Re: Fefelarue's 3rd gen Honda Prelude
Finished off the rear bumper wrap today so got a couple more snaps:


Re: Fefelarue's 3rd gen Honda Prelude
Haha that was kindof an in-joke with my mate, it will be removed though, I just have to keep it on for a few days as a bet, in return for them helping me with the wrap

-
NafemanNathan

- LotM Winner
- Posts: 20144
- Joined: Sun Aug 08, 2010 9:37 pm
- My Generation: 0G
- Location: Yeovil, Somerset
- Has thanked: 8 times
- Been thanked: 124 times

Re: Fefelarue's 3rd gen Honda Prelude
Hello everyone, it's been a while!
So the other day I got properly underneath the car and had a good look round for the first time. I've got very limited knowledge of suspension components and all that jazz, but it needed some maintenance doing so I thought I'd crack on and polybush everything I can at the same time.
First up was the radius arm to chassis mount. This unfortunately doesn't make a good photo, and as I needed my car for work every day I had to just swap it over without painting anything or making it look good, but here an old vs new bush.

Then it was ARB time! I took the rear one off and it was in a right state; cracked bushes and a drokk-ton of rust.


Even worse, one droplink snapped, and the mounting brackets and clamps both had rusty holes in them and were falling to pieces.


After failing to find the brackets anywhere, Honda told me I'd have to wait about 3 weeks while they imported them from Japan. I was like nahh mate, and took them to a local welder who sorted them right out

Then I gave them a nice coat of hammerite

The bush clamps I also couldn't find anywhere except Honda, so the best I could get was this "universal" ARB clamp in the right diameter which did nicely.

To get new droplinks from Honda is £90 A PAIR!! For what is essentially a long bolt, so I improvised.


Then came the ARB itself. I was happy to find that under the rust, there was actually some metal


The front ARB wasn't in bad nick at all, but off it came anyway.

Then they both got a nice lick of paint.

And I made up some front droplinks too. Front and rear, Old vs new:

old vs new bushes for the front.

Polybushed the rear.

Rear assembled.

Front assembled.

Rear back on.


Then got my trusty purple carpet out and got the front back on


And finished it off with a nice suede MOMO wheel

Thanks for looking!
So the other day I got properly underneath the car and had a good look round for the first time. I've got very limited knowledge of suspension components and all that jazz, but it needed some maintenance doing so I thought I'd crack on and polybush everything I can at the same time.
First up was the radius arm to chassis mount. This unfortunately doesn't make a good photo, and as I needed my car for work every day I had to just swap it over without painting anything or making it look good, but here an old vs new bush.
Then it was ARB time! I took the rear one off and it was in a right state; cracked bushes and a drokk-ton of rust.
Even worse, one droplink snapped, and the mounting brackets and clamps both had rusty holes in them and were falling to pieces.
After failing to find the brackets anywhere, Honda told me I'd have to wait about 3 weeks while they imported them from Japan. I was like nahh mate, and took them to a local welder who sorted them right out
Then I gave them a nice coat of hammerite
The bush clamps I also couldn't find anywhere except Honda, so the best I could get was this "universal" ARB clamp in the right diameter which did nicely.
To get new droplinks from Honda is £90 A PAIR!! For what is essentially a long bolt, so I improvised.
Then came the ARB itself. I was happy to find that under the rust, there was actually some metal
The front ARB wasn't in bad nick at all, but off it came anyway.
Then they both got a nice lick of paint.
And I made up some front droplinks too. Front and rear, Old vs new:
old vs new bushes for the front.
Polybushed the rear.
Rear assembled.
Front assembled.
Rear back on.
Then got my trusty purple carpet out and got the front back on
And finished it off with a nice suede MOMO wheel
Thanks for looking!
-
NafemanNathan
- LotM Winner
- Posts: 20144
- Joined: Sun Aug 08, 2010 9:37 pm
- My Generation: 0G
- Location: Yeovil, Somerset
- Has thanked: 8 times
- Been thanked: 124 times
-
wurlycorner

- Ye are glad to be dead, RIGHT?
- Posts: 21493
- Joined: Sat May 19, 2012 3:33 pm
- My Generation: 4G
- Location: Chelmsford, Essex
- Has thanked: 2481 times
- Been thanked: 306 times
Great work and very inventive - well done! 
BTW, You can see in those pics what would have happened is you had shortened the rear drop links - the arb wouldn't clear the handbrake cables, so as you drove along, the handbrake would be coming on over bumps.
BTW, You can see in those pics what would have happened is you had shortened the rear drop links - the arb wouldn't clear the handbrake cables, so as you drove along, the handbrake would be coming on over bumps.
--
Iain.
Iain.
Super Secret 1G (not really super secret!)