Congratulations to vtecmec for winning May/June's Lude Of The Month, with his DIY Turbo BB1 build.

>>> Click Here For Profile <<<

Image

Josh's BB4

Tell us all about your Lude, you know you want to ...
User avatar
NafemanNathan
LotM Winner
Posts: 20144
Joined: Sun Aug 08, 2010 9:37 pm
My Generation: 0G
Location: Yeovil, Somerset
Has thanked: 8 times
Been thanked: 124 times

Post by NafemanNathan » Tue Nov 10, 2015 8:29 am

Been a while since I've checked out your lude Josh. Nice job with all those niggley jobs and upgrades.

The Advans should look pretty smart as well :)

http://i9.photobucket.com/albums/a85/Ch ... g~original

[Img] coding wouldn't work ^^^

EDIT: Bloody Nora nor will that! Oh well, it was a picture of a phantom grey 4th with the same wheels on. I'm sure you'll have plenty for us in time ;)

User avatar
wurlycorner
Ye are glad to be dead, RIGHT?
Posts: 21493
Joined: Sat May 19, 2012 3:33 pm
My Generation: 4G
Location: Chelmsford, Essex
Has thanked: 2481 times
Been thanked: 306 times

Post by wurlycorner » Tue Nov 10, 2015 8:34 am

:? Neither does clicking on the link? :?

User avatar
jjmartin349571
Supporter 2016
Posts: 3344
Joined: Fri Feb 10, 2012 12:41 am
My Generation: 4G
XBOX GamerTag: jjm349571
Location: Newhaven, East Sussex
Contact:

Re: Josh's BB4

Post by jjmartin349571 » Tue Nov 10, 2015 8:36 am

:lol:

I'm fairly certain googling Advan Touring Competition brings up a Prelude in grey/black as the first image.

*Edit:

It's the 4th image :lol:

Shamelessly stolen, this should give you an idea of what it looks like;

Image

I will definitely need to lower mine soon as there is a similar vertical gap between the wheels and arches and nobody like to see that :)

*Double edit:

Oh, I can't link it either :lol:

newkid
Supporter 2016
Posts: 2665
Joined: Thu Feb 23, 2012 8:28 pm
My Generation: 4G
PSN GamerTag: spaz_ma_taz
Location: Edinburgh
Has thanked: 13 times
Been thanked: 50 times

Post by newkid » Tue Nov 10, 2015 8:47 am

Image

;)

User avatar
NafemanNathan
LotM Winner
Posts: 20144
Joined: Sun Aug 08, 2010 9:37 pm
My Generation: 0G
Location: Yeovil, Somerset
Has thanked: 8 times
Been thanked: 124 times

Post by NafemanNathan » Tue Nov 10, 2015 9:02 am

That's cheating newkid! Yes I checked your link! ;) :lol:

newkid
Supporter 2016
Posts: 2665
Joined: Thu Feb 23, 2012 8:28 pm
My Generation: 4G
PSN GamerTag: spaz_ma_taz
Location: Edinburgh
Has thanked: 13 times
Been thanked: 50 times

Post by newkid » Tue Nov 10, 2015 9:05 am

NafemanNathan wrote:That's cheating newkid! Yes I checked your link! ;) :lol:
:lol:

alinton
Posts: 490
Joined: Thu May 08, 2014 10:17 pm
My Generation: 4G

Post by alinton » Tue Nov 10, 2015 9:36 am

With your bumper skin off, couldn't you measure the distance between the pole tip and those two mounting points?

Then with the skin back on, use a pair of vernier callipers to mark small arcs using those measurements, where they cross is the place to drill?
---------------------
'96 BB4.

User avatar
jjmartin349571
Supporter 2016
Posts: 3344
Joined: Fri Feb 10, 2012 12:41 am
My Generation: 4G
XBOX GamerTag: jjm349571
Location: Newhaven, East Sussex
Contact:

Re: Josh's BB4

Post by jjmartin349571 » Thu Nov 12, 2015 10:44 pm

alinton wrote:With your bumper skin off, couldn't you measure the distance between the pole tip and those two mounting points?

Then with the skin back on, use a pair of vernier callipers to mark small arcs using those measurements, where they cross is the place to drill?
I like your thinking, but the tip of the bumper pole stands proud of the bumper bar so you'd have the same need for bolts and shims to take your measurements accurately. My acrylic drilling jig did the job in the end :)

User avatar
jjmartin349571
Supporter 2016
Posts: 3344
Joined: Fri Feb 10, 2012 12:41 am
My Generation: 4G
XBOX GamerTag: jjm349571
Location: Newhaven, East Sussex
Contact:

Re: Josh's BB4

Post by jjmartin349571 » Thu Nov 12, 2015 11:23 pm

Right then, I've come back to this a little later than expected as I got Fallout 4 the other day and I have spent all my spare time glued to my Xbox One as a result :lol: Laura wanted to spend the evening on Fallout today though so I went and sulked in the workshop.

First up was finishing fitting he bumper pole. My 'obvious error' from my post RE the jig I made was that I drilled out the hole which was meant to be the guide for the pilot hole in the bumper :facepalm: I was ging to remake the jig, but then I engaged my brain and realised I could use a large drill bit in the jig to scribe a small mark in the bumper, and then drill a pilot hole. That gave me this which wasn't too scary:

Image

I measured the outer shaft/housing on the bumper pole, it came in at 16.5 mm. I thought I needed a snug fit so went off to buy a 17mm holesaw, however Screwfix only had a 20mm so I got that instead, which was a happy coincidence as it seems to be the perfect size - I think 17mm would have caused issues with the securing nuts. There was no going back from this point!

Image

It feels very wrong drilling holes that size in a part of your car :lol:

Next up I mounted the bumper pole to the bracket on the bumper bar:

Image
Image

I have no idea if that is the correct place for the bracket to go, but it seemed to fit happily there and puts the pole where it needs to be. Then it was just a case of screwing the shroud on:

Image
Image

Considering all I had to go by was a few pictures on the web, I'm pretty pleased with the final location. It could perhaps have gone back slightly by 2-4mm but I don't think it's going to notice.

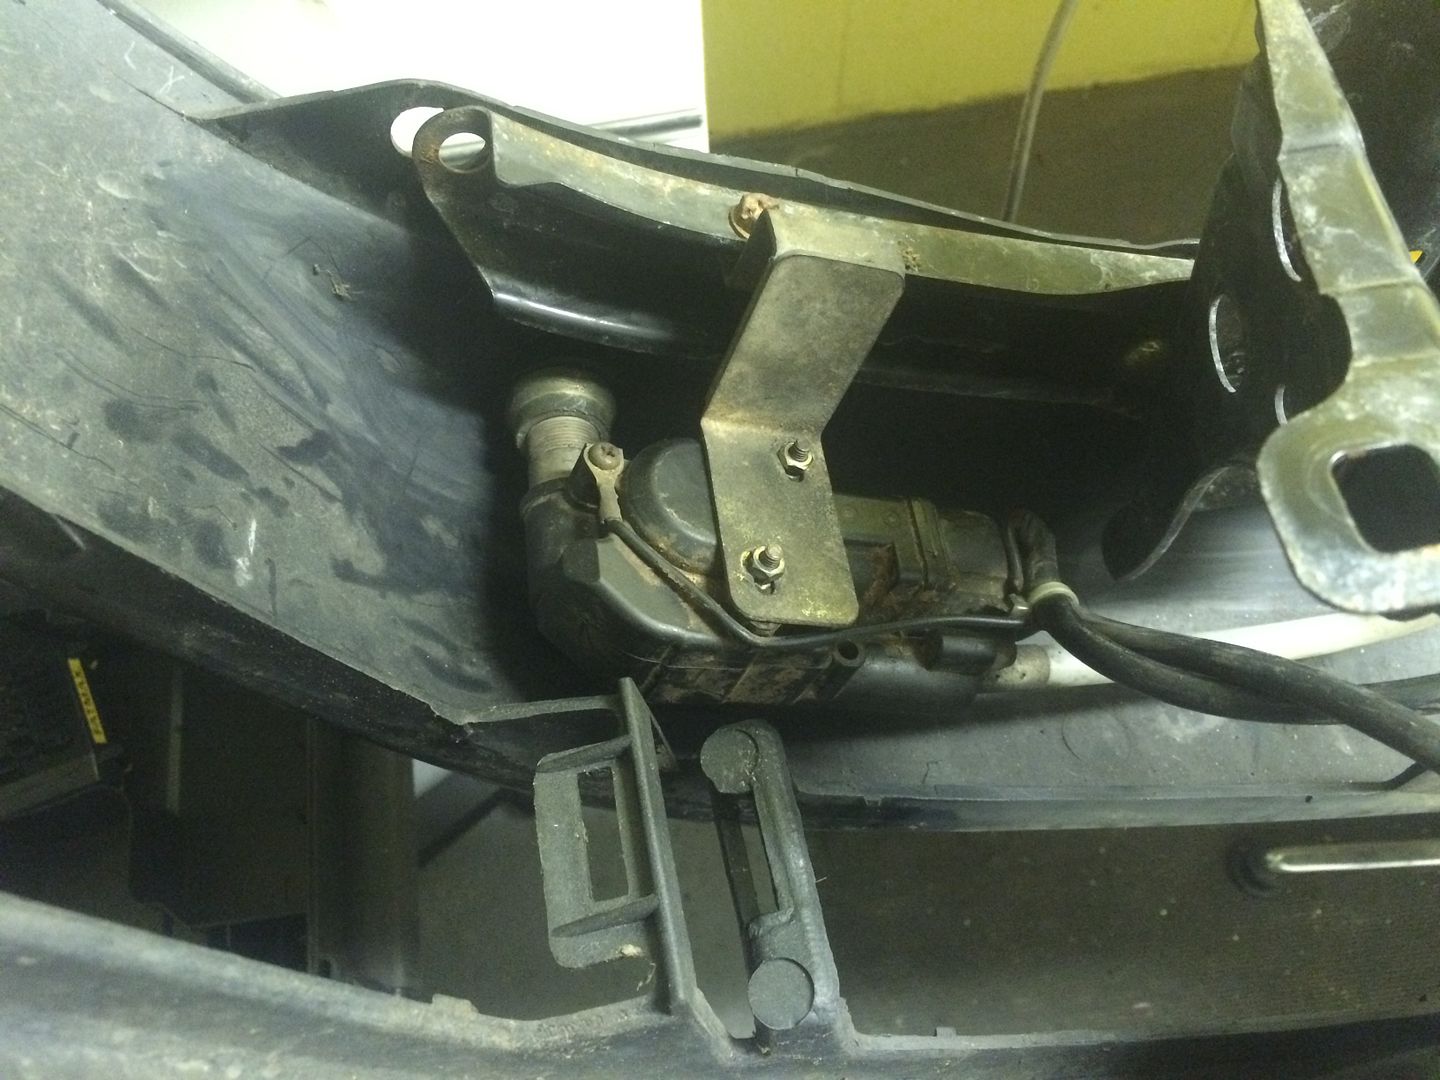
Wiring-wise I needed a feed from the bumper pole control unit and a feed from the sidelights - I was surprised to find that an accessory loom is present on the car for the lighting, which just leaves me to run two wires to the control unit to complete the eltrical side of the install. The lighting loom in question:

Image

There is an identical one the other side for the turning lights. I'm guessing these must be standard on all Jap imports?

With the wiring figured out (I've yet to run the wires to the control unit) I set about refitting the bumper... What an absolute fecker of a job. My hands are cut to bits and I still had to leave it half done as it got too late to be swearing my tits off and crashing around outdoors :lol:

Most of my frustration is coming from this bolt:

Image

Try as I might I can't get the bracket foot in to place and so the bolt keeps on cross threading :evil: I will get back on the case tomorrow with a clear head.

I also need to check if there are bulbs in my fog lights, I have a sneaking suspicion that there aren't and that I forgot this when I fitted them :facepalm: :lol:

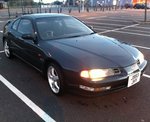
At any rate here's a sneaky preview of the car as it now stands:

Image

Once it's finished I will give it a good wash and get some daylight shots 8-)

I'm just hoping that I can get the bumper back into alignment, the top of it and nearside is all over the shop currently :? More fun for the weekend I guess.

User avatar
Drax
Moderator
Posts: 6342
Joined: Wed Dec 22, 2010 4:05 pm
My Generation: 4G
Location: Wrexham, North Wales
Has thanked: 24 times
Been thanked: 431 times

Post by Drax » Fri Nov 13, 2015 9:00 am

good work!! I am highly jealous :twisted: but loving this thread 8-) tell me about it with the drilling holes in your bumper feeling wrong, I have two dirty great holes in the front on mine I cut out with a dremel :lol:
2.2 JDM DOHC SI-VTEC LSD TCS 4WS ABS BB1 MANUAL 1992
Image
FOR PAUL

Post Reply

Return to “Lude Profiles”